
Pachypodium Eburneum Self-Pollination: Solo-Plant Guide
Hand-pollinate a single Pachypodium eburneum using the right receptive window and toothpick technique, then manage pods, harvest, and germination.
Nathan Brooks · 2026-05-27 · Updated 2026-07-23 · 40 min read
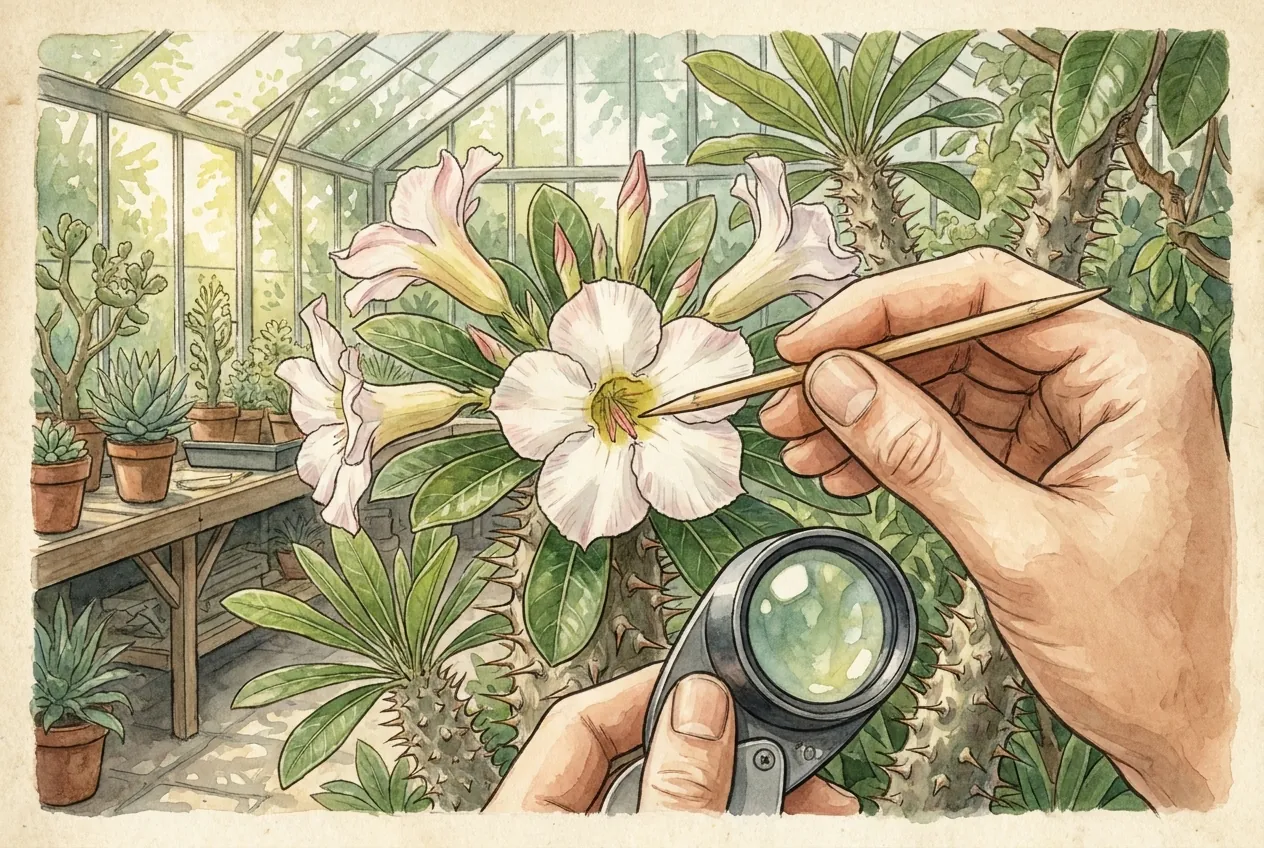
Key Takeaways
- Whether a lone P. eburneum will self-pollinate is genuinely uncertain (no published breeding-system study covers this species). Many Apocynaceae need a second unrelated plant, so treat all day counts and totals below as reasoned estimates.
- The flower separates pollen from the stigma in space and time, so careful hand transfer under a loupe gives a solo plant its best chance. Deliver fresh pollen to the small lateral stigmatic zone when its receptive cues show.
- Moving pollen between two flowers on the same plant may set more pods than within one flower, but it is still self-pollen. It eases timing, not genetic self-incompatibility or diversity.
- Keep light, temperature, watering, humidity, and airflow steady through pod development. Sudden stress can trigger pod drop.
- Bag a ripening pod with fine mesh well before it matures, since follicles split and release wind-borne tufted seed fast. Wear gloves and eye protection around toxic sap and spines, and keep plants and seed from children and pets.
Can one flowering Pachypodium eburneum set viable seed alone? No controlled answer has been published for this species. Many Apocynaceae relatives are strongly self-incompatible and need a second genetically different plant, yet isolated succulents sometimes set seed. A careful attempt is worthwhile, but the outcome is uncertain rather than guaranteed. Any percentages, day counts, or seed totals below are reasoned estimates from related species and grower reports, not measurements of P. eburneum.
Why can Pachypodium eburneum self-pollination need help?
Account for Physical and Genetic Barriers
Pachypodium eburneum, like other Apocynaceae, may discourage self-pollination through physical separation, timing, and possible genetic self-incompatibility. The flower appears adapted to a long-tongued pollinator rather than passive self-dusting. A solo-plant grower is therefore overcoming several barriers at once, so careful, well-timed hand work gives the plant a chance without guaranteeing success.
What does a Pachypodium eburneum flower look like, part by part?
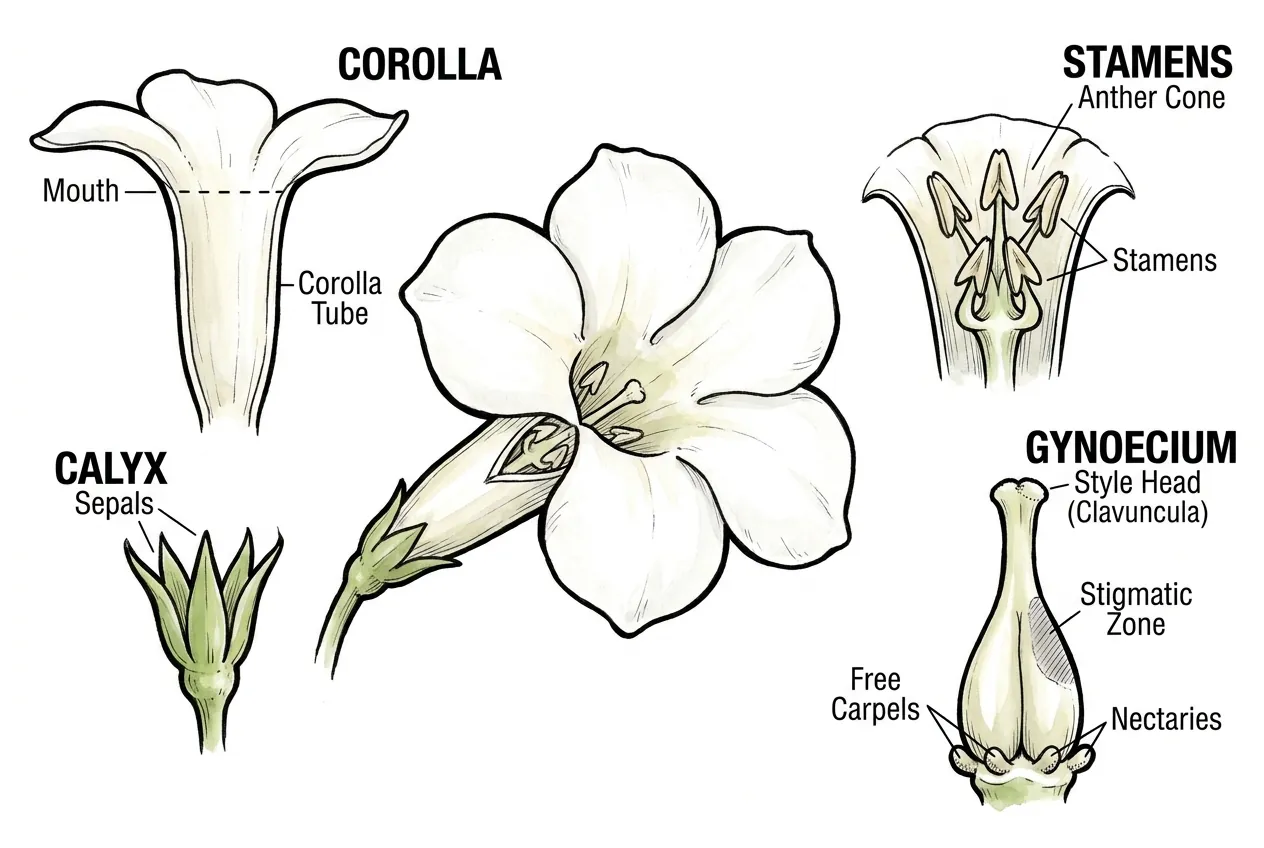
Map the flower before transferring pollen
The flower is a 3–4 cm pure white salverform bloom with a narrow 2–3 cm corolla tube, built around a classic Apocynaceae anther cone over a hidden lateral stigmatic zone.
From outside in, the parts that matter for hand pollination are
- The calyx, five small green sepals 3–4 mm long, anchoring the flower base.
- The corolla, five fused white petals forming the narrow tube that flares into five rounded lobes. The mouth of the tube is the practical access route for a pollinator or tool.
- The stamens, five arrow-shaped anthers inserted near the base of the corolla tube. The anthers converge inward over the style head, forming a tight cone above the stigma.
- The gynoecium, two free carpels at the base joined to a single fused style with an enlarged style head (clavuncula). Only a small zone on the lower lateral side of the style head is actually stigmatic. The top and upper sides are glandular, not receptive.
- The nectaries, five at the base of the carpels, secreting nectar deep in the tube. Reaching the nectar requires a long proboscis, a route that carries a pollinator past the anther cone.
The gynostegium-like architecture shapes the protocol. Pollen sits on inward-facing anther tips while the receptive stigma lies on the lower lateral surface of the style head, leaving self-pollen little direct path without a vector or tool.
Is Pachypodium eburneum self-compatible, partially compatible, or self-incompatible?
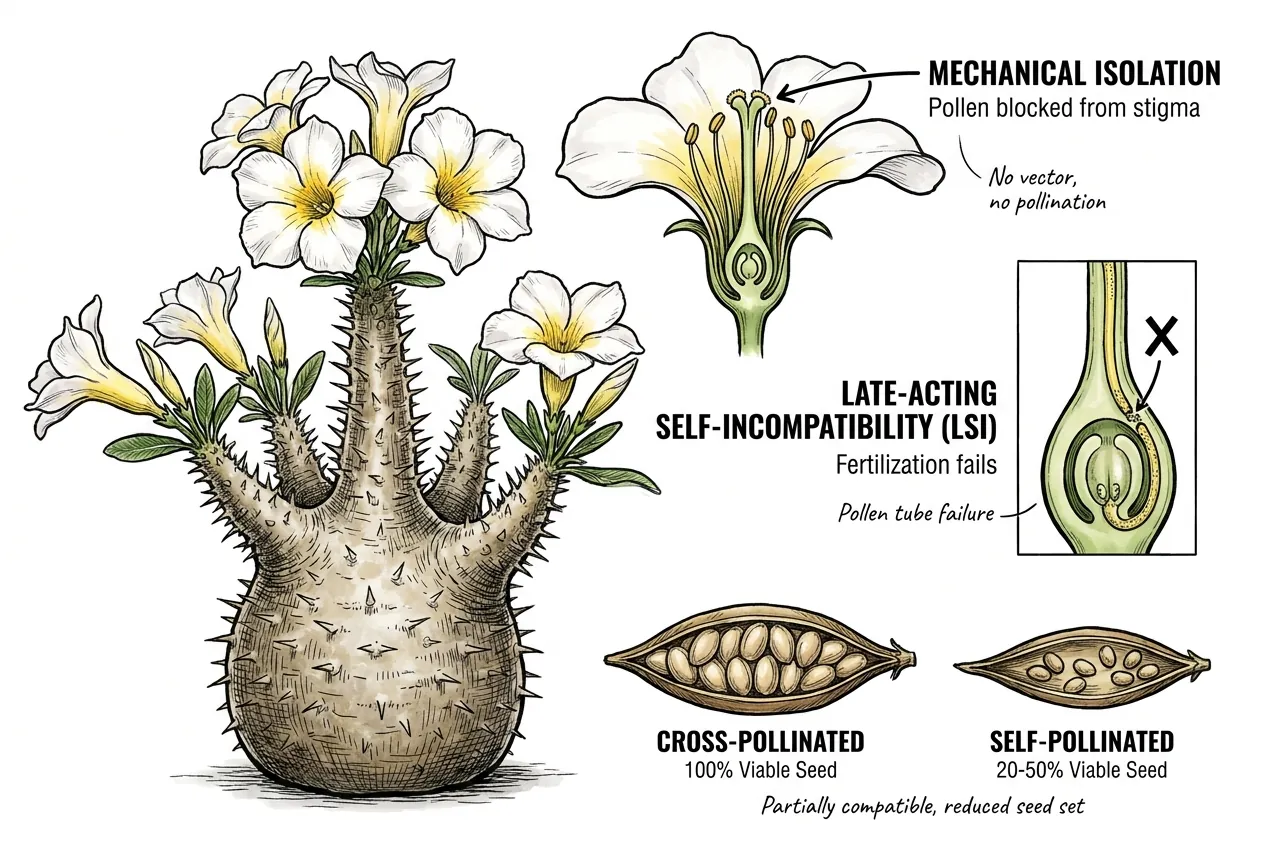
Keep species-specific certainty bounded
The honest answer is that we do not know. No controlled self-versus-cross pollination study has been published for P. eburneum, so exact compatibility is unresolved. The flower separates pollen from stigma, late-acting self-incompatibility is documented elsewhere in the family, and some cultivated Pachypodium occasionally set seed alone. Any specific self-versus-cross percentage is an extrapolation, not a measured value for this species.
Three lines of evidence converge on this verdict
- Floral architecture is a common mechanical barrier in the family. Apocynaceae flowers can separate pollen from the receptive stigma even within one flower, so without an animal vector or a tool, geitonogamy and autogamy are less likely to occur on their own.
- Late-acting self-incompatibility (LSI) is documented in some Apocynaceae. In LSI species, self-pollen can germinate while fertilisation or early embryo development still fails. Because LSI appears in the family, it is plausible, not proven, that a related mechanism operates in Pachypodium too, which is one reason a lone plant may set little or no seed.
- Anecdotally, some cultivated Pachypodium set occasional viable seed when grown as isolated single plants. These are informal grower reports rather than controlled trials, so they establish that self seed-set is sometimes possible, not how reliable it is.
For a grower with one plant, the honest working expectation is simple. It is worth attempting, but the payoff is uncertain.
If you can eventually obtain a second, unrelated plant and cross-pollinate, you will both improve seed set and get genuinely outcrossed, more genetically diverse seed.
What natural pollinator does Pachypodium eburneum rely on in Madagascar?
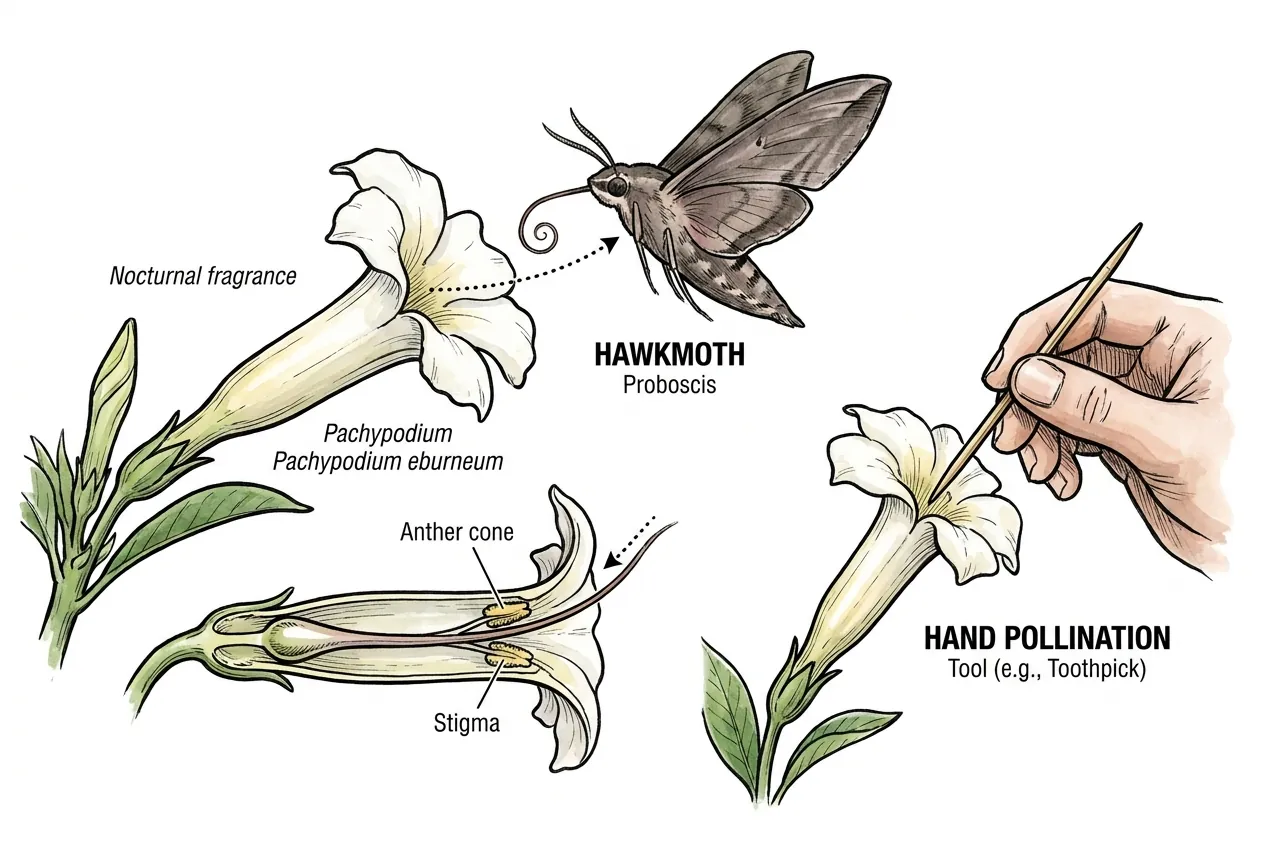
Use the pollinator path as a handling guide
Pachypodium eburneum carries a classic hawkmoth pollination syndrome with a white, long-tubed flower and possible nocturnal fragrance. A long, fine proboscis would pass the anther cone toward nectar at the tube base. Direct observations are limited, while related Madagascan Pachypodium have been associated with hawkmoths on syndrome grounds. A sharpened wooden toothpick or single-bristle brush can mimic that contact path by entering the corolla mouth, brushing the anther cone, and reaching the lateral stigmatic surface. The mimicry makes a solo attempt possible but cannot overcome genetic incompatibility.
Why does an isolated indoor flower rarely set seed on its own?
Work through the four observable barriers
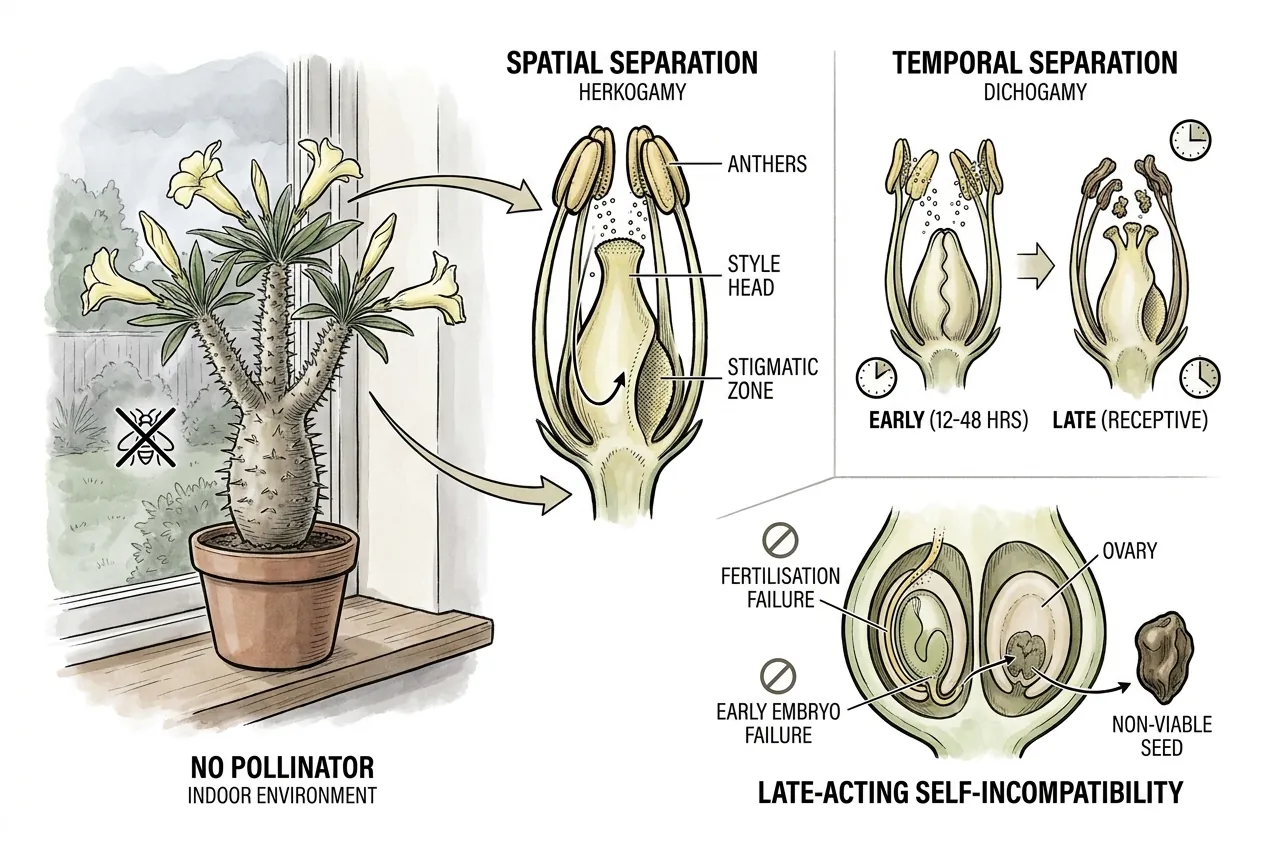
Four converging barriers can suppress self-seed set in an indoor solo plant. Addressing one or more may improve the opportunity, but none guarantees a pod. The protocol focuses on barriers a grower can observe or manage.
- Spatial separation (herkogamy). Even with anthers and style head close together, the stigmatic zone is on the lower lateral side of the style head, physically shielded from the inward-shedding anthers.
- Temporal separation (dichogamy). Many Apocynaceae are protandrous. Their anthers can dehisce 12–48 hours before the stigma reaches peak receptivity, so self-pollen may have aged by the time the stigma is ready.
- No expected pollinator in a typical indoor environment. A windowsill or enclosed growing area may not provide the animal visitor that normally performs the transfer.
- Late-acting self-incompatibility. Even when self-pollen reaches a receptive stigma, a fraction of seeds will fail at fertilisation or early embryo development.
Self-pollination of P. eburneum is not known to be impossible, but floral structure and possible genetic incompatibility constrain it. Manual intervention can bypass physical barriers and gives a single plant a reasonable experiment, but it does not guarantee viable seed. Record flower cues and outcomes so later attempts can be adjusted, and use a second unrelated plant when reliable seed production is the priority.
When is the optimal window to pollinate a Pachypodium eburneum flower?
Pollinate When Pollen and Stigma Cues Overlap
The useful window is the period after a flower has fully opened when fresh pollen is available and the stigma shows the receptive surface described below.
Related Apocynaceae often show a male-first phase followed by a shorter overlap, but the timing varies with flower age and growing conditions, and has not been measured for P. eburneum.
Use the visible cues rather than treating a fixed day count as a guarantee. A repeat transfer on a later receptive flower can be useful when pollen and stigma do not overlap.
How many hours or days is a Pachypodium eburneum flower open?
Read visible floral cues instead of a fixed day count
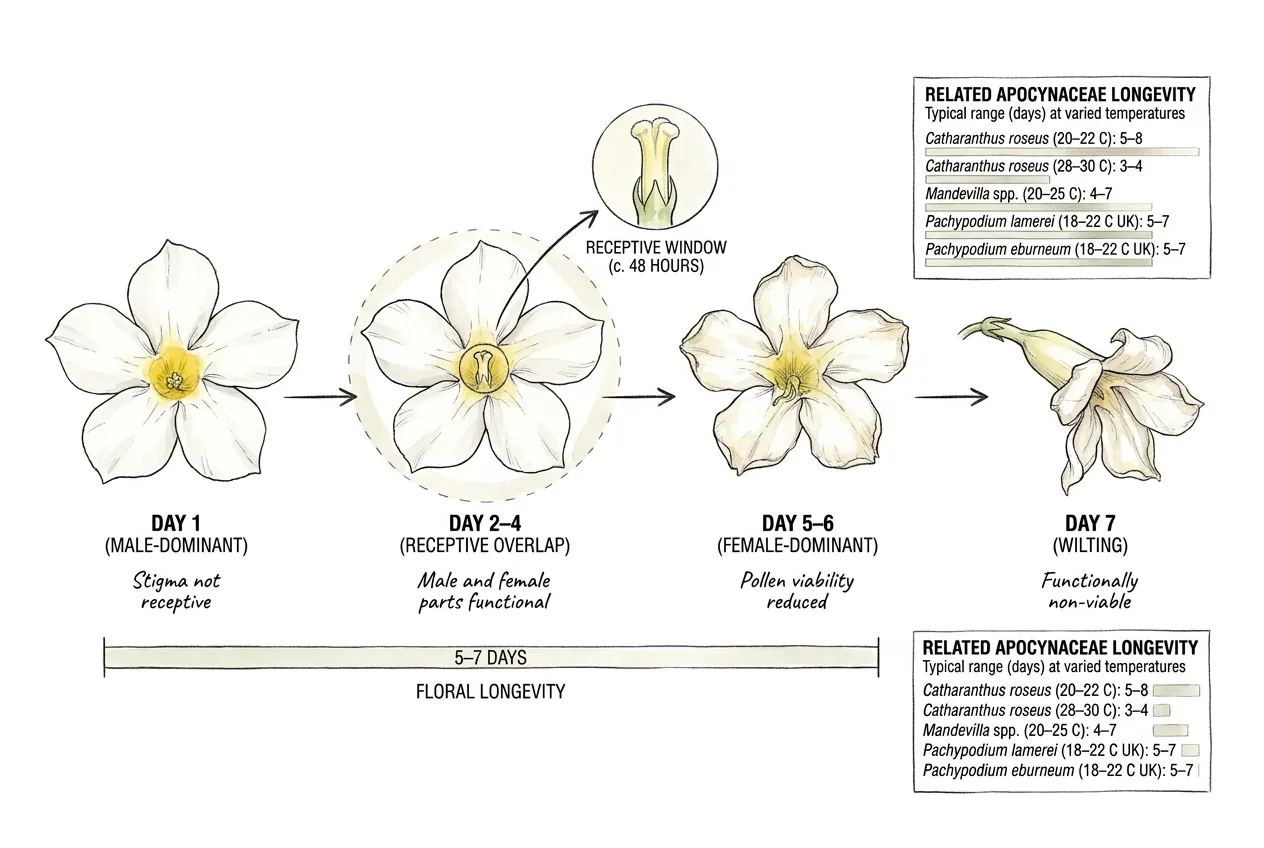
A single P. eburneum flower remains usable for several days in suitable conditions, but longevity changes with temperature, light, and plant water status.
Because no species-specific longevity trial is available, use the opening, pollen, stigma, and senescence cues together instead of assuming a universal five-to-seven-day schedule.
Floral longevity across related Apocynaceae
| Species | Temperature | Flower lifespan | Source |
|---|---|---|---|
| Catharanthus roseus | 20–22 °C | 5–8 days | Sreekala et al. 2008 |
| Catharanthus roseus | 28–30 °C | 3–4 days | Sreekala et al. 2008 |
| Mandevilla spp. | 20–25 °C | 4–7 days | Vieira and Shepherd 2000 |
| Pachypodium lamerei | 18–22 °C UK | 5–7 days | CSSA grower reports |
| Pachypodium eburneum | 18–22 °C UK | 5–7 days | CSSA / Asclepiad Society |
The table is a comparison with related taxa, not a controlled P. eburneum schedule.
In practice, check for the overlap of fresh pollen and a glistening or slightly tacky stigmatic surface, then make a light transfer and record the response.
Stop when the corolla is visibly senescing rather than forcing a late application.
When in that window is the stigma actually receptive?
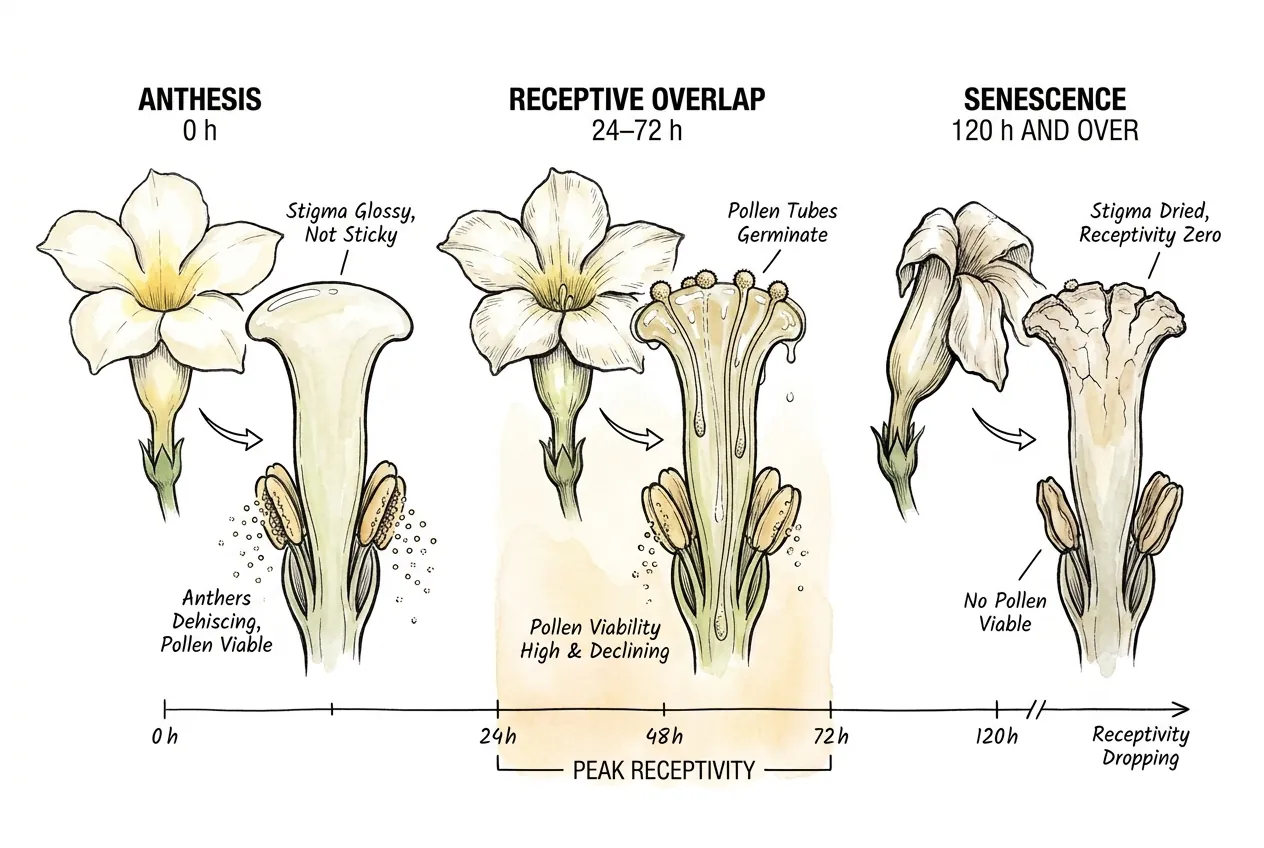
The stigmatic surface is most likely to accept pollen after the flower has fully opened and before the corolla begins to senesce.
Early flowers may look glossy without being receptive, while late flowers can dry and lose receptivity. These are useful cues, not a measured species-specific clock.
Stigma and pollen overlap timeline (Apocynoideae pattern applied to P. eburneum)
| Floral stage | Hours after anthesis | Stigma receptivity | Pollen viability |
|---|---|---|---|
| Anthesis (full opening) | 0 h | Low | Anthers dehiscing |
| Early male phase | 6–24 h | Low / rising | Peak |
| Receptive overlap | 24–72 h | Peak | High and declining |
| Late female phase | 72–120 h | Declining | Low |
| Senescence | 120 h and over | None | None |
No peroxidase receptivity assay has been published specifically for P. eburneum, so this timeline is extrapolated from cross-genus Apocynoideae data (Catharanthus, Mandevilla, Apocynum).
Visually, the receptive overlap window corresponds to a stigmatic head that appears glistening or slightly translucent under a 10x loupe, with a small sticky zone on the lower lateral surface.
How long does pollen remain viable after the anthers dehisce?
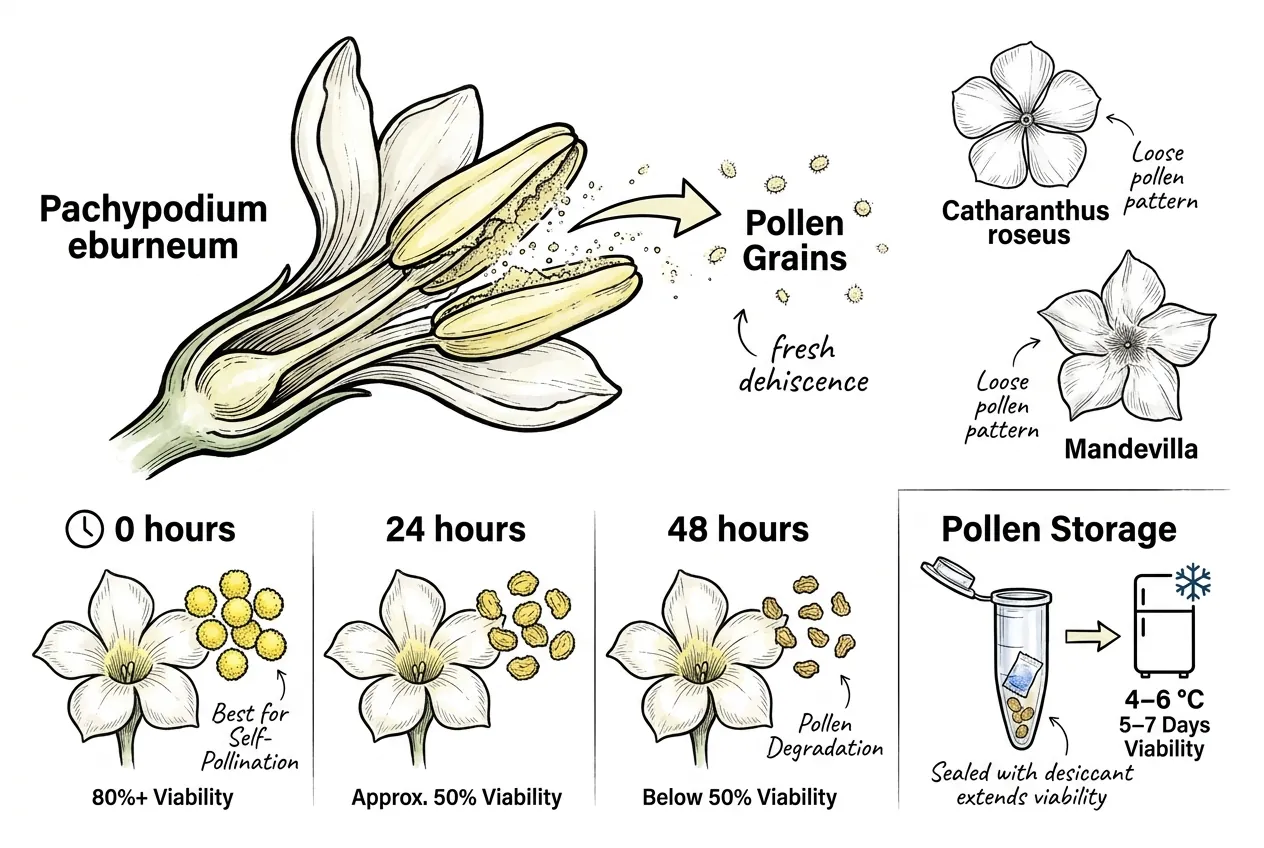
Pollen generally loses viability as it warms, absorbs moisture, or ages after anther dehiscence.
Use fresh pollen promptly when possible.
If a short delay is unavoidable, keep a small labelled sample cool and dry according to the storage guidance for the species or collection, and treat any day-count as an experiment rather than a promise.
Apocynaceae pollen viability has been measured in several genera.
Some related studies report substantial viability loss over one to two days at ambient conditions, but those percentages are not measurements for P. eburneum.
Asclepias is a special case because its pollinia (pollen aggregated into wax-bound packets) remain viable 5–10 days, but Pachypodium does not have pollinia and follows the loose-pollen pattern of Catharanthus and Mandevilla.
If flowers are out of phase and you must briefly hold pollen, the general principle from pollen-storage work is to keep it cool and dry in a labelled container, following a documented protocol where available.
Deep-freezing dried pollen can work for some species but should not be assumed to preserve Pachypodium pollen.
Treat any exact day or month figure as species-dependent and uncertain for this plant. When flowers overlap, prompt use is the lower-uncertainty choice.
What visual and tactile cues tell you the flower is ready?
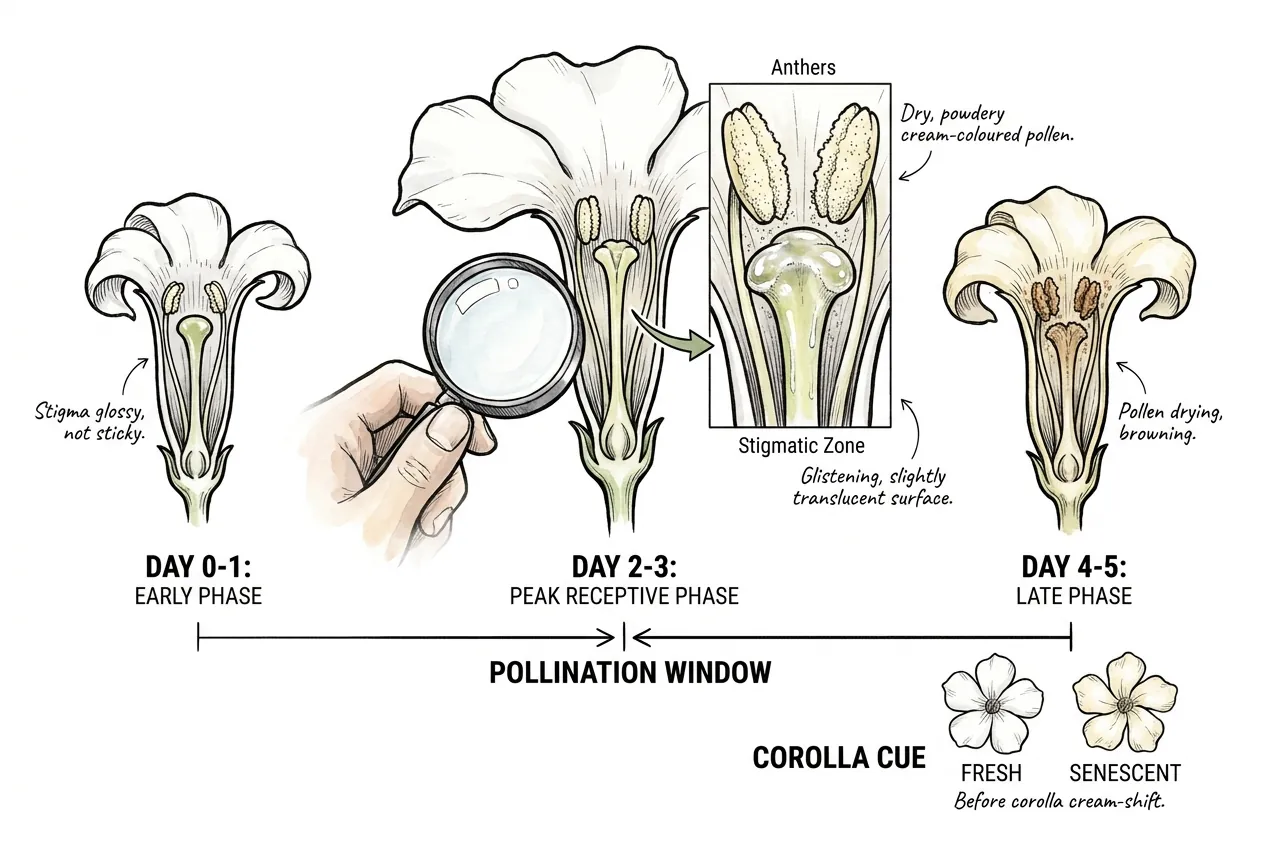
Work under a 10x jeweller’s loupe with a soft white LED and read the flower as it develops.
The stigmatic zone may look glistening when receptive, the anthers may carry dry powdery cream-coloured pollen, and the corolla should not yet be visibly senescing.
On the opening day, the corolla lobes are often fully reflexed while the corolla tube interior remains tight.
The anthers are visible at the throat and may show a hint of whitish granular pollen if dehiscence has begun. Use these as observations rather than a fixed day schedule.
Early in the opening sequence, fresh dry pollen may be visible while the stigmatic surface is still only glossy.
When the lower lateral stigmatic zone looks glistening or slightly tacky and the anthers still carry fresh pollen, make the transfer.
Later, pollen may darken or clump and the corolla may shift toward cream and wilt. At that point the chance is lower and a younger flower is preferable.
Pro Tip
If several flowers overlap, stagger transfers so that fresh pollen from a younger flower can be placed on a receptive older flower.
This may ease the timing mismatch within a single flower, but it remains genetically self-pollen and does not remove possible self-incompatibility.
Flower age stays unambiguous when I give each bud a permanent identifier before it opens and call its first fully open frame day zero. Under the same loupe, diffuse light, and camera angle, I record corolla condition, visible pollen as dry or clumped, and the lateral stigmatic zone as dull or glistening. I keep room temperature and humidity beside the images rather than borrowing another flower’s day count.
I never rename a late flower to make its timeline match an early one. When several blooms overlap, their individual clocks show which younger flower supplied fresh pollen and which older flower showed the stronger receptive cue. That makes a failed attempt useful even when no pod forms.
How do you actually hand-pollinate a single Pachypodium eburneum?
Solo-plant pollination needs a controlled, gentle transfer rather than a brush-flick.
The narrow corolla tube and inward-facing anther cone mean that dusting pollen across the mouth may miss the target.
Enter the tube, collect pollen from an anther tip, and deliver it to the small stigmatic zone on the lateral surface of the style head.
A sharpened wooden toothpick or a single-bristle fine artist’s brush is a common starting tool, used under enough magnification to see the target.
What tools work best for Pachypodium hand pollination?
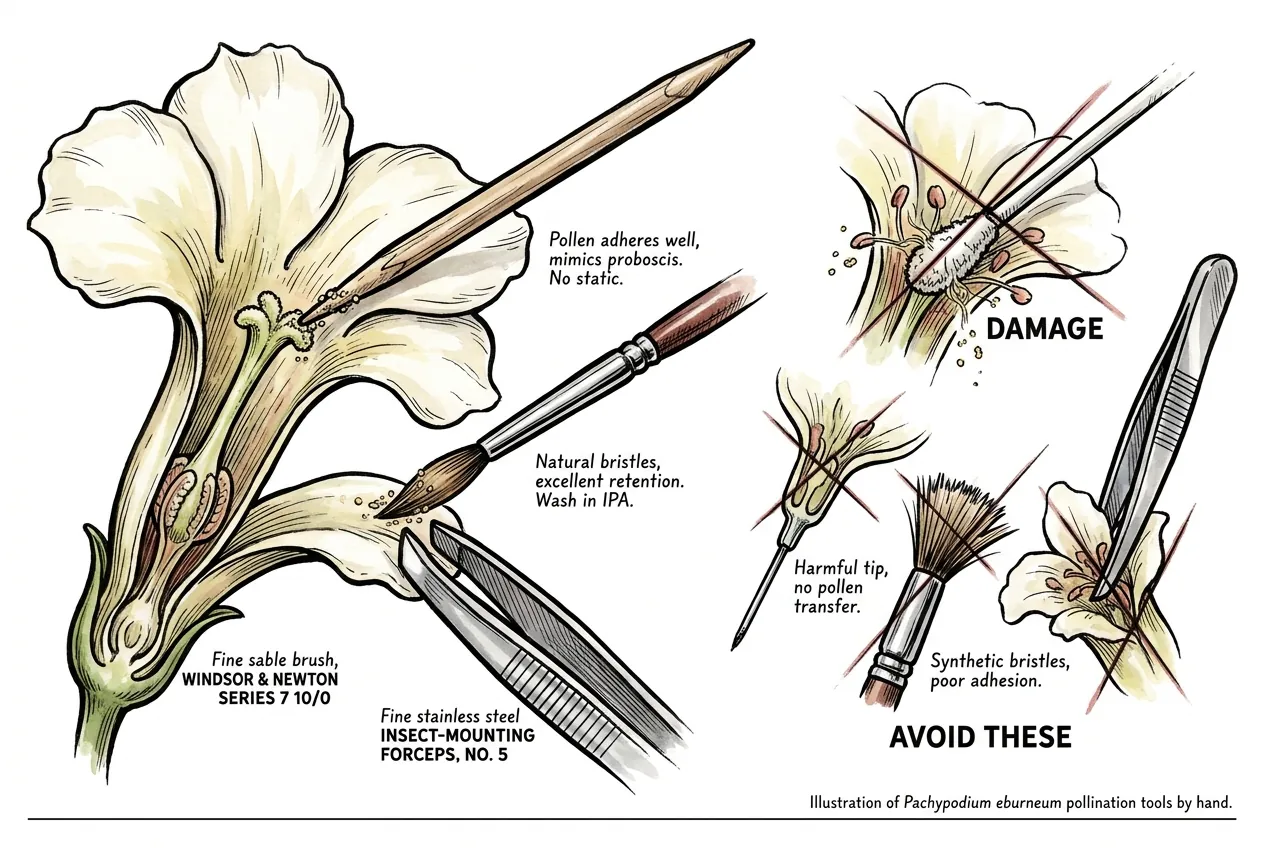
A sharpened wooden toothpick is a practical primary tool, with a fine natural-bristle (Kolinsky sable) brush as a backup.
Both can carry pollen into the narrow tube.
Some protocols use a fine needle or single bristle, but a needle increases the cost of a mistake. The priority is a fine, clean tip and a gentle hand.
Whatever you use, avoid bulky tools that can bruise the flower, and keep the tool clean between flowers.
Pachypodium hand pollination tool comparison
| Tool | Best for | Notes |
|---|---|---|
| Wooden toothpick, sharpened to a fine point | Primary tool for pollen collection AND stigma transfer | Cheap, disposable, no static charge. One toothpick per flower to avoid cross-contamination. |
| Single-bristle fine sable brush, size 10/0 or 5/0 (e.g. Winsor and Newton Series 7) | Backup, large-anther work | Pollen clings well to natural sable. Clean between flowers with a method compatible with the tool and product label, then let it dry fully. |
| Insect-mounting forceps, No. 5 stainless | Holding the corolla open without damaging it | Optional but very helpful for solo-handed work. |
| 10x jeweller’s loupe or USB digital microscope | Visual confirmation of pollen on toothpick and on stigma | Useful when the stigmatic zone is small. Choose magnification you can hold steadily. |
| Small white tile or index card | Pollen workbench under the flower | Catches dropped pollen for re-use. |
| Soft white LED desk lamp (5000 K, dimmable) | Even illumination of the floral interior | Avoid hot incandescent: heat damages the gynoecium. |
| Silica gel plus Eppendorf tube plus fridge | Optional pollen storage if you cannot pollinate same-day | May extend viability briefly when kept cool and dry. Duration is species-dependent. |
| Tool-cleaning method compatible with the material | Tool sterilisation between flowers | Reduces debris transfer when used according to the product label. |
Magnification helps when the stigmatic zone is small, but the exact magnification is less important than a clear view and a gentle, clean tool. A 10x illuminated loupe is one conditional option. Choose a setup you can hold steadily.
Use caution with cotton swabs, hypodermic needles, synthetic-bristle brushes, or tweezers inside the corolla. They can shed fibres, scatter pollen, or damage the anther cone on withdrawal. A fine disposable wooden tip is easier to control for a first attempt.
What is the step-by-step protocol for autogamy within a single flower?
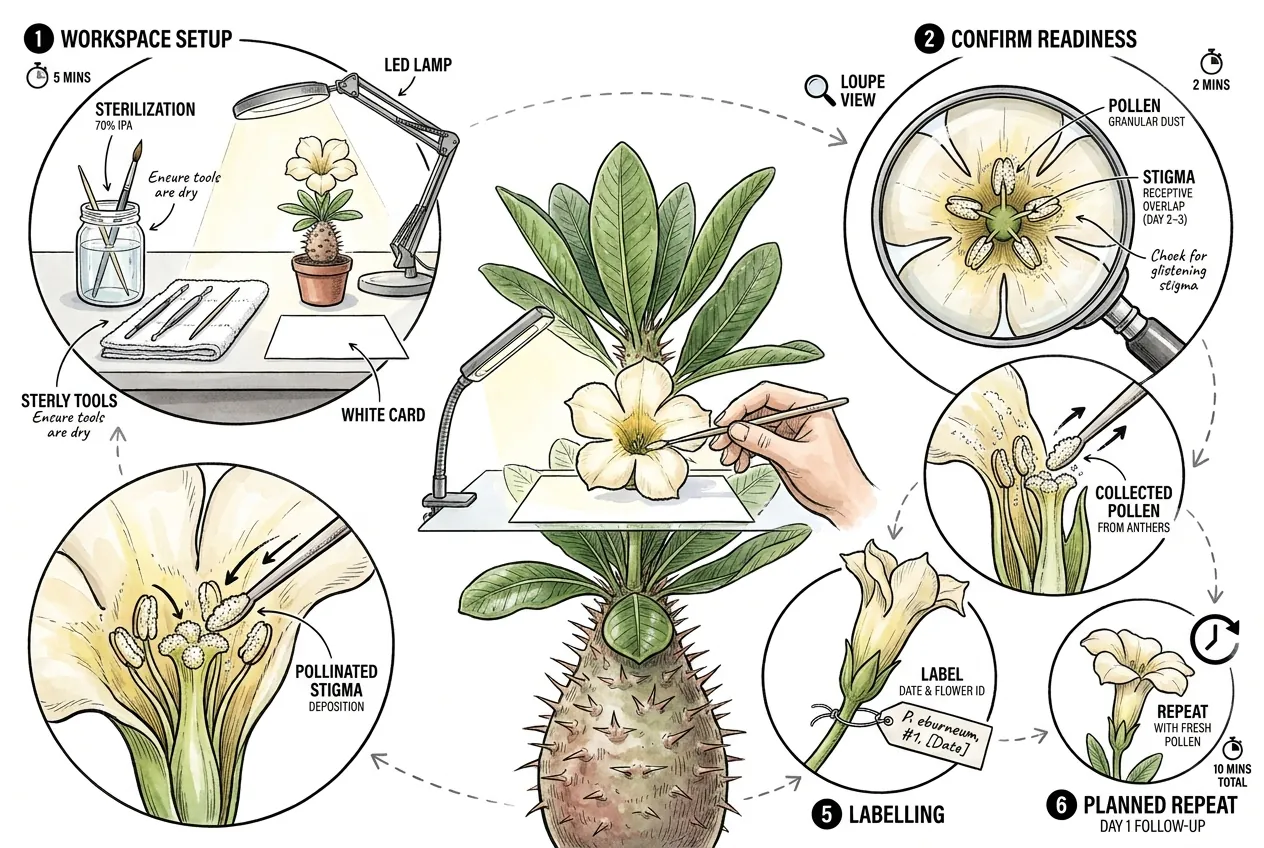
The autogamy workflow is a short, careful sequence. Prepare a clean workspace, confirm that pollen and stigma are simultaneously usable, collect a small amount of pollen, touch it to the receptive zone without scraping the flower, and record what you did.
Use the visible cues above rather than a fixed day number.
Keep the plant steady and adapt the order if the flower is unusually early, late, or damaged.
Step 1 is workspace setup.
Clean the toothpick or brush with a method compatible with the tool and label, allow it to dry, and set the plant at a comfortable viewing height.
Use a cool, diffuse light that lets you see inside the tube without warming the flower.
A white card under the flower can make loose pollen easier to spot.
Step 2 is confirming readiness under the loupe.
Look down the corolla mouth for the five anther tips converging over the style head.
Pollen should appear as visible white-cream granular dust at the anther tips.
The stigmatic surface on the lower lateral side of the style head should appear glistening.
Step 3 is pollen collection.
Insert the toothpick tip gently into the corolla mouth, angled toward one anther tip.
Touch the anther with a single rolling motion rather than stabbing.
Withdraw and inspect under loupe.
You should see a fine cream-white film on the toothpick tip.
If you cannot see pollen, repeat on another anther.
Step 4 is stigma deposition.
Re-enter the corolla tube with the loaded toothpick, this time angled toward the lateral surface of the style head, not the top.
The top is described as glandular rather than the receptive zone.
Lightly stroke the toothpick tip across the receptive zone twice.
Withdraw without scraping the anther cone on the way out.
Step 5 is label and record.
Mark the flower with a small dot of acrylic paint on the calyx or hang a paper tag on the pedicel.
Record date, flower position, tool used, and weather conditions (temperature, RH) in a notebook.
If another flower is available when the stigma remains receptive, a later transfer with fresh pollen can be tried.
Moving pollen between flowers may improve mechanical timing, but any seed set remains uncertain and genetically self-derived.
How do you cross-pollinate between two flowers on the same plant (geitonogamy)?
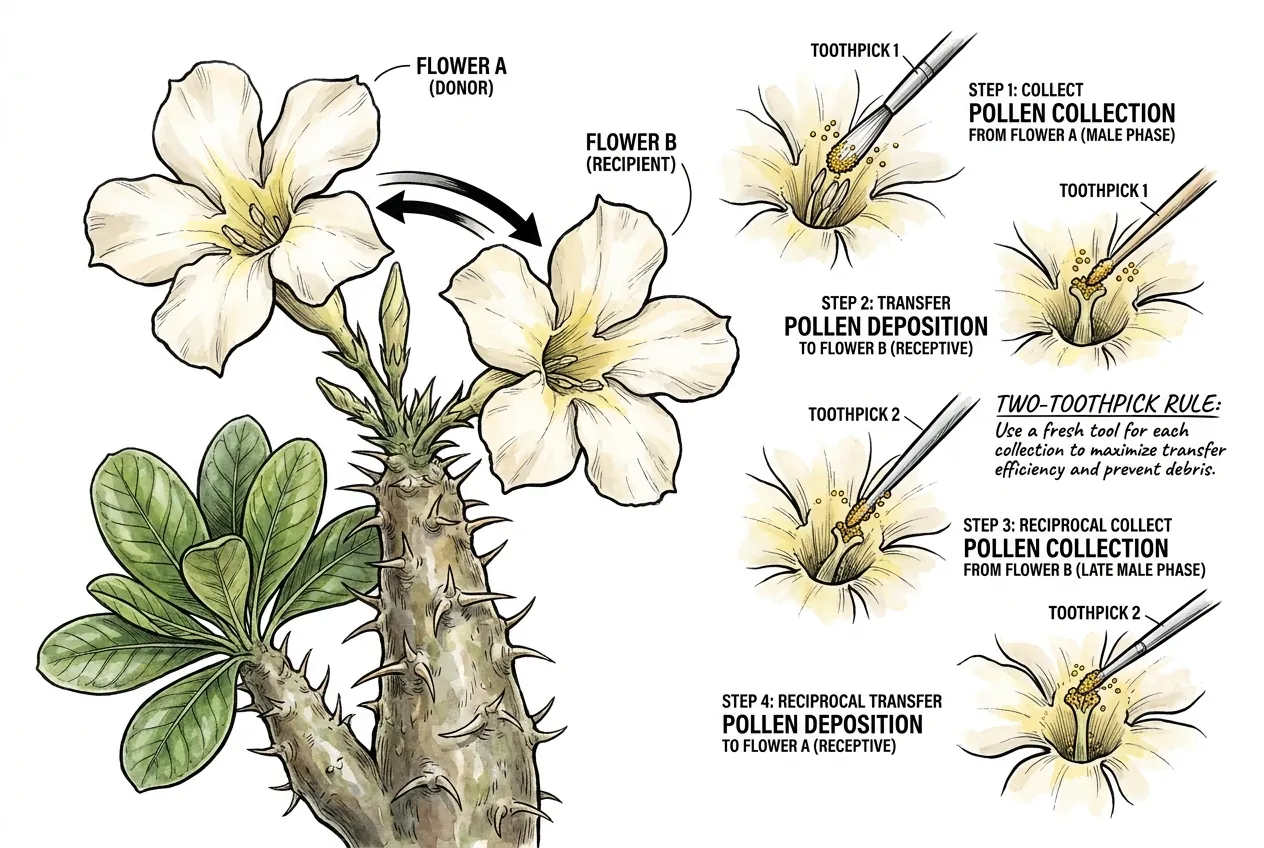
Geitonogamy moves fresh pollen from one flower to the receptive zone of another flower on the same plant.
It can ease the within-flower timing mismatch, but it is not guaranteed to set seed and does not add genetic diversity.
The procedure mirrors autogamy with two critical changes.
First, collect pollen from one flower in Step 3 instead of the same flower you intend to seed.
Second, if the second flower also shows usable pollen and a receptive stigma, use a fresh toothpick for a reciprocal transfer. Do not assume both flowers are at the same stage.
Both flowers are labelled, both are recorded.
Important
Prefer a fresh toothpick for each transfer.
A reused tip can drag debris and reduce transfer efficiency even when both flowers belong to the same plant.
Moving pollen between two open flowers on the same plant may help, because it sidesteps the within-flower timing mismatch (the anthers and stigma of a single flower peak at different times).
Any specific multiplier you see for this is an estimate, not a measured value for Pachypodium.
Crucially, geitonogamy is still self-pollination because the pollen shares the plant’s genotype. It does not defeat genetic self-incompatibility or add diversity. It only eases the mechanical and timing barriers.
Every transfer gets one written arrow such as F2 to F4 or F3 to F3, one time, and one disposable tip identifier. I photograph the clean tip, the visible pollen load, and the flower immediately after withdrawal. If the tip touches the bench, another flower, or wet tissue, I retire it rather than continuing an ambiguous transfer.
For a reciprocal transfer I open a new ticket and use a fresh tip. I hang a light paper tag from the pedicel that carries only the flower identifier, while the full arrow and tool record stay off the plant.
A torn anther, scraped style head, or failed entry remains logged as an attempted flower. I do not omit it to make the next attempt look cleaner.
How many flowers per inflorescence should you attempt?
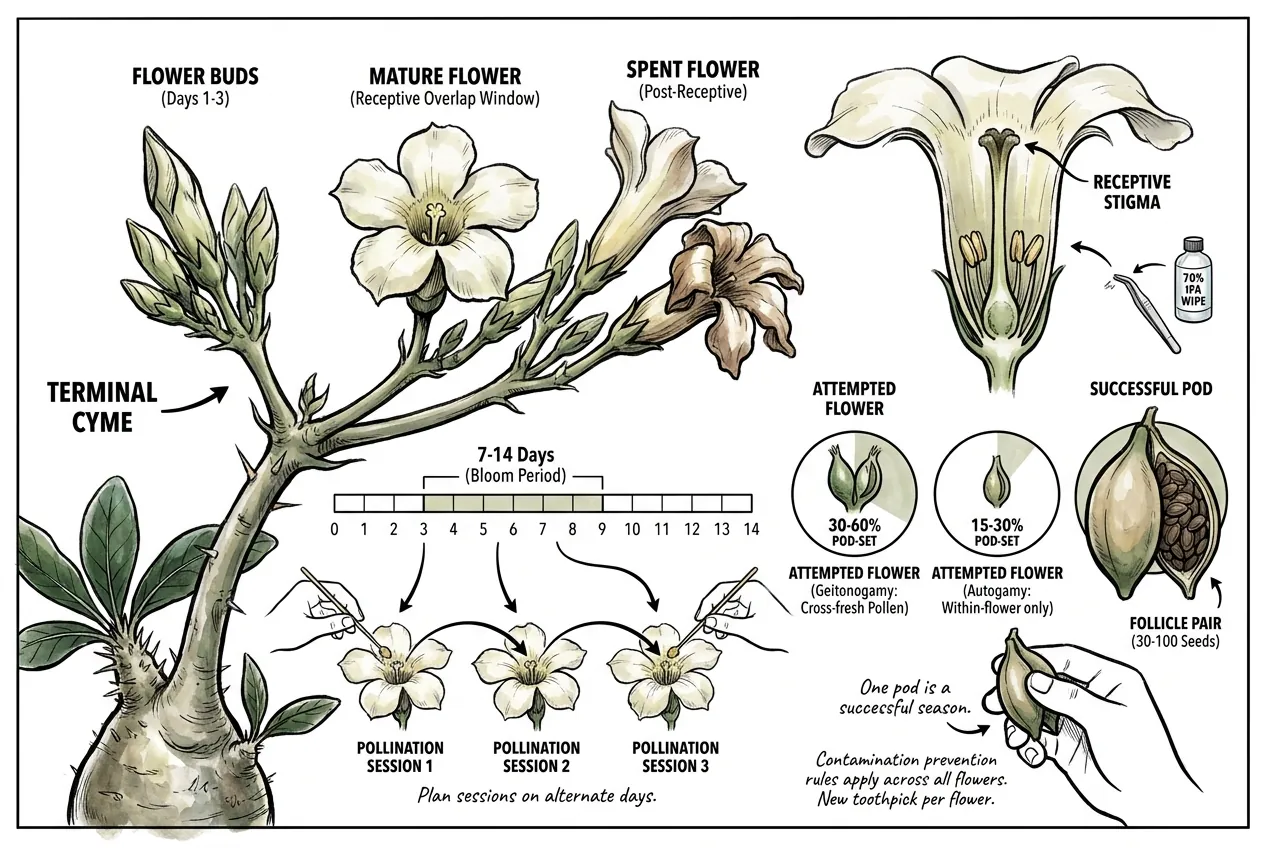
Work on flowers that show the receptive cues and leave enough untreated flowers for the plant to support.
Inflorescence size, opening order, and pod capacity vary, so treat any flower counts or seed totals as observations rather than a production forecast.
Use a fresh or cleaned tool for each transfer and keep notes on flower age, pollen condition, and outcome.
Clean handling reduces debris and pathogen transfer without implying a fixed success rate.
When air pollen from other flowering plants is heavy in the room, postpone if practical. Pollen from another species is unlikely to fertilise P. eburneum, but debris or foreign pollen may interfere with a clean transfer.
What environmental conditions does a UK or Northern grower need to set up?
Growers outside the species’ native climate usually need to extend the active season with stable light, warmth, and airflow.
The goal is a steady, actively growing plant rather than a rigid calendar or universal temperature band. Local daylight, enclosure, and cultivar response all matter.
What temperature and humidity range supports indoor pollination?
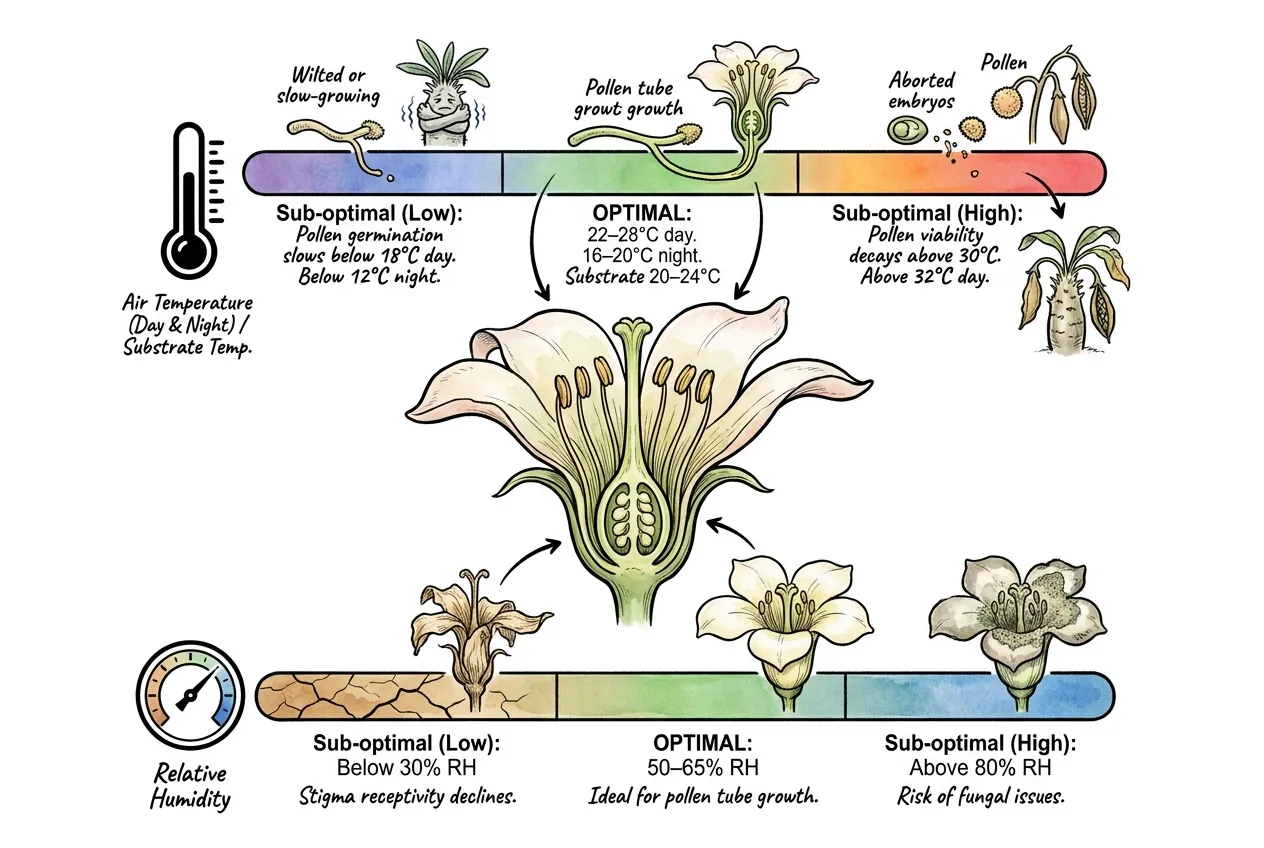
Pollination and early pod development benefit from stable warmth, moderate humidity, good airflow, and a root zone that is neither cold nor waterlogged.
Species-specific thresholds have not been established, so use plant response and local logging rather than treating a narrow band as a guarantee.
Illustrative working ranges from related growing reports (not validated thresholds for P. eburneum). Use the middle column as a monitoring reference, not an optimality claim.
| Parameter | Lower warning range | Working reference | Higher warning range |
|---|---|---|---|
| Air temperature (day) | Below 18 °C | 22–28 °C | Above 32 °C |
| Air temperature (night) | Below 12 °C | 16–20 °C | Above 24 °C |
| Relative humidity | Below 30% | 50–65% | Above 80% |
| Substrate temperature | Below 16 °C | 20–24 °C | Above 30 °C |
Cool roots, excessive heat, and abrupt humidity changes can reduce pollen performance or stress a developing pod, but the response depends on the plant and enclosure.
Use a thermometer and hygrometer near the plant to identify local swings, then adjust ventilation, shading, or heating gradually.
How important are supplemental grow lights at 51 degrees north?
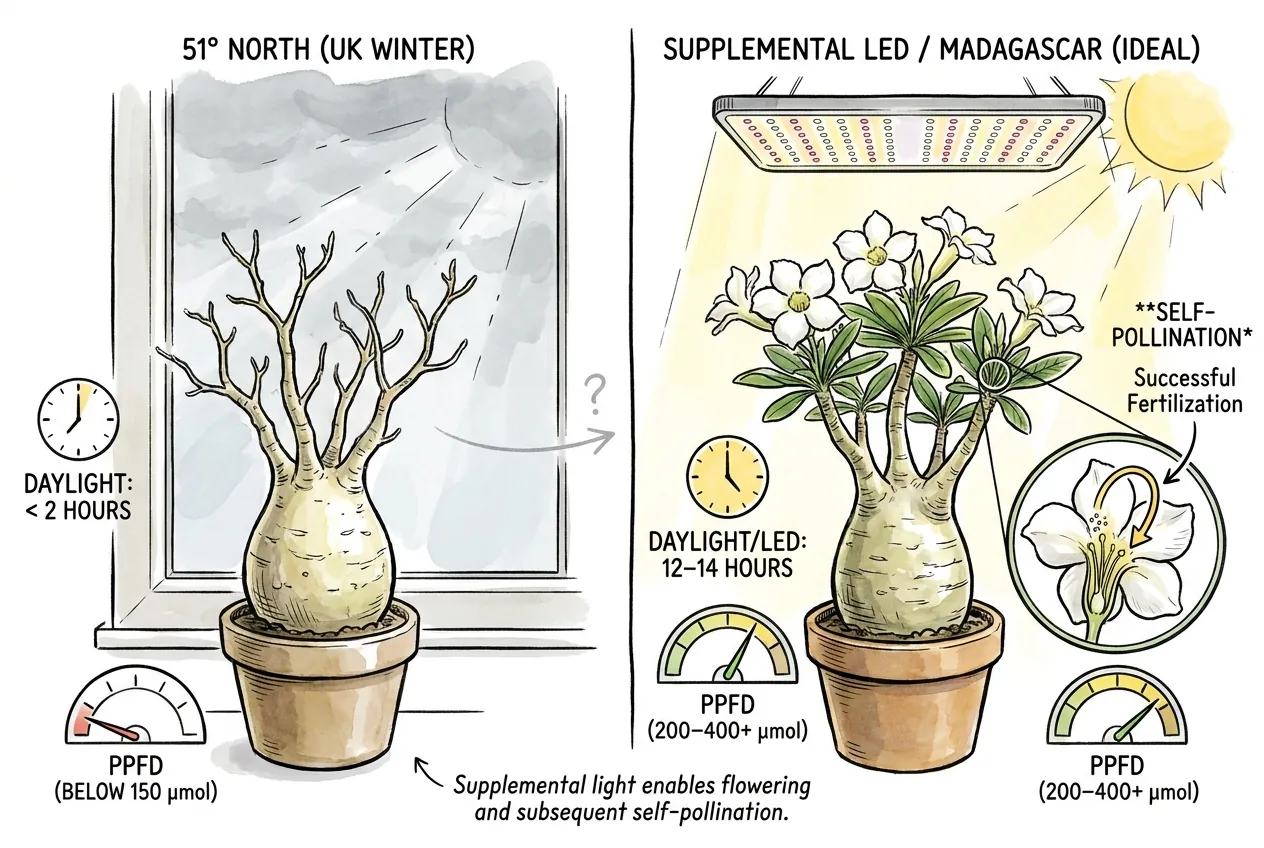
Supplemental light can help a northern grower maintain active growth when window light is weak, but the required intensity and photoperiod depend on distance, fixture, season, and plant response.
Measure at canopy level where possible, acclimate gradually, and avoid turning an illustrative PPFD value into a species-specific requirement.
Should you push winter flowering or wait for summer?
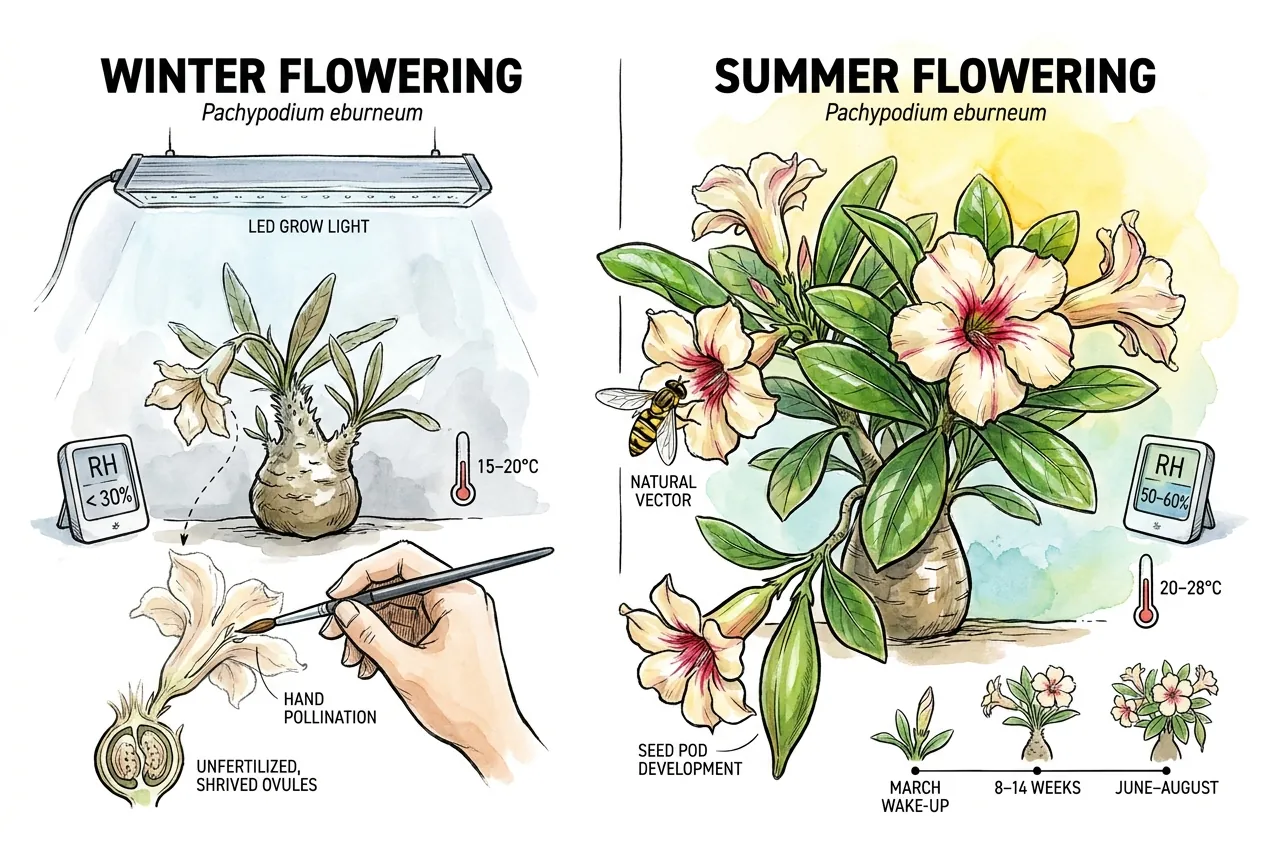
Summer often provides a wider margin for light and temperature, while winter flowering can still be attempted when the plant is actively growing and the indoor setup is stable.
Choose the season that lets you maintain consistent light, warmth, watering, and airflow rather than following a rigid calendar.
How do you manage UK greenhouse heat spikes during pod development?
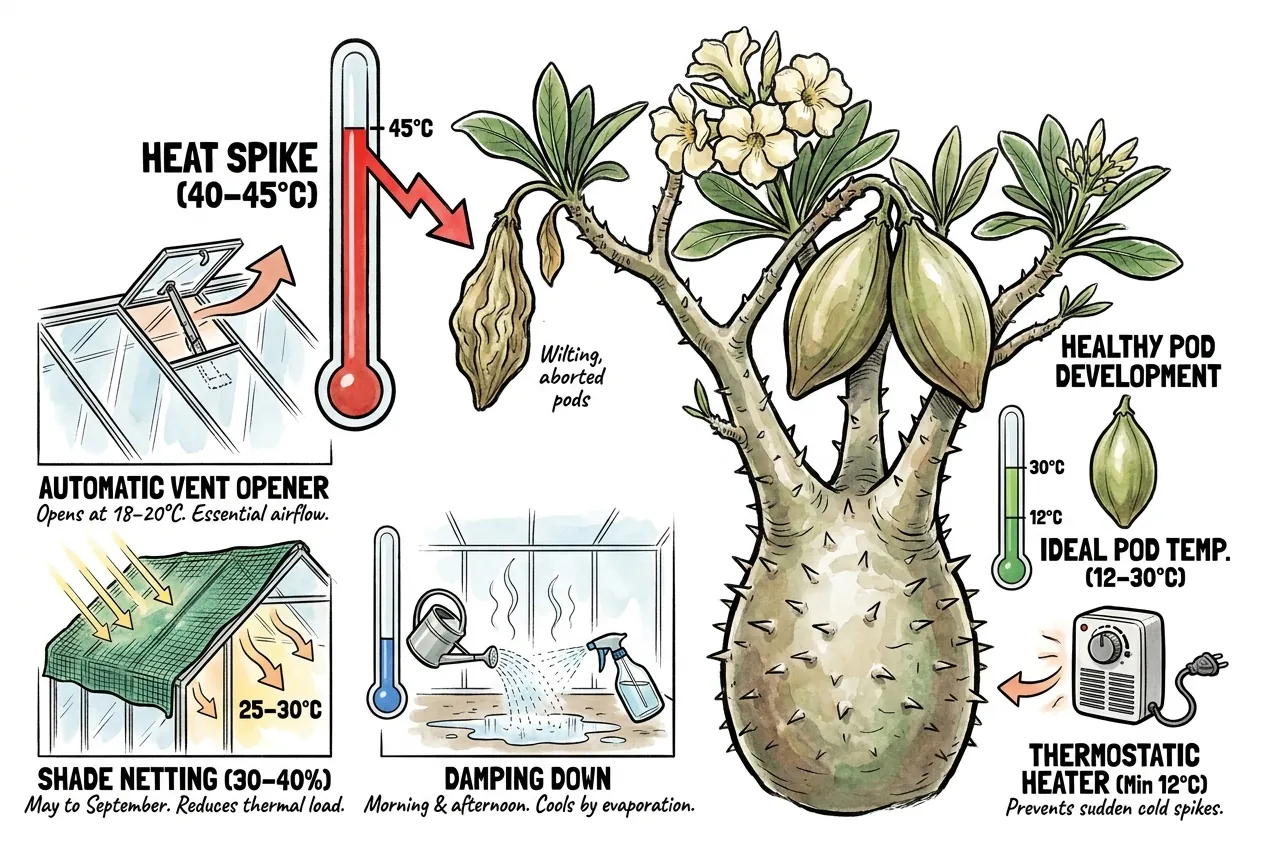
Heat spikes and cold nights can stress flowers and young pods, especially in enclosed spaces.
Ventilation, temporary shading, and a reliable temperature log are practical safeguards. Use any heater or shade product according to its current instructions and the plant’s response.
For windowsill growers without a greenhouse, move the plant back from a south-facing window during the hottest summer afternoons or use a sheer curtain, then adjust from leaf and pod response.
Ventilate as conditions allow while avoiding abrupt cold drafts.
What happens during seed pod development and how do you support it?
After successful pollination, the paired follicles may begin swelling after the flower fades and can take many weeks or months to mature.
Rate and final size vary with plant reserves, light, temperature, and water management.
Use the timeline below as an observation framework, not a fixed calendar.
How soon after pollination does the follicle start swelling?
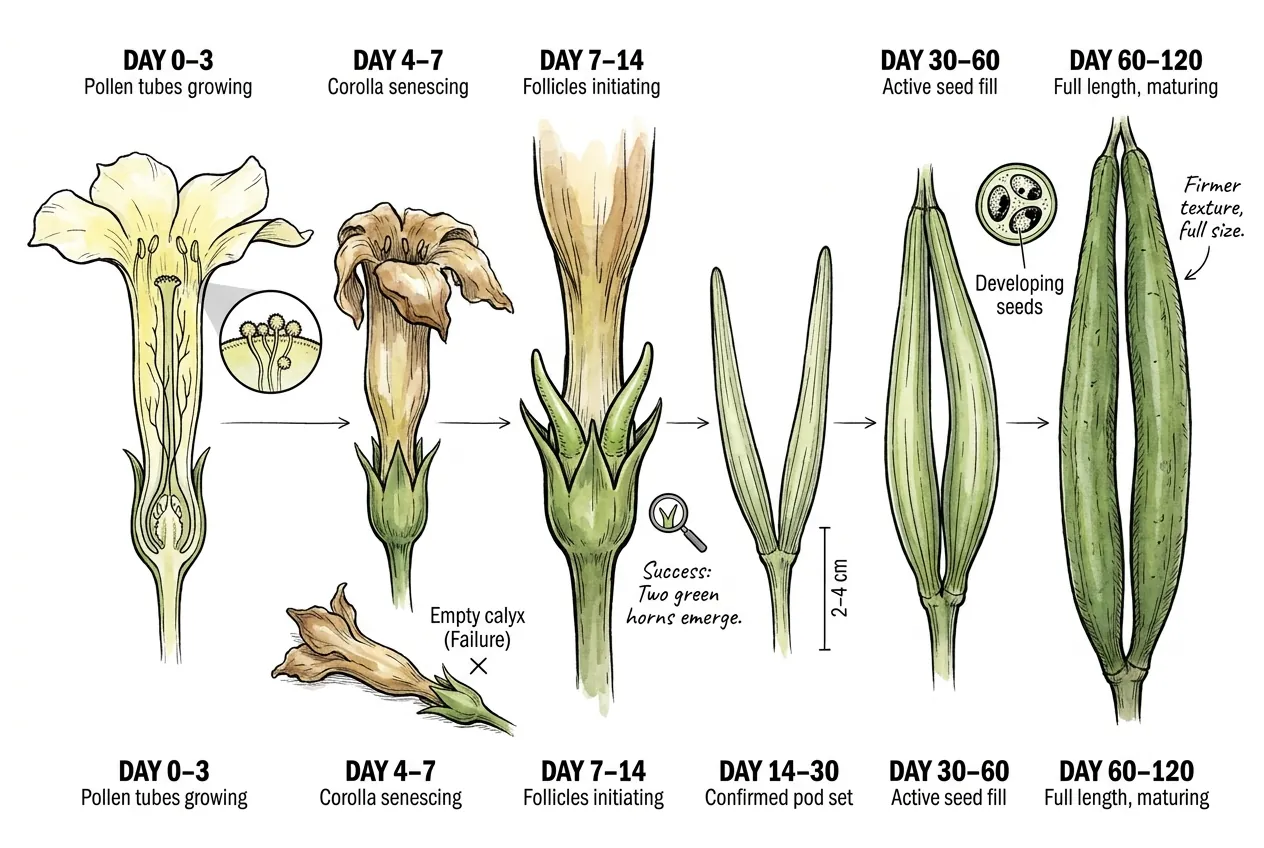
A swelling pair of green follicles after the corolla fades is a useful sign that a pollination may have taken.
An empty calyx suggests failure, but early observations are not conclusive. Continue monitoring until the pod either fills or aborts.
Illustrative pod-development timeline post-pollination
The ranges are comparative cues, not a validated schedule for this species.
| Days post-pollination | Visible change | What it means |
|---|---|---|
| Day 0–3 | Flower remains open | Pollen tubes growing down the style |
| Day 4–7 | Corolla begins to senesce (browning, wilting) | Fertilisation occurring OR flower aborting |
| Day 7–14 | Corolla detaches. Two tiny green horns emerge from the calyx | Follicles initiating |
| Day 14–30 | Follicles elongate to 2–4 cm, pale green, paired and diverging at 45 degrees | Pod likely set. Continue monitoring |
| Day 30–60 | Follicles elongate to 5–8 cm, deepening green | Active seed fill |
| Day 60–120 | Follicles reach full length (8–15 cm), become firmer, slight surface texture | Approaching maturity |
| Day 120–150 | Follicles change colour from green to brown/grey-brown, surface dries | Maturation. Harvest window opens |
When two follicles remain attached and continue to enlarge, mark the plant and monitor it regularly.
Use the plant’s visible progression rather than a fixed day window to decide when closer checks are warranted.
What is the full pod-to-mature-pod timeline?
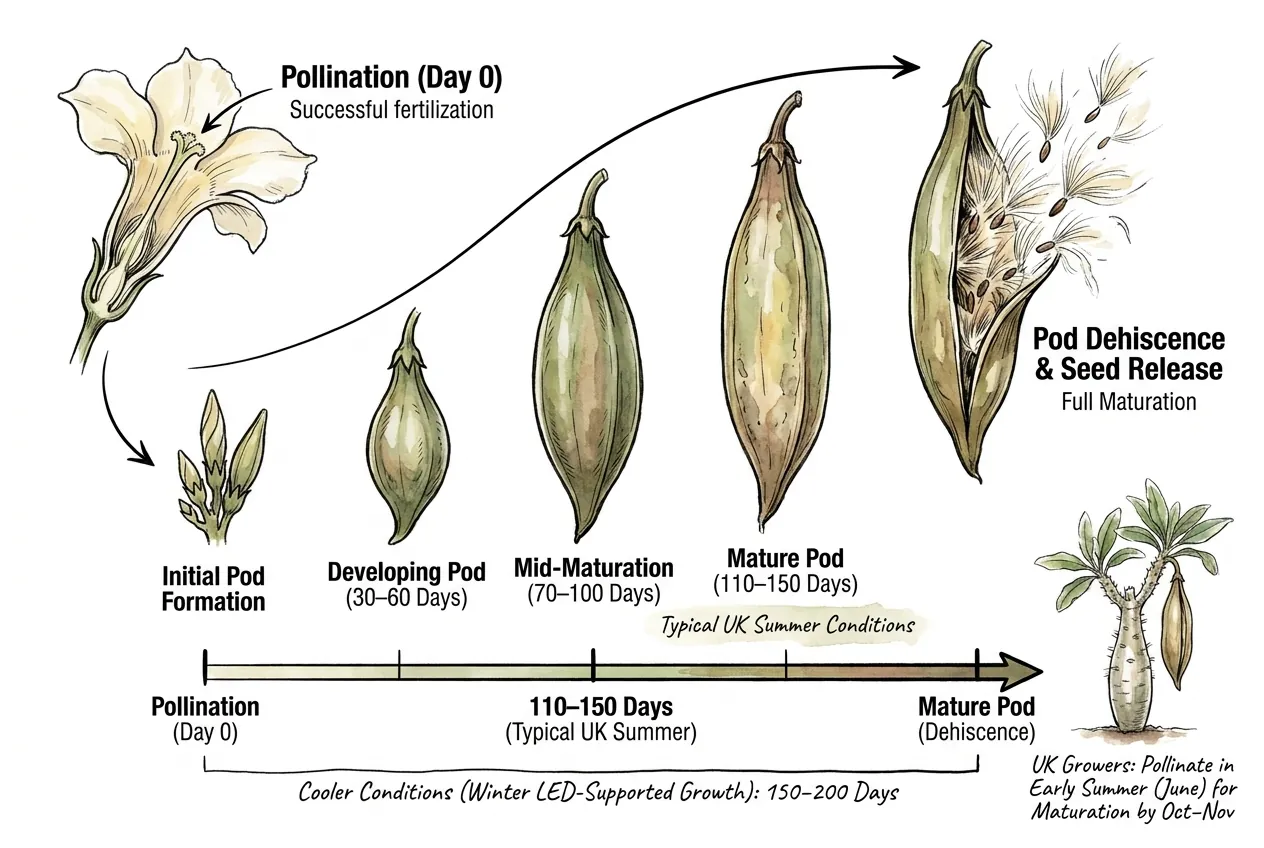
Full pod maturation commonly takes many weeks to months, and the interval changes with season and setup.
The comparison table below is an illustrative range from related reports, not a validated schedule for this species.
Days from pollination to dehiscence across Pachypodium species
| Species | Days to dehiscence (typical) | Source |
|---|---|---|
| Pachypodium lamerei | 90–120 | CSSA Journal grower reports |
| Pachypodium rosulatum | 100–140 | Rapanarivo et al. 1999 |
| Pachypodium eburneum | 110–150 | CSSA / Asclepiad Society grower reports |
| Pachypodium brevicaule | 120–180 | Conservatoire Nancy ex-situ data |
Longer maturation leaves the pod exposed to more environmental changes.
Plan around the season in which you can keep light, temperature, watering, and airflow stable, and adjust the monitoring frequency as the pod changes colour or texture.
How do you tell a fertile pod from an empty parthenocarpic one?
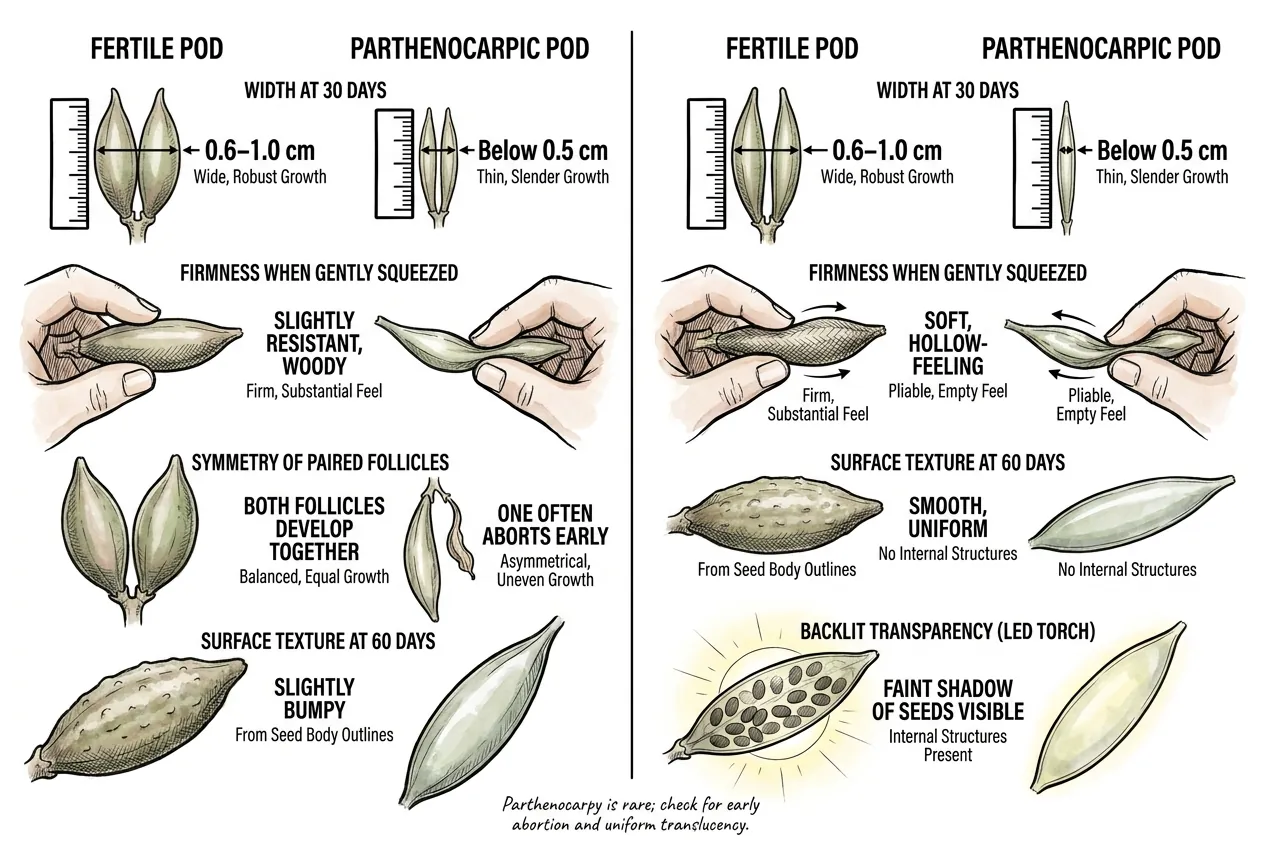
A fertile pod often becomes firmer and fuller, with both follicles developing together and occasional seed shadows when backlit.
An empty or aborted pod may remain thin, soft, or uneven, but these signs vary and should be treated as clues rather than a definitive test.
Illustrative fertile-versus-parthenocarpic pod checks
Use these as observation aids, not species-specific thresholds.
| Check | Fertile pod | Parthenocarpic pod |
|---|---|---|
| Width at 30 days | 0.6–1.0 cm | Below 0.5 cm |
| Firmness when gently squeezed | Slightly resistant, woody | Soft, hollow-feeling |
| Symmetry of paired follicles | Both follicles develop together | One often aborts early |
| Surface texture at 60 days | Slightly bumpy from seed body outlines | Smooth, uniform |
| Backlit transparency (LED torch behind pod) | Faint shadow of seeds visible inside | Even translucency, no internal shadows |
Parthenocarpic or aborted pods can persist without filled seed.
If the follicles remain thin and soft while a comparable pod continues to fill, review the pollination notes and environmental log, but avoid declaring the result from a single early inspection.
What watering, feeding, and temperature regime maximises seed fill?
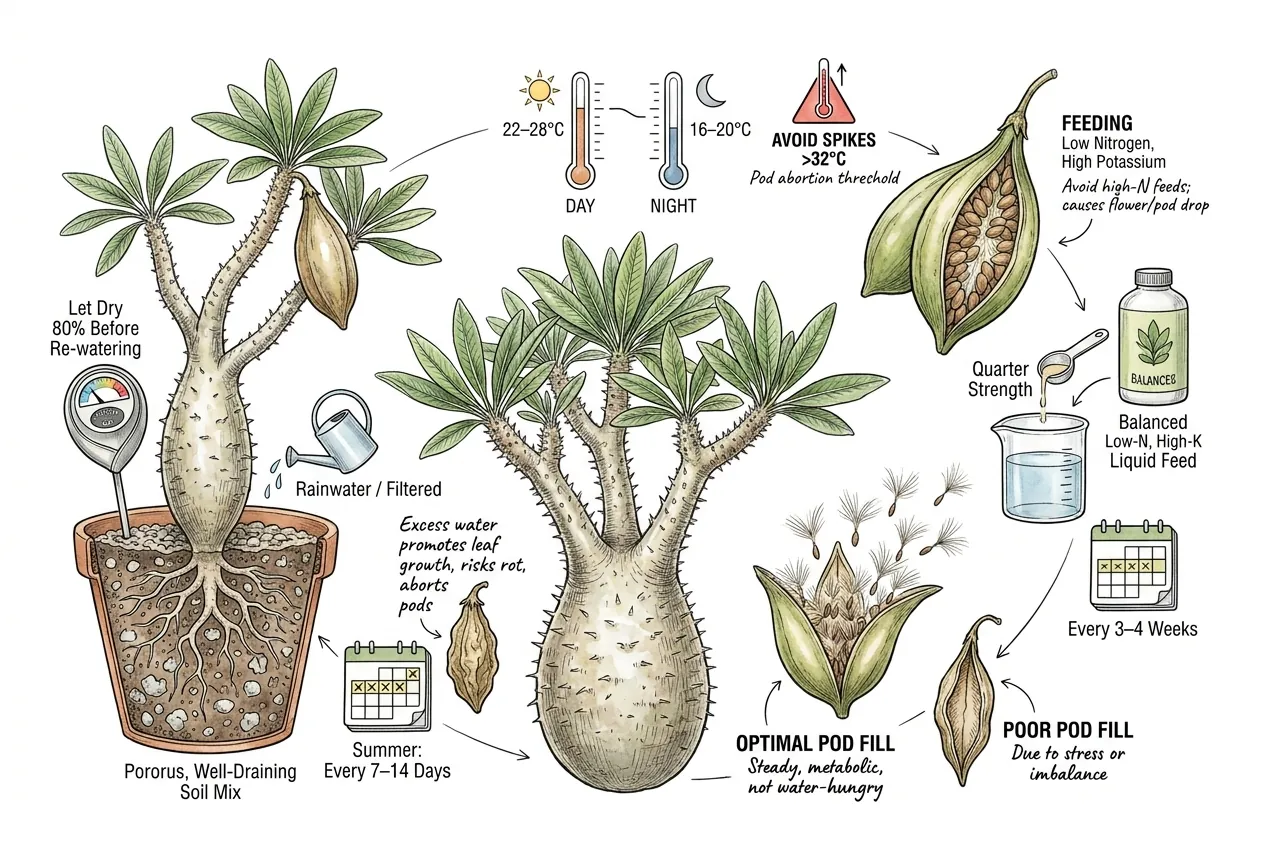
The principle for pod development is steady, moderate care.
Let the substrate approach the plant’s usual dry-down before watering again, avoid prolonged saturation, and account for pot size, substrate, season, and root activity rather than following a fixed interval.
Use a dilute, label-directed feed only while the plant is actively growing, and avoid abrupt changes or high-nitrogen pushes that produce soft growth.
Maintain stable light, temperature, humidity, and airflow. Exact bands from related taxa are illustrative, not validated requirements for P. eburneum.
Pro Tip
Once a pod is confirmed, avoid unnecessary repotting or abrupt changes in position, light, watering, or feeding.
If a change is necessary, make it gradually and continue logging the plant’s response.
What can go wrong during pod development and how do you fix it?
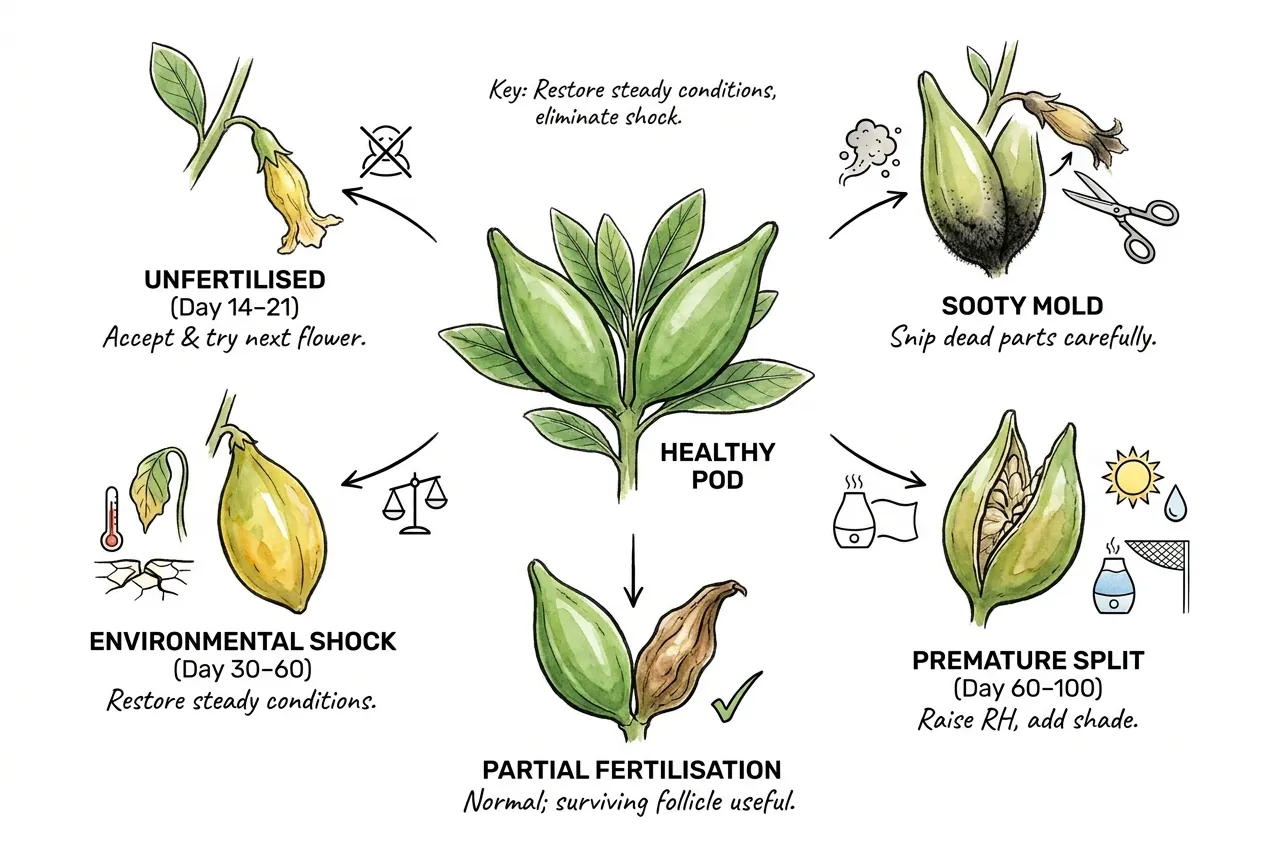
Pod-development problems often involve environmental shock or pest pressure on metabolically expensive tissue.
A sensible first response is to restore steady conditions, address the suspected stressor, and let the plant recover.
Pod development problems and fixes
| Symptom | Cause | Fix |
|---|---|---|
| Pod yellows and drops at day 14–21 | May be unfertilised or an early pod loss | Review timing and try the next flower. Do not assume a care problem |
| Pod yellows at day 30–60 | Possible environmental shock (cold spike, drought, repotting) | Restore steady conditions. Later pods may fare better |
| One follicle aborts, other matures | Possible partial fertilisation (one carpel fertilised) | One outcome that can occur. Continue monitoring the surviving follicle |
| Pod surface splits prematurely (day 60–100) | Possible low RH plus temperature spike | Reduce heat and abrupt dryness. Improve airflow and use measured humidity appropriate to the setup |
| Sooty or blackened pod base | Possible Botrytis or other decay on dead floral parts | Carefully snip off dead corolla remnants with sterile scissors |
| Aphid colony on developing pod | Pest opportunism on soft new tissue | Use a product labelled for the plant and pest. Avoid treatment that the label restricts during pod development |
Pod loss is often associated with a combination of poor timing, weak pollen, physical damage, pest pressure, or environmental swings.
Review the log for abrupt heat, cold, drought, saturation, relocation, or feeding changes instead of assigning the loss to one universal threshold.
How do you harvest, clean, and store the seed?
Pachypodium follicles can split along a suture and release tufted seed quickly once fully ripe.
Seed number and the interval from colour change to dehiscence vary, so protect a filling pod with breathable fine mesh and check it regularly as the suture changes.
Store clean, fully dry seed in a cool, dry, labelled container. Retained viability depends on harvest quality and storage conditions.
What visual signals indicate a pod is ready to dehisce?
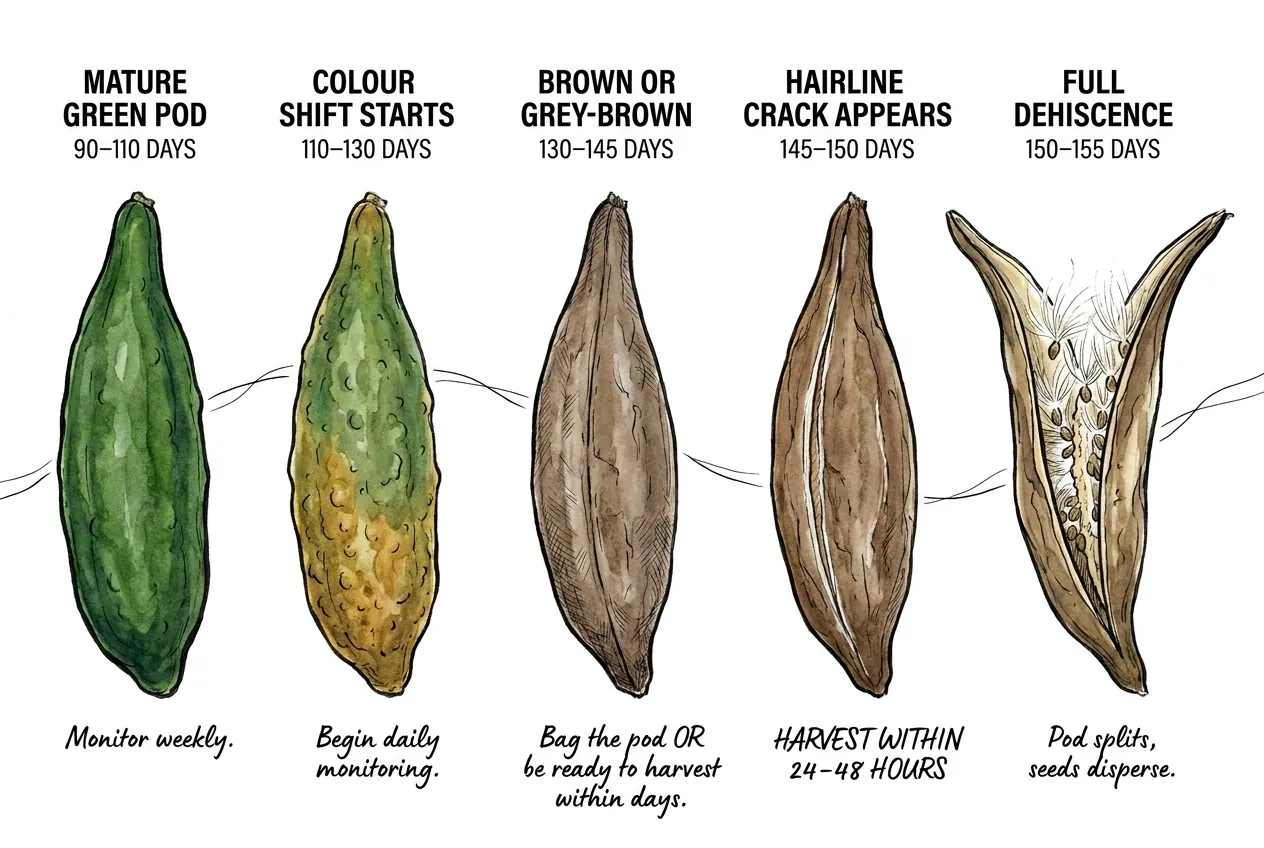
The pre-dehiscence sequence usually moves from green filling to a visible colour shift, surface drying, and a hairline opening at the suture.
A crack is a final warning to harvest or secure the pod, not a dependable calendar date.
Pre-dehiscence visual signal sequence
| Stage | Days from pollination | Appearance | Action |
|---|---|---|---|
| Mature green | 90–110 | Full length, deep green, firm, smooth-bumpy surface | Monitor weekly |
| Colour shift starts | 110–130 | Bumpy surface, base of pod begins yellow-brown discolouration | Begin daily monitoring |
| Brown or grey-brown | 130–145 | Whole pod becomes brown, surface dry to the touch, slight longitudinal seam visible | Bag the pod and increase monitoring as the opening approaches |
| Hairline crack appears | 145–150 | Faint pale line along one side of each follicle | Harvest promptly or keep the pod enclosed and monitored |
| Full dehiscence | 150–155 | Pod splits, paired horn shape opens like a banana skin, seeds with white plumose tufts begin to release | Seed may scatter quickly if the pod was not enclosed |
How do you bag a ripening pod to prevent seed loss?
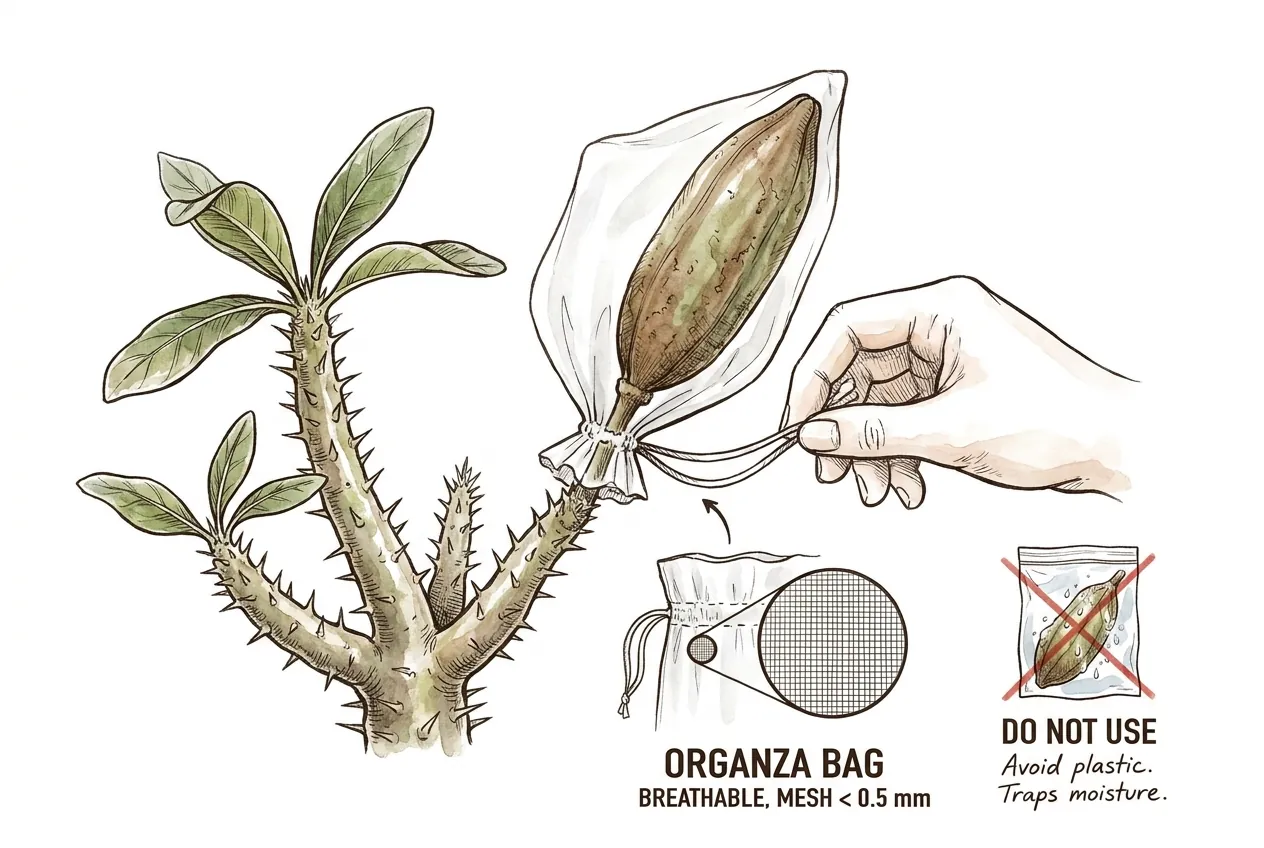
As soon as the pod begins to change colour or the suture becomes more visible, slip a breathable fine-mesh bag around the entire pod and secure it loosely at the pedicel.
Leave room for expansion and inspect regularly so the fabric does not abrade the pod.
Bag characteristic requirements
| Bag characteristic | Recommended | Why |
|---|---|---|
| Material | Organza or fine nylon mesh | Breathable and transparent, allowing monitoring without removing the bag |
| Mesh size | Below 0.5 mm | Pachypodium seeds with their coma can be 30–40 mm overall. Even small mesh will retain them |
| Closure | Drawstring | Repositionable without damaging the pod |
| Colour | White or natural | Reflects heat, does not absorb thermal energy |
Fine-mesh organza bags are one conditional option for breathable, see-through coverage. Select a size and weave that fit the pod without rubbing it.
Caution
Do not seal a ripening pod in an airtight plastic bag. Trapped condensation can raise fungal risk.
A breathable mesh enclosure is a lower-risk option when it fits loosely and is checked regularly.
How do you separate the seed body from its coma (plumose hairs)?
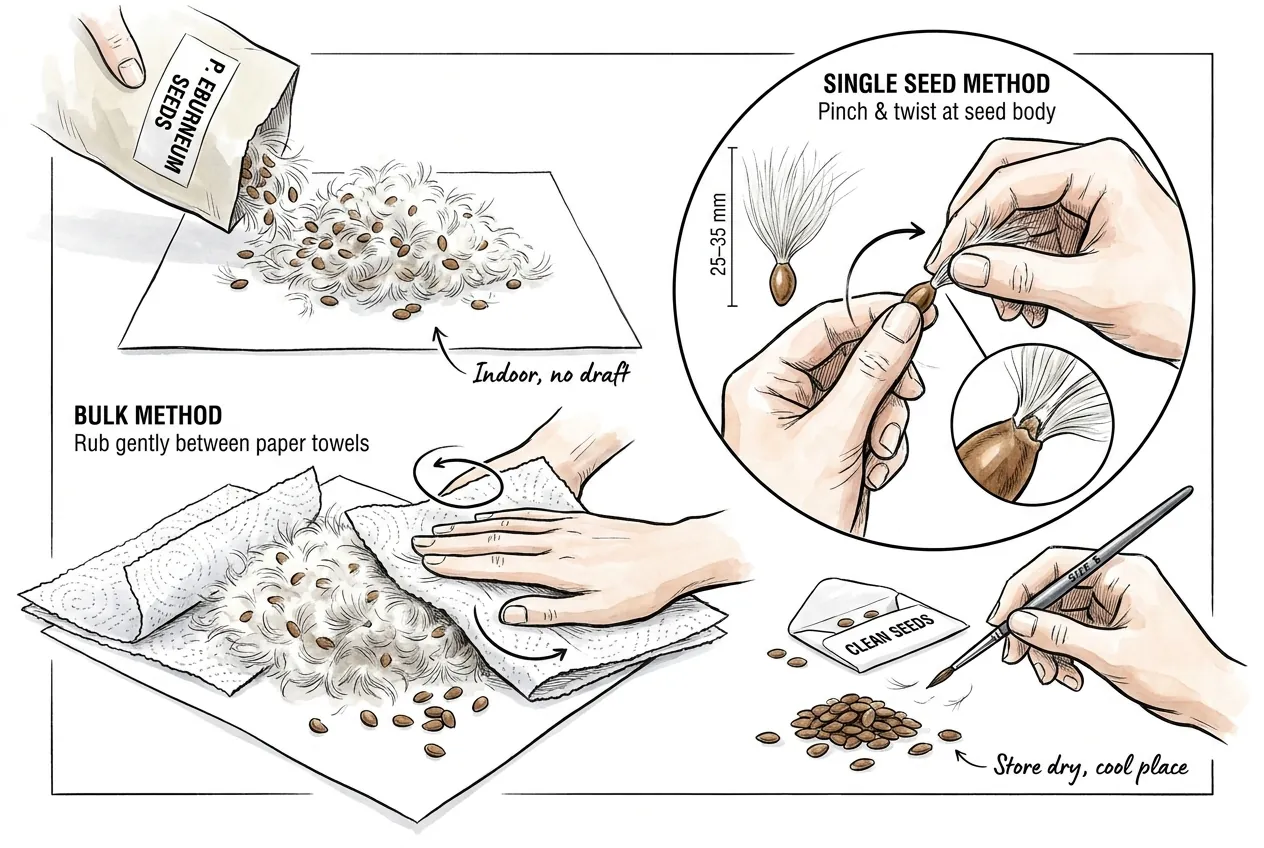
Each P. eburneum seed body is small (reported around 5–7 mm) with a parachute-like tuft of silky white hairs (the coma) attached at one end.
The coma aids wind dispersal. Removing most of it can make storage and sowing easier, but handle the seed gently.
The separation sequence can be adapted to a small or large batch.
Open the bag over a white sheet on a table indoors with no draft so the seed-and-coma mixture is easy to see.
Step 2 is separate by friction. Pinch a single seed between thumb and finger at the seed body (not the coma) and twist gently. The coma will detach where it joins the seed body.
Step 3 is an alternative bulk method for larger batches. Gently rub the seed mass between two paper towels. The coma will mat together while the heavier seed bodies release and roll out.
Step 4 is final clean. Use a small (size 5) artist’s brush to flick away any remaining coma fragments from the seed bodies, aiming for clean brown seed bodies with no white fluff attached.
Step 5 is a visual screen. Plump, firm, coloured seeds are more promising, while flat, pale, or shrivelled seeds deserve separate labelling and a germination test rather than automatic rejection.
A few minutes of careful separation now saves hours of frustration at sowing time, where leftover coma fragments will mat into the substrate and lift seeds off contact.
What storage conditions preserve germination rate?
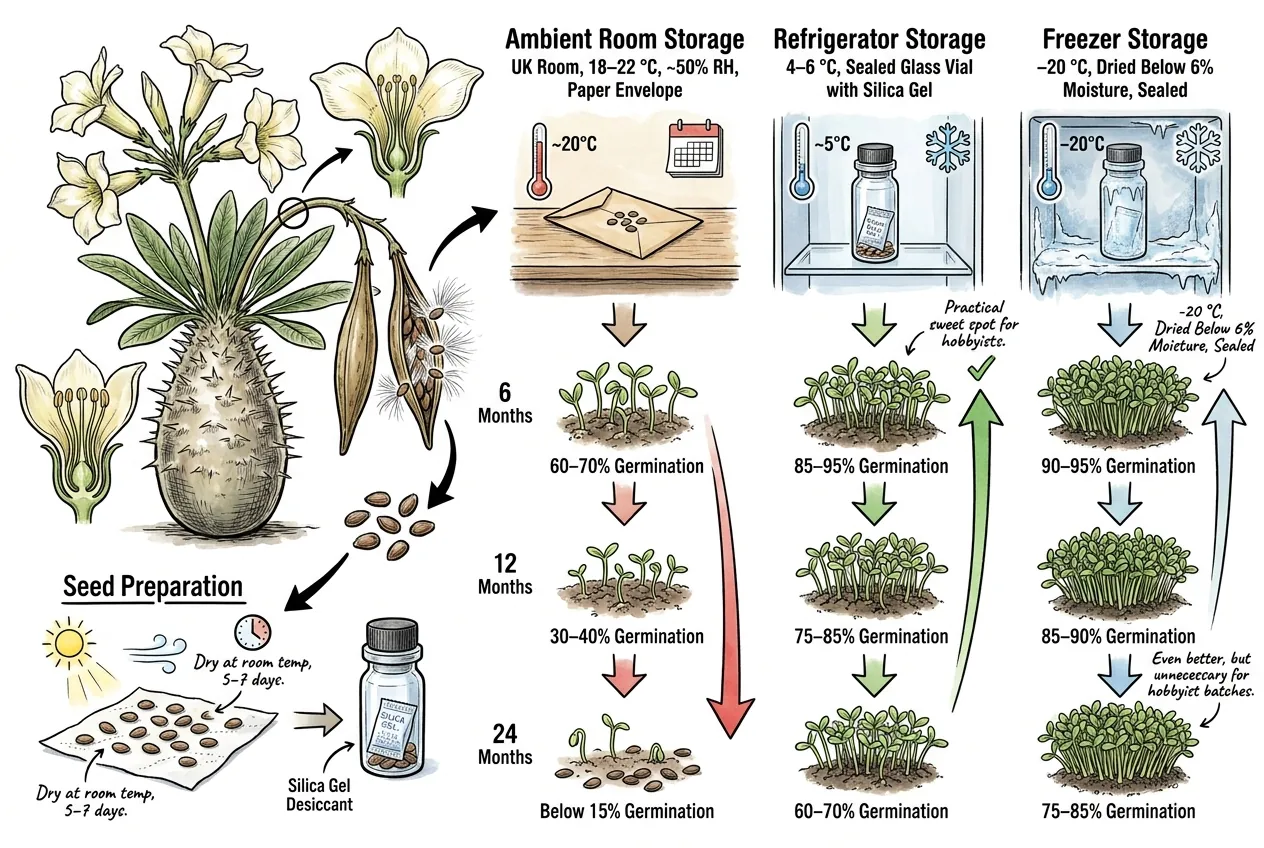
Cool, dry storage generally slows viability loss, but no species-specific retention trial supports a precise shelf-life forecast.
Use a labelled, moisture-controlled container and test a small sample before relying on older seed. Freezing should only be considered when the seed is thoroughly dry and the collection guidance supports it.
Illustrative storage comparison from related seed-handling practice
| Storage condition | Relative expectation |
|---|---|
| Ambient (UK room, 18–22 °C, ~50% RH, paper envelope) | Viability may decline fastest. Test before relying on the batch |
| Refrigerator (4–6 °C, sealed glass vial with silica gel) | Often better retained when seed is fully dry and moisture is controlled |
| Freezer (-20 °C, dried below 6% moisture, sealed) | Species and drying protocol determine whether freezing is beneficial |
| Cryo (-80 °C, dried, sealed) | Requires specialist protocols and is not a routine hobby method |
For a small hobby batch, dry the cleaned seed fully, place it in a sealed labelled container with an appropriate desiccant, and store it in a cool, stable location.
Keep the species, harvest date, parent information, and pollination method with the sample.
Pro Tip
A small germination check while the seed is still relatively fresh is more informative than a promised shelf-life percentage.
Use the result to decide whether to sow the remainder or refresh the storage conditions.
How do you germinate self-pollinated Pachypodium eburneum seed?
Fresh Pachypodium seed is usually sown warm on a clean, free-draining medium kept evenly moist but not saturated, with bright but measured light.
Self-pollinated seed may differ from outcrossed seed in fill or vigour, but the direction and size of any difference are not established for P. eburneum.
Keep a tray under observation for several weeks before judging a slow batch.
What germination rate should you expect from fresh, self-pollinated seed?
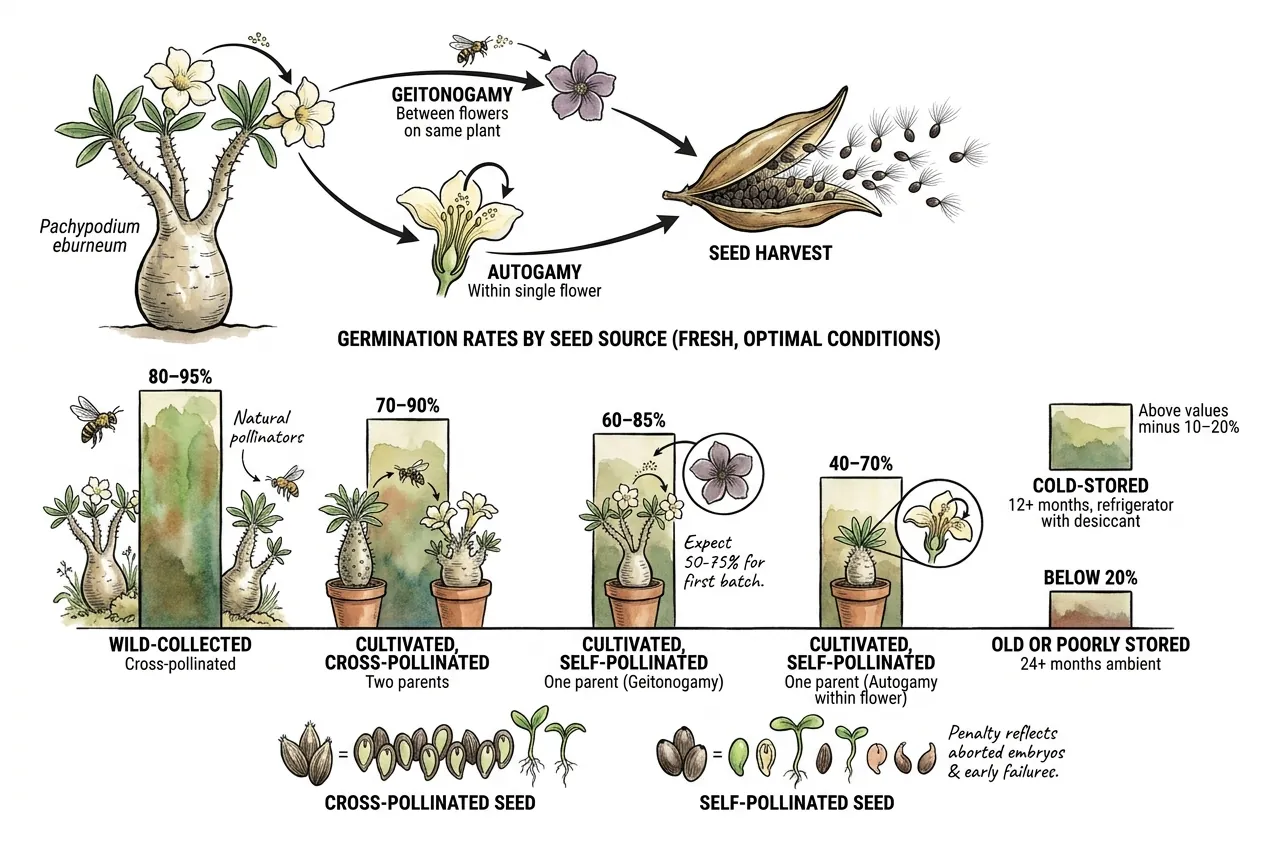
Germination from self-pollinated seed is unresolved for this species and can vary widely with pollination success, seed fill, freshness, and sowing conditions.
Geitonogamy may produce better-filled seed than within-flower attempts, but treat any percentage as a batch result, not a forecast.
Germination rates by seed source
| Seed source | Relative expectation (fresh seed. Unvalidated) |
|---|---|
| Cultivated, cross-pollinated (two unrelated parents) | May be higher when seed is well filled |
| Cultivated, self-pollinated (one parent, between two flowers) | Variable. Compare with a labelled control batch |
| Cultivated, self-pollinated (one parent, within a single flower) | Variable. Do not rank without batch data |
| Cold-stored seed | Declines with storage time |
| Old or poorly stored seed | Poor |
Use comparison tables as observation aids
The directions in this table are the useful part. No controlled comparison establishes a reliable ranking for this species, so compare labelled batches rather than treating the rows as a forecast.
Please do not seek wild-collected seed of this Critically Endangered, CITES-listed species. Buy or trade only documented, nursery-propagated material.
Self-pollinated seed may germinate or grow less vigorously than outcrossed seed if incompatibility or inbreeding affects fill, but the direction and frequency are not established here.
What substrate, temperature, and moisture protocol gives the highest germination?
Start germination with a measured, airy setup
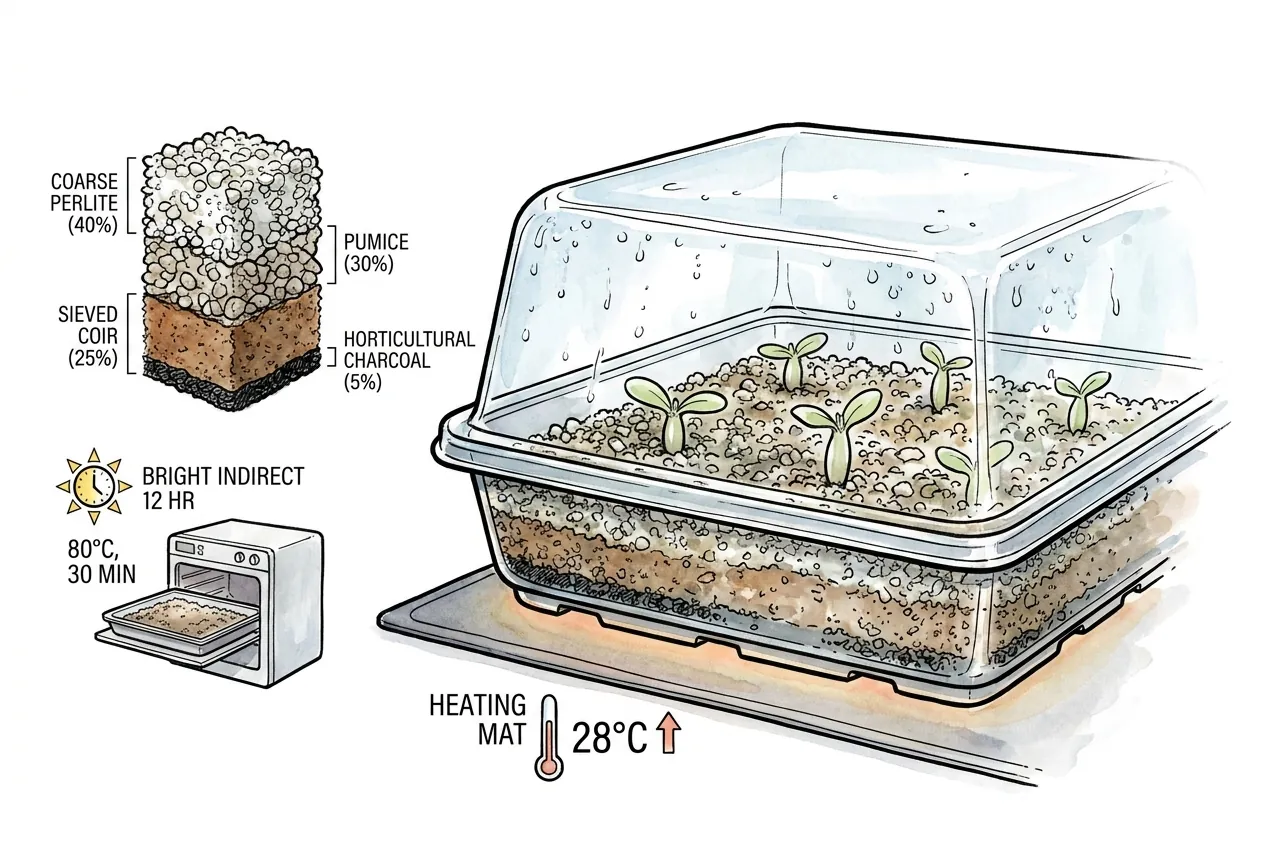
The references point toward a clean, free-draining medium in a shallow tray with controlled moisture, gentle warmth, and measured light.
The composition below is an illustrative starting point, not a species-specific prescription.
Illustrative germination substrate composition
| Component | Example proportion | Function |
|---|---|---|
| Coarse perlite (3–6 mm) | 40% | Drainage, aeration |
| Pumice or pumice grit (2–4 mm) | 30% | Drainage, root anchor |
| Sieved coir or fine peat-free seed compost | 25% | Moisture buffer |
| Horticultural charcoal (fine) | 5% | Fungal inhibition |
If you sterilise a sowing medium or tray, use a method suitable for that material, let it cool or dry fully, and avoid leaving residues that could harm seed.
Sow shallowly on a clean, free-draining surface and keep the tray protected from direct heat and sun.
Water from below or with a fine stream so seed is not displaced. Keep the medium evenly damp with ventilation appropriate to the enclosure.
Bottom heat and supplemental light are conditional tools. Measure the root-zone and canopy response, acclimate gradually, and follow current product instructions.
Illustrative germination timeline from sowing
Treat each window as a cue to observe, not a guarantee.
| Days after sowing | Possible event |
|---|---|
| 5–10 | First radicles emerge from viable seeds |
| 10–14 | Cotyledons unfold, vivid green |
| 14–21 | Main flush of germination usually over, but keep ungerminated seed warm and don’t discard a tray yet |
| 21–30 | First true leaves. Gradually reduce dome humidity over 7–10 days |
| 30–60 | Seedling roots reach 3–5 cm. Pot-on to 5 cm individual pots if vigour allows |
How quickly do self-pollinated seedlings germinate compared to outcrossed ones?
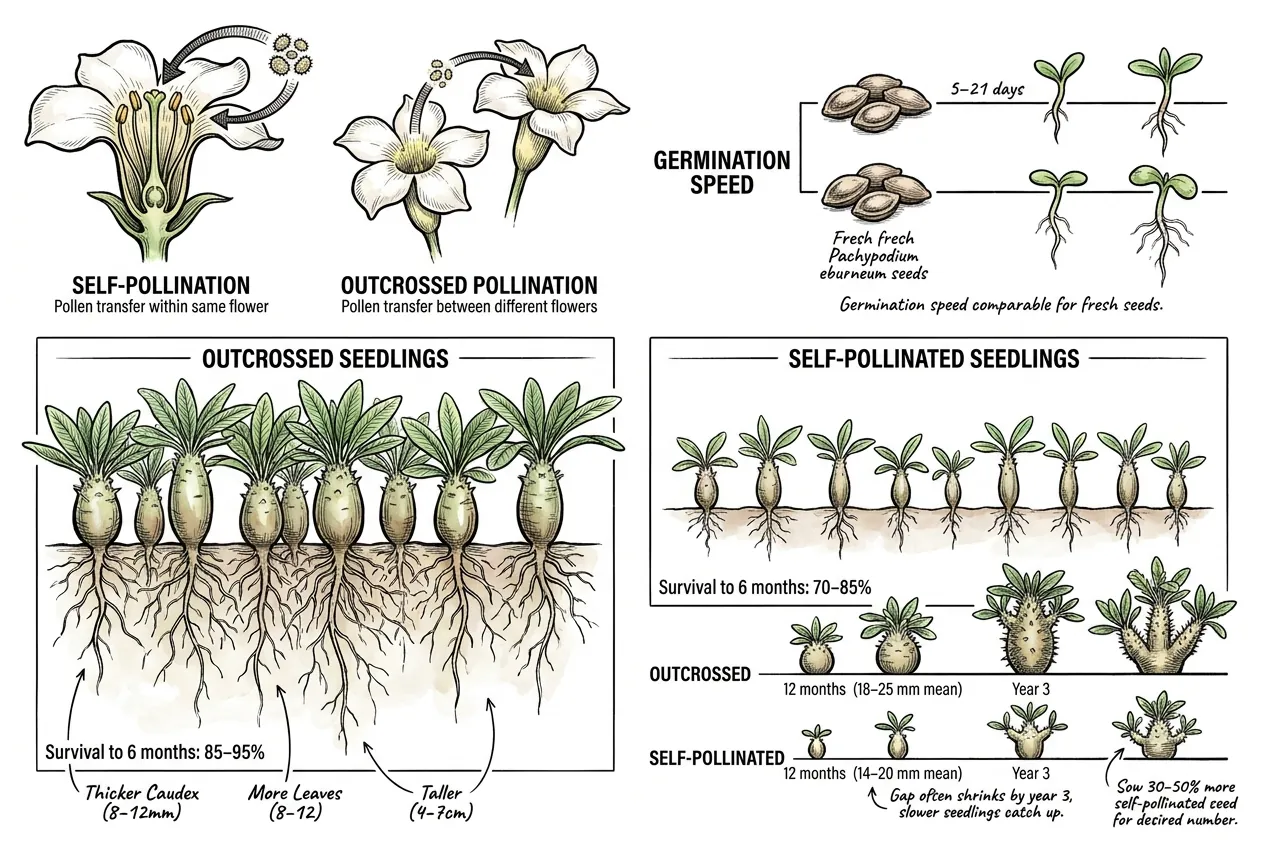
Compare labelled batches under equal conditions
Fresh seed may germinate over a broad window from several days to several weeks.
No controlled comparison establishes a fixed speed or vigour difference between self- and cross-pollinated P. eburneum. Compare batches under the same conditions and record the result.
Seedling growth at six months under identical conditions
No species-specific comparison establishes the numeric outcomes, so use this table as a measurement template.
| Metric | Outcrossed seedlings | Self-pollinated seedlings |
|---|---|---|
| Caudex diameter (mean) | Record measured batch range | Record measured batch range |
| Height | Record measured batch range | Record measured batch range |
| First true leaf count | Record measured batch range | Record measured batch range |
| Survival to 6 months | Record survivors / starting count | Record survivors / starting count |
Seedling size and survival are shaped by seed fill, substrate, light, watering, and disease as well as parentage.
Track selfed and outcrossed batches under the same conditions before drawing a conclusion about vigour or losses.
Is genetic bottleneck or inbreeding depression a real concern for a hobbyist?
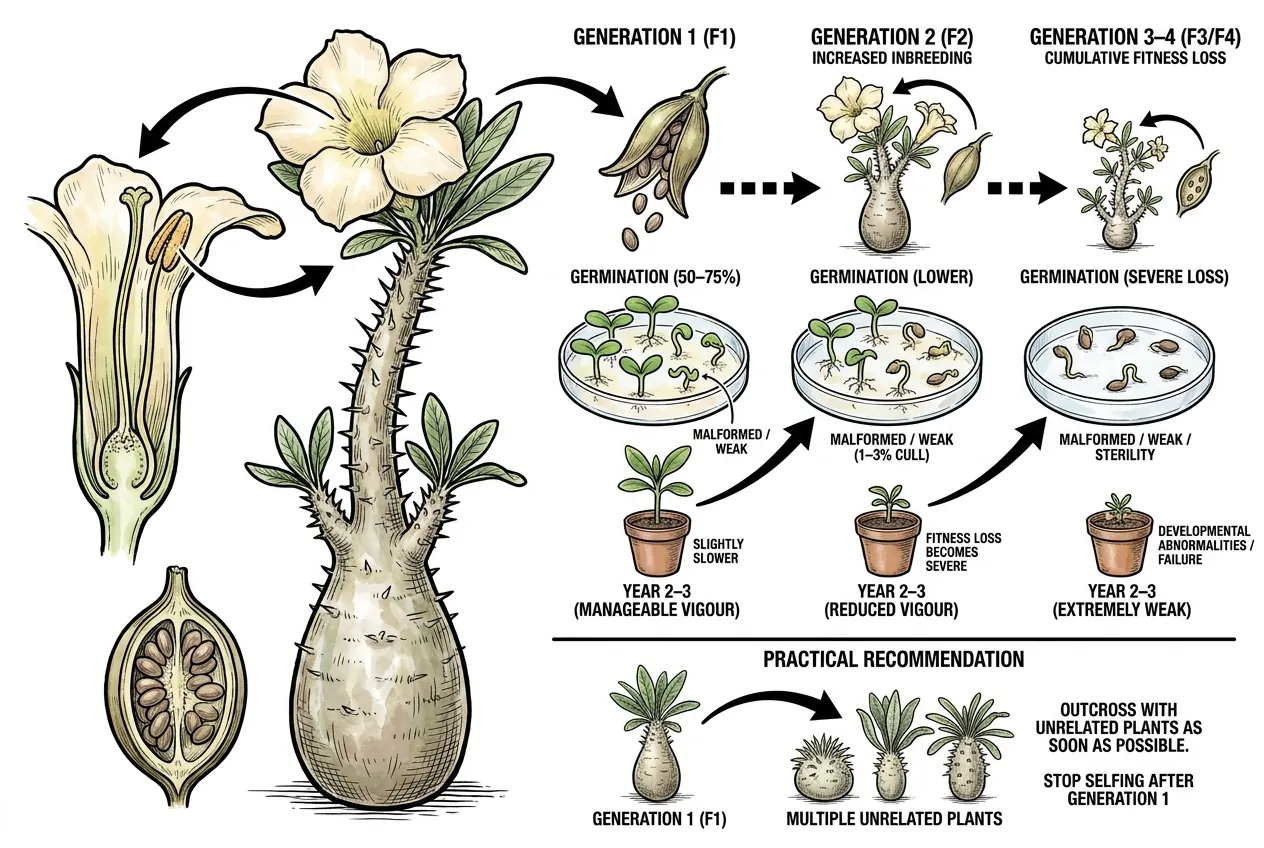
For one generation, inbreeding risk is a reason to keep records and avoid presenting a small selfed batch as representative of the species.
Potential effects include variable germination, weak seedlings, or malformed growth, but their frequency is not established for P. eburneum.
Remove clearly failing seedlings for welfare reasons and retain healthy plants for comparison.
For multi-generation selfing (raising your self-pollinated seedlings to maturity and selfing them too), inbreeding depression compounds.
Under the simple full-selfing model, the inbreeding coefficient rises toward one (starting at 0.5 in the first selfed generation, then 0.75, 0.875, and so on).
Inbreeding depression can become severe in outcrossing-adapted species, but the frequency and severity of developmental abnormalities, sterility, or weak vigour are not established for P. eburneum.
Switch to cross-pollination when unrelated plants are available
For UK hobbyists, self-pollinate generation 1 to get seedlings. As soon as you have multiple unrelated plants, whether yours plus plants from a fellow grower, a trade, or acquired seed, switch to cross-pollination for subsequent generations.
Conservation-grade Pachypodium ex-situ programmes at Kew, Royal Botanic Gardens Edinburgh, and Conservatoire Nancy all explicitly maintain unrelated stock to avoid the multi-generation selfing problem. The principle scales down to a hobbyist with two or three unrelated plants in a windowsill collection.
What goes wrong and how do you fix it?
Log Failures by Category
When a solo-plant attempt fails, review timing, pollen condition, mechanical damage, environmental stress during pod development, and pests. A structured log makes the next attempt more informative, but no published study supports a universal success-rate increase for this species.
If a transfer progresses, I keep the original flower identifier through every later stage. The same identifier follows a dropped corolla, an initiated pod, its mesh bag, harvested seed envelope, and the sowing cells. I never combine seed from different transfer arrows or dates merely because the batch is small.
My denominator begins with every attempted flower, not only the pods that survived. The record separates attempted flowers, visible pod starts, pods retained to harvest, recovered seeds, visibly filled seeds, flat seeds, and germinated cells. One successful pod cannot then hide repeated failed transfers or lost seed.
If a pod aborts, I close its chain with the last image taken from its fixed pot-rim orientation and the environmental events since pollination. If seed disperses before counting, I mark the harvest total as incomplete rather than estimating the missing seeds. A clean chain is more useful for the next flowering than an impressive percentage built from survivors alone.
What are the top five reasons a hand-pollinated flower fails to set a pod?
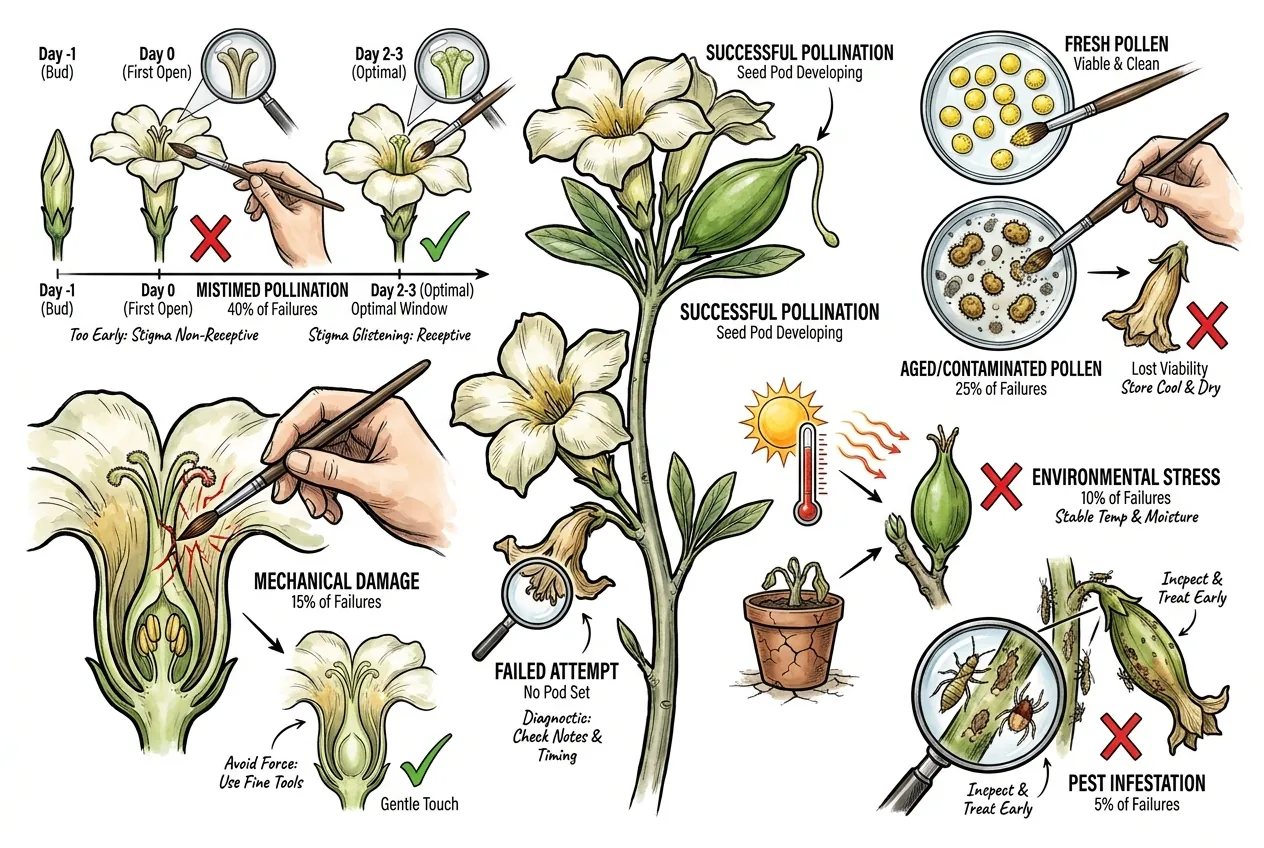
These failure modes can overlap, and their relative frequency is unknown for P. eburneum.
Use the categories as a checklist rather than a percentage ranking.
Mistimed pollination is one plausible failure mode.
An attempt made as soon as the flower opens may precede the receptive cue suggested by related Apocynaceae observations.
Pollen on a non-receptive surface may lose viability before the stigma becomes usable.
Check whether the transfer was made before the stigma showed the receptive sheen or after the corolla had begun to senesce.
On the next attempt, wait for the visual overlap of fresh pollen and a glistening or slightly tacky stigmatic zone, then repeat only if the flower remains receptive.
Aged or contaminated pollen is another common possibility.
Fresh, dry pollen used promptly is the safest baseline. Desk storage and visible moisture make the outcome less predictable.
Dust, water, sweat, or residues on a tool can reduce transfer.
Use a clean, dry tip and follow a compatible cleaning method. If pollen must be held, keep a small labelled sample cool and dry and treat the storage period as unvalidated.
Mechanical damage can prevent pollen from reaching the receptive surface.
Apocynaceae style heads are delicate, so a fine clean tip and a light touch are preferable to force or scraping.
Diagnostic. Inspect the flower interior under a loupe after pollination. Are anthers visibly displaced, torn, or oozing? Is the style head crushed or oozing?
Fix. Use a fine, clean tip and move slowly. Touch and stroke rather than pushing or scraping.
Environmental stress during the early pod phase can undo an otherwise successful transfer.
Look for abrupt heat or cold, drought, saturation, relocation, or repotting around the time the pod began to swell.
Diagnostic. Check your temperature and humidity logs. Was there a cold night or hot day between pollination and day 21? Did you repot, move, or change feeding regime?
Fix. Environmental smoothing as covered in the pod-development H2.
Aphids, thrips, and mealybugs can colonise soft new tissue and deform a developing pod.
Inspect closely and use a product labelled for the plant and pest, avoiding the pod when the label requires it.
Diagnostic. Look closely at the pod and surrounding plant. Tiny green or grey clusters at the pod base can indicate aphids, silvery streaks on flower remnants can indicate thrips, and white cottony patches in leaf axils can indicate mealybugs.
Fix. Isolate the problem area and use a product labelled for the plant and pest, following the label around flowers and pods.
How do you tell unfertilised flower drop from aborted-pod drop?
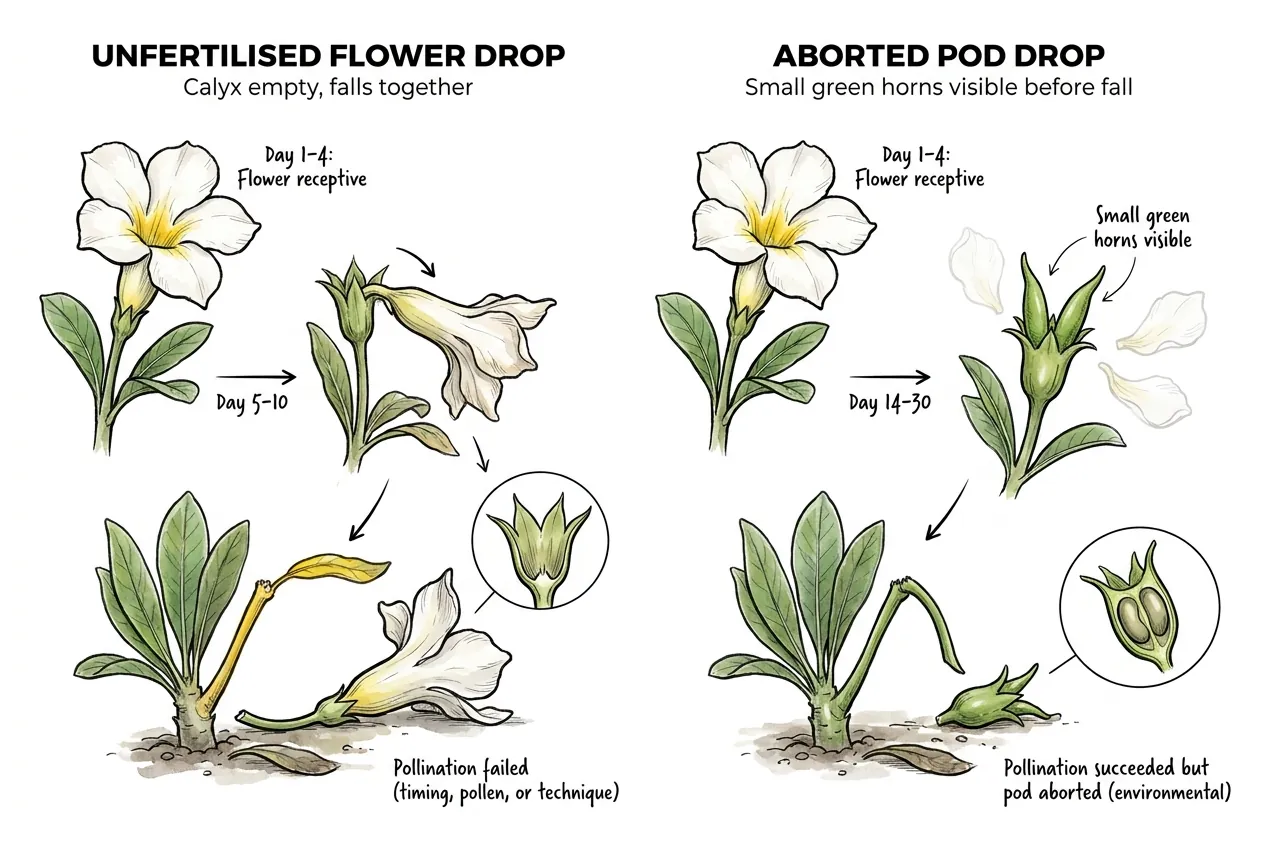
The two patterns look superficially similar but differ in timing, visible pod presence, and implication.
Reading the difference correctly saves you from blaming your technique when the problem is actually environmental, and vice versa.
Unfertilised flower drop versus aborted pod drop
| Signal | Unfertilised flower drop | Aborted pod drop |
|---|---|---|
| Timing | Day 5–10 (corolla and calyx fall together) | Day 14–30 (small pod horns visible before fall) |
| Visible pod | None. The calyx is empty after drop | Yes. Two small green horns 0.5–2 cm long |
| Pedicel residue | Pedicel turns yellow, abscission clean | Pedicel may persist. Pod abortion may be partial |
| Implication | Pollination failed (timing, pollen, or technique) | A pod was present but may have aborted. Review environmental notes |
If you see unfertilised flower drop, start by reviewing the receptive window and tool sections before trying the next flower.
If a small pod later drops, review the temperature, humidity, watering, and disturbance notes from the relevant development window rather than assigning a single cause.
What environmental shocks cause pod abortion?
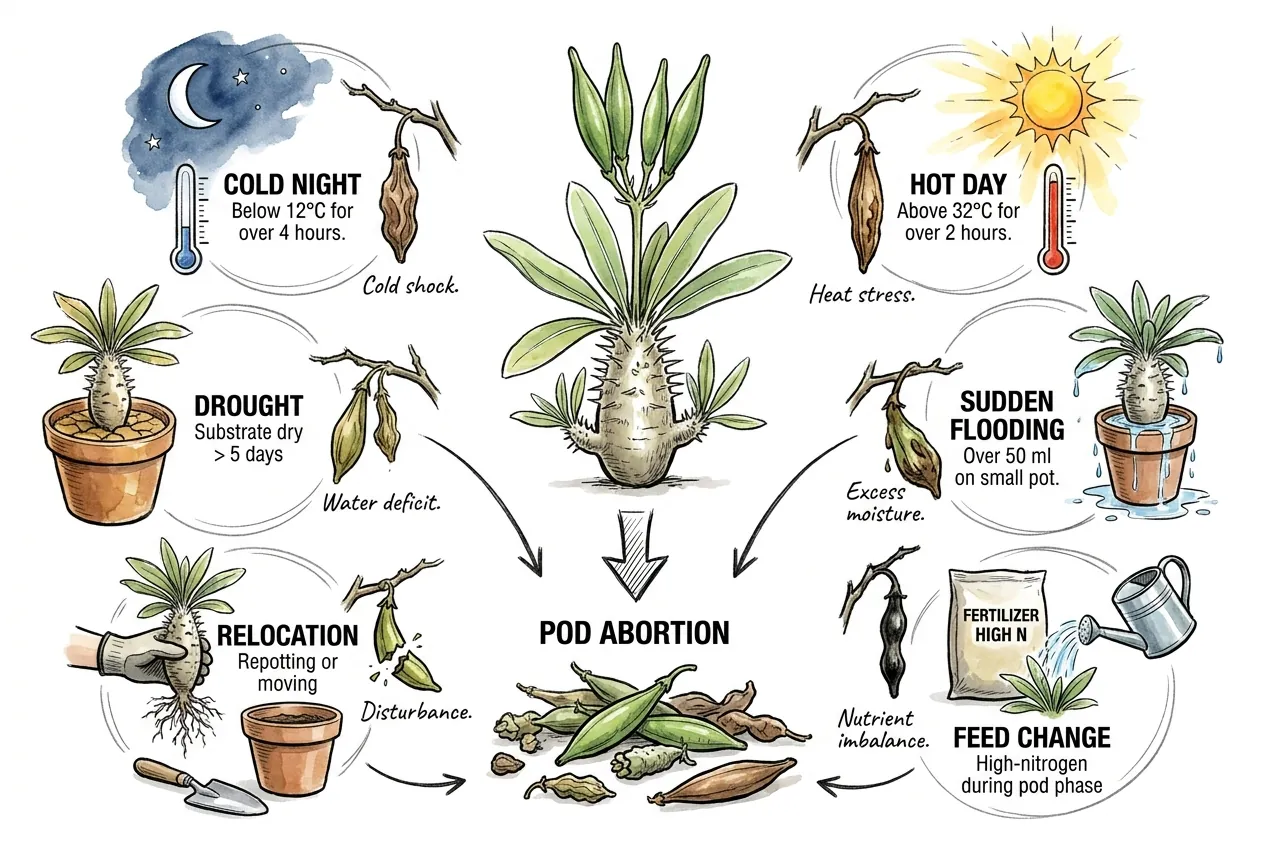
Pod abortion has been associated with abrupt cold or heat, prolonged drought, sudden saturation, relocation or repotting, and abrupt feeding changes in cultivated plants.
No validated threshold set exists for P. eburneum, so use the table as a monitoring checklist rather than a diagnostic rule.
Environmental shock checklist and mitigation
| Shock | What to record | Mitigation |
|---|---|---|
| Cold night | Record cold exposure and compare it with the plant’s response | Reduce abrupt cooling. Use controlled heat only when needed and safely monitored |
| Hot day | Record heat exposure and pod response | Ventilate or shade gradually. Avoid chasing a fixed cutoff |
| Drought | Record the dry-down and root-zone condition | Water according to the established dry-down cycle. Avoid prolonged saturation |
| Sudden flooding | Record unusual saturation or runoff | Return to measured watering and allow appropriate aeration |
| Relocation or repotting | Any abrupt move or root disturbance | Defer nonessential work when practical. If necessary, make the change gradually |
| Feed change (high N) | Switching to a high-N feed during pod phase | Avoid abrupt high-N changes. Follow the product label and the plant’s response |
Several stresses at once are harder for a plant to recover from than one mild change.
Stabilise the setup, record what changed, and avoid claiming that any combination will always abort a pod.
What alternatives exist if self-pollination repeatedly fails?
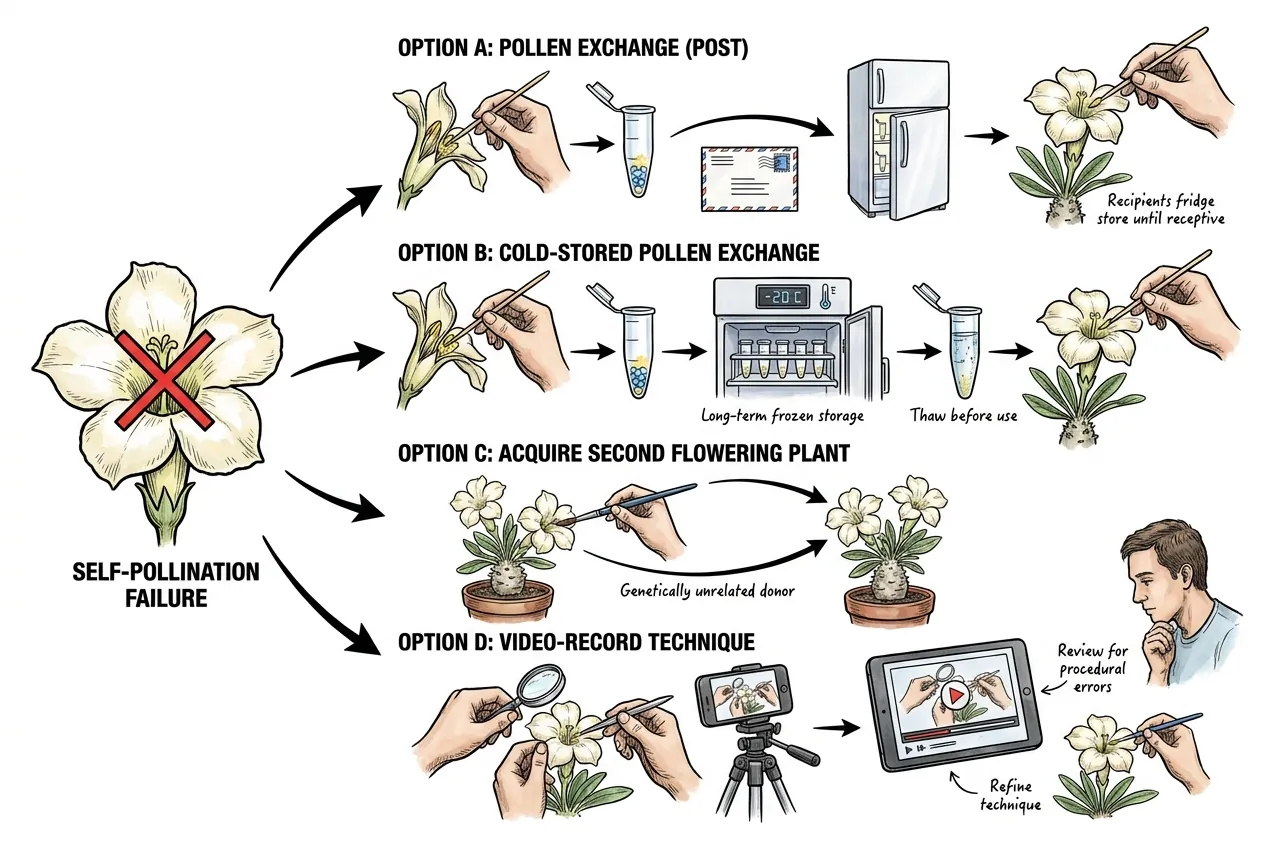
Switch to unrelated pollen when reliability matters
If careful attempts continue to fail, consider four alternatives. Obtaining unrelated pollen, arranging a supported pollen exchange, acquiring a second flowering plant, or recording the technique for a closer review.
Choose the option that fits local rules, plant health, and conservation responsibilities.
Pollen exchange may be possible through specialist societies or trusted growers.
Follow the donor’s collection and storage guidance, comply with plant-health and shipping rules, and treat viability after transit as uncertain.
The recipient should keep any donor material labelled and follow the agreed storage guidance until a compatible flower is receptive.
Unrelated pollen can address the genetic limitation, but it does not remove the need for careful timing and gentle placement.
Longer-term cold storage is species- and protocol-dependent.
Do not assume that a domestic freezer preserves Pachypodium pollen for a fixed number of months. Use it only when a documented collection protocol supports the method.
Option C, obtaining a second flowering plant, is the clearest long-term route to outcrossed seed.
A second specimen of P. eburneum provides a local pollen source. Any interspecific crossing experiment requires separate compatibility and conservation checks.
Option D is to reassess the technique.
Repeated failure can reflect one or more small errors compounding.
If useful, record an attempt for later review, while keeping the plant and flower handling gentle.
The most common technique errors visible on replay are entering the wrong angle into the corolla, touching the top of the style head instead of the lateral surface, and crushing the anther cone on withdrawal.
Practical conclusion
Keep Self-Pollination in Proportion
A lone plant can be hand-pollinated as an experiment, but viable selfed seed is uncertain. A second unrelated plant remains the reliable route for outcrossing.
Use fresh pollen and steady pod care
Moving fresh pollen between flowers on the same plant may ease timing and placement while leaving genetic self-incompatibility unresolved. Keep light, temperature, watering, humidity, and airflow steady through pod development, and use measurements as local diagnostics rather than universal thresholds.
Protect and judge the harvest carefully
Protect a filling pod with breathable fine mesh and harvest from visible colour and suture changes rather than a fixed day count. Judge germination and seedling vigour from labelled batches, and switch to unrelated pollen when dependable seed production or genetic diversity matters.