
Bagging Adenium Seed Pods: The 70-Day Catch Window
Bagging Adenium seed pods before they split is a timing game. Pods ripen in roughly 70 days, then burst. Learn the seam cue that tells you when to bag.
Rachel Torres · 2026-08-26 · 10 min read
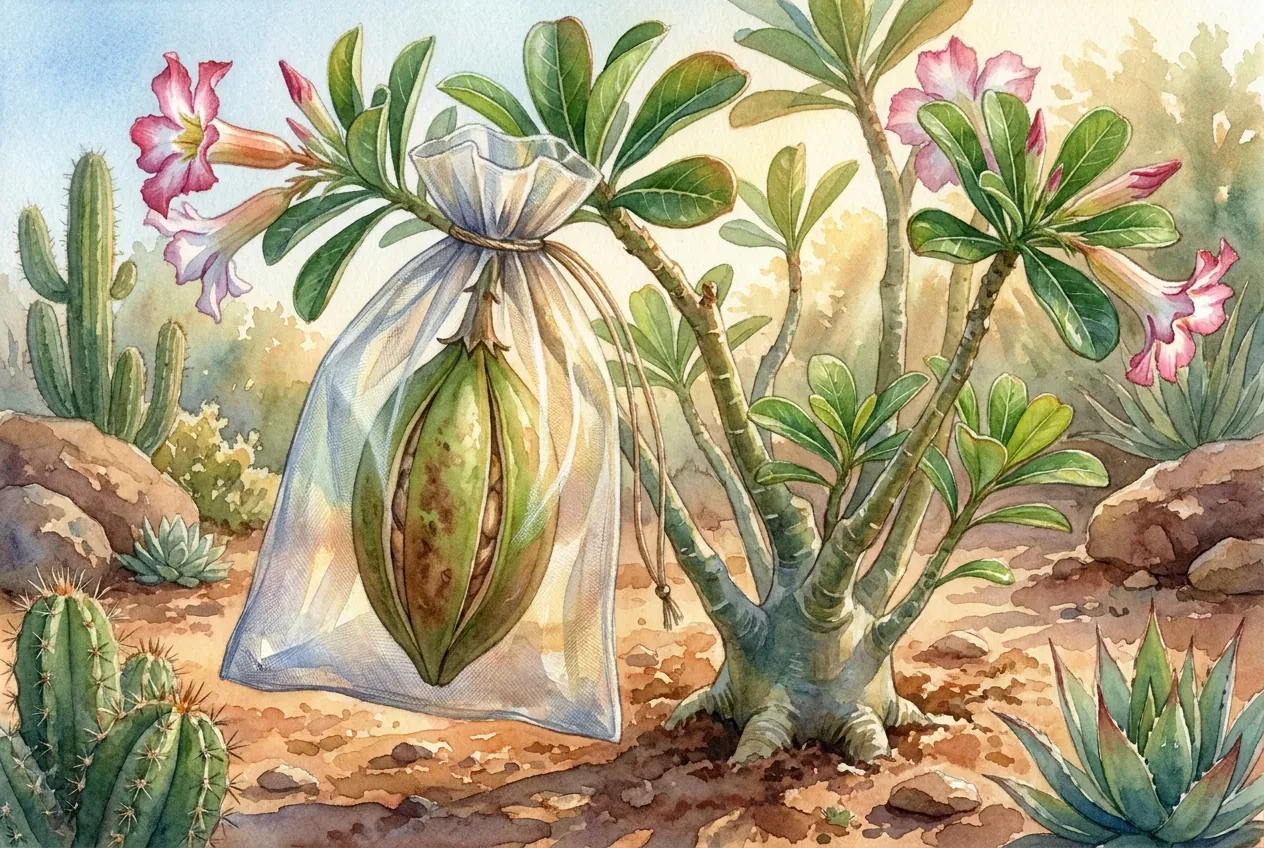
Key Takeaways
- An open Adenium pod is an empty pod, so bag before it splits, not after.
- Pods ripen in roughly 60 to 90 days, centered near 70 in warm conditions.
- Bag on the first straw-colored seam break or hairline crack, never on a gap.
- Use breathable fine mesh, not sealed plastic, and secure below the pod.
- Sow fresh, because Adenium seed germinates in about a week at high rates.
An Adenium seed pod does not wait for you. It dries, it splits along one seam, and the seeds ride the wind out of reach within hours.
If you want those seeds, the bag has to be on the pod before that split, not after.
Start watching before the pod looks fully ripe. Around day 55, the calendar triggers daily seam checks. The first straw-colored break triggers the bag, so the seam decides the action.
Why an open pod is already an empty pod
An Adenium fruit is a follicle, a dry fruit built from a single carpel. At maturity it opens along one longitudinal seam and lets its seeds go.
The pod is not a container that holds seeds. It is a launcher that releases them.
Each seed carries a coma, a tuft of fine silky hairs, at both ends. That coma works exactly like a dandelion parachute. A light seed with twin parachutes travels far from the parent plant on the smallest breeze.
Once the seam parts, any air movement empties the pod, so an open pod is effectively a lost pod. Growers describe mature pods that burst at the slightest touch and send seeds flying.
Waiting to collect after the pod opens usually leaves you holding an empty husk.
This is why the plan is a catch, not a harvest. You are placing a net around a device engineered to fling its contents. The net has to be there first.
The maturation clock, from pod set to split
You get a pod when a pollination takes. From that pod set, the follicle needs time to fill and dry before it can open.
Knowing that span is what lets you plan the bag instead of reacting to a mess of scattered seeds.
How long does an Adenium pod take to ripen
The honest answer is a range, roughly 60 to 90 days. Hobby growers repeatedly report about 70 days to a pod that then splits. A peer-reviewed study on manually pollinated plants reported dehiscence beginning about 90 days after pollination.
Both figures are correct because fruit development scales with warmth. A hot windowsill or a summer patio ripens a pod faster than a cool indoor room.
Treat 70 days as your warm-conditions estimate and stretch toward 90 when it is cool.
Use the day count only to decide when to start watching, never as the day to harvest. The same cultivar can split near day 62 in summer heat and near day 85 in a cool room.
The calendar sets a watch date, and the pod itself sets the split date.
How to date a pod you never recorded
Plenty of growers notice a pod weeks after it set. You can still place it on the clock using two features. Length plateaus before color changes, so a full-size still-green pod is mid to late in the cycle.
A mature follicle reaches roughly 15 to 25 centimeters long. When such a full-length pod starts losing its uniform green, it is near the end. A full-length pod with any color break should be bagged now, whatever its unknown age.
Reading a pod that is about to split
This is the part that saves your seeds. The pod tells you it is close before it opens, and the clearest signal is the seam.
Watch it daily near the end and you will bag in time.
The color sequence, in order
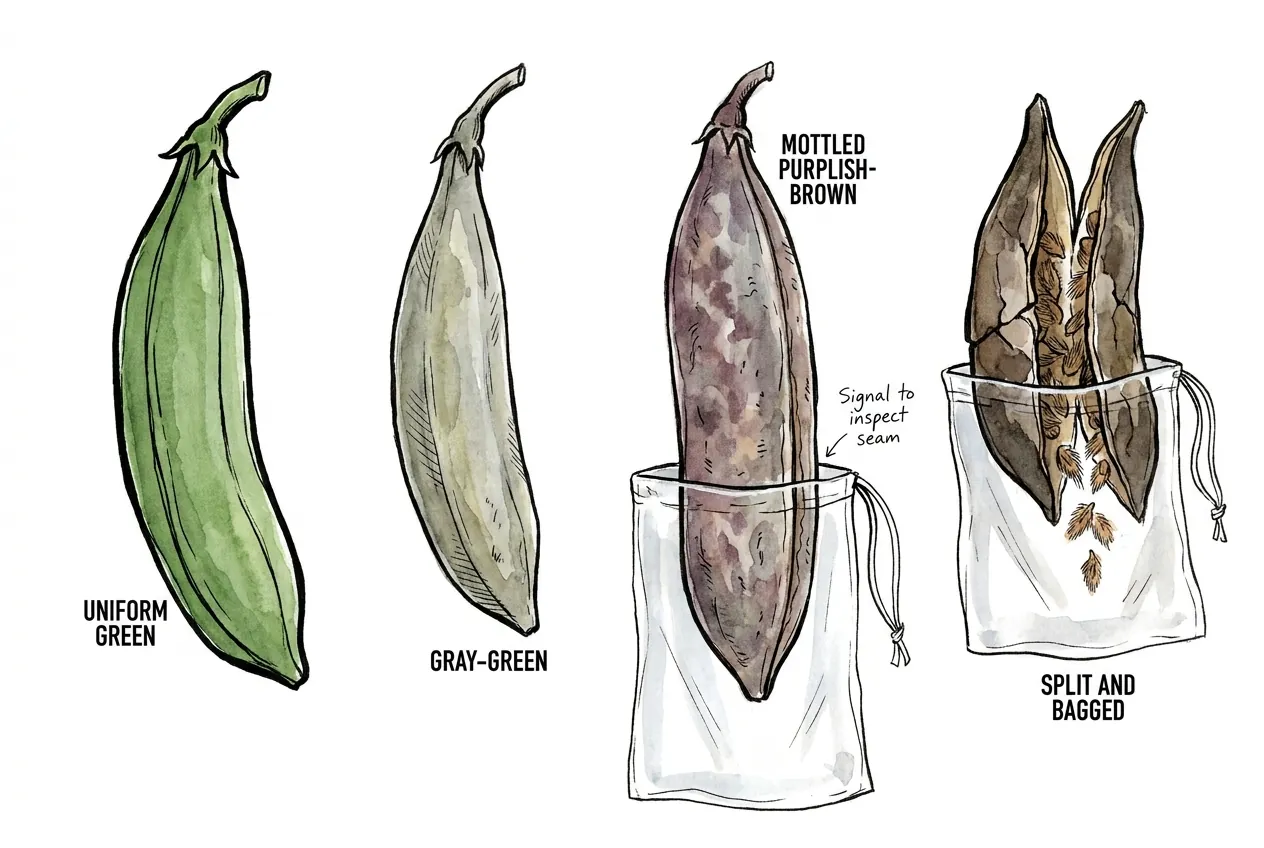
The pod moves through a predictable color path as it dries. It goes from uniform green, to a dull gray-green, to a mottled purplish or gray brown near the end of the roughly 70 day cycle. Color change tracks drying, and drying is what triggers the split.
Any loss of uniform green is your signal to start inspecting the seam closely every day. The seeds inside are already mature by the time color shifts. From here the pod can open within days.
The seam is the real trigger
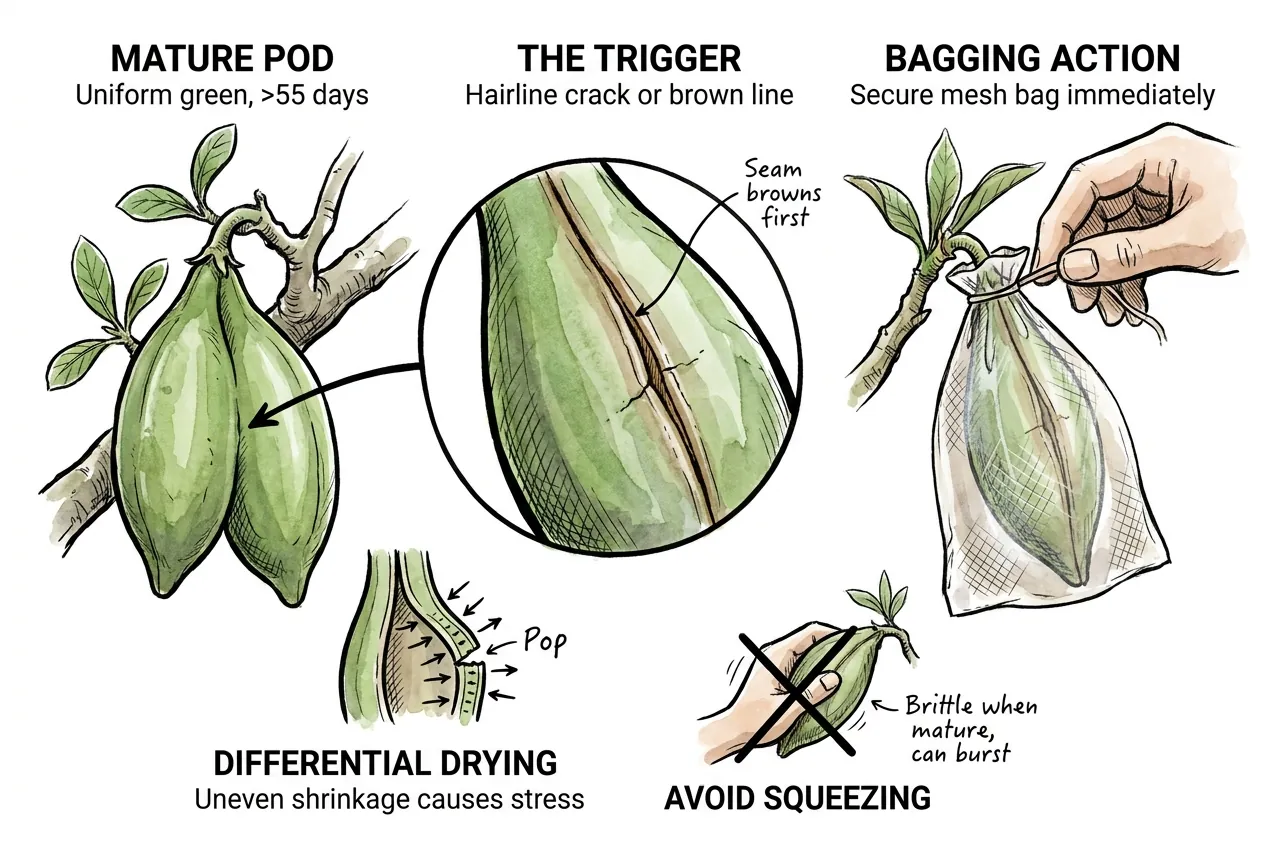
Dehiscence happens along one longitudinal suture, not across the whole pod. That seam browns and cracks before the rest of the pod fully changes. So the seam is the earliest reliable go signal.
The physical cause is differential drying. As the follicle wall dries, its cells shrink at different rates, and that uneven shrinkage concentrates stress along the pre-programmed suture. When the stress passes a threshold, the seam pops open.
Once either follicle passes day 55 or loses its uniform green, I label the pair L and R on a dated pod photograph. I check each seam daily under the same bright, indirect light. The labels matter because paired follicles can dry and open on different days.
A white card behind the seam makes a straw-colored break or hairline crack easier to separate from shadow. I bag that follicle on the first visible break and never squeeze it. The seam cue overrides the calendar because heat and cultivar shift the actual split date.
How to bag the pod so it actually catches
The bag has one job, to catch comose seeds while letting the pod dry and split on schedule.
Get the material and the placement right and the catch is nearly automatic. Get them wrong and you trade lost seeds for moldy ones.
Pick a breathable fine mesh, not sealed plastic
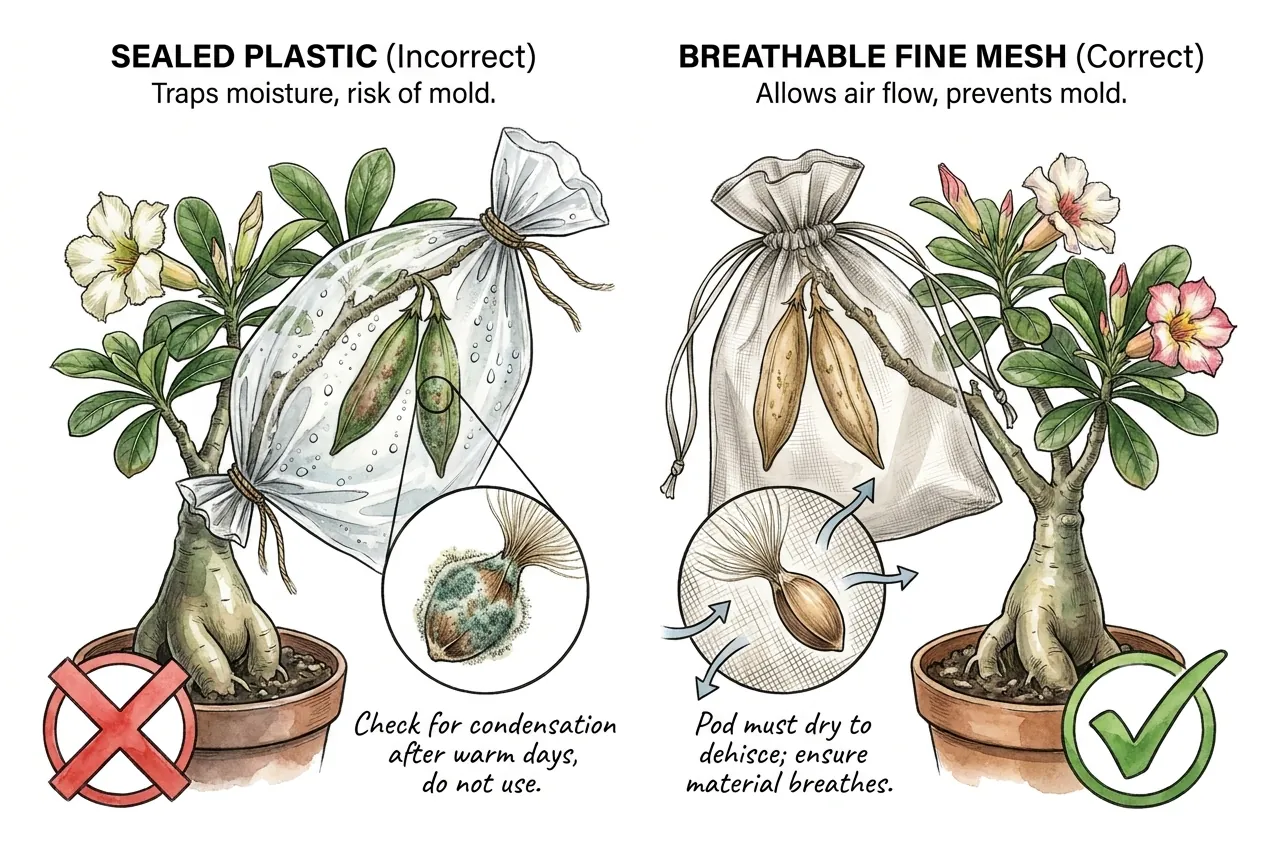
A seed with its coma attached is far larger than a bare seed. That means a fine mesh with small openings still traps it while air passes freely. Organza gift bags, fine nylon mesh, muslin, and a cut nylon stocking all work.
The material must breathe, because dehiscence depends on the pod continuing to dry. A sealed plastic bag traps transpired and ambient moisture around a warm pod. That condensation can mold the seeds and can slow the drying the pod needs.
Use a breathable bag with openings small enough to trap a comose seed, and reject sealed plastic outright. I inspect the bag at dawn after its first night and again one hour after sun or lights reach it. If the fabric feels damp or droplets remain, I replace it with drier, more open mesh because trapped moisture can mold seed and delay drying.
Secure below the pod, snug but not tight
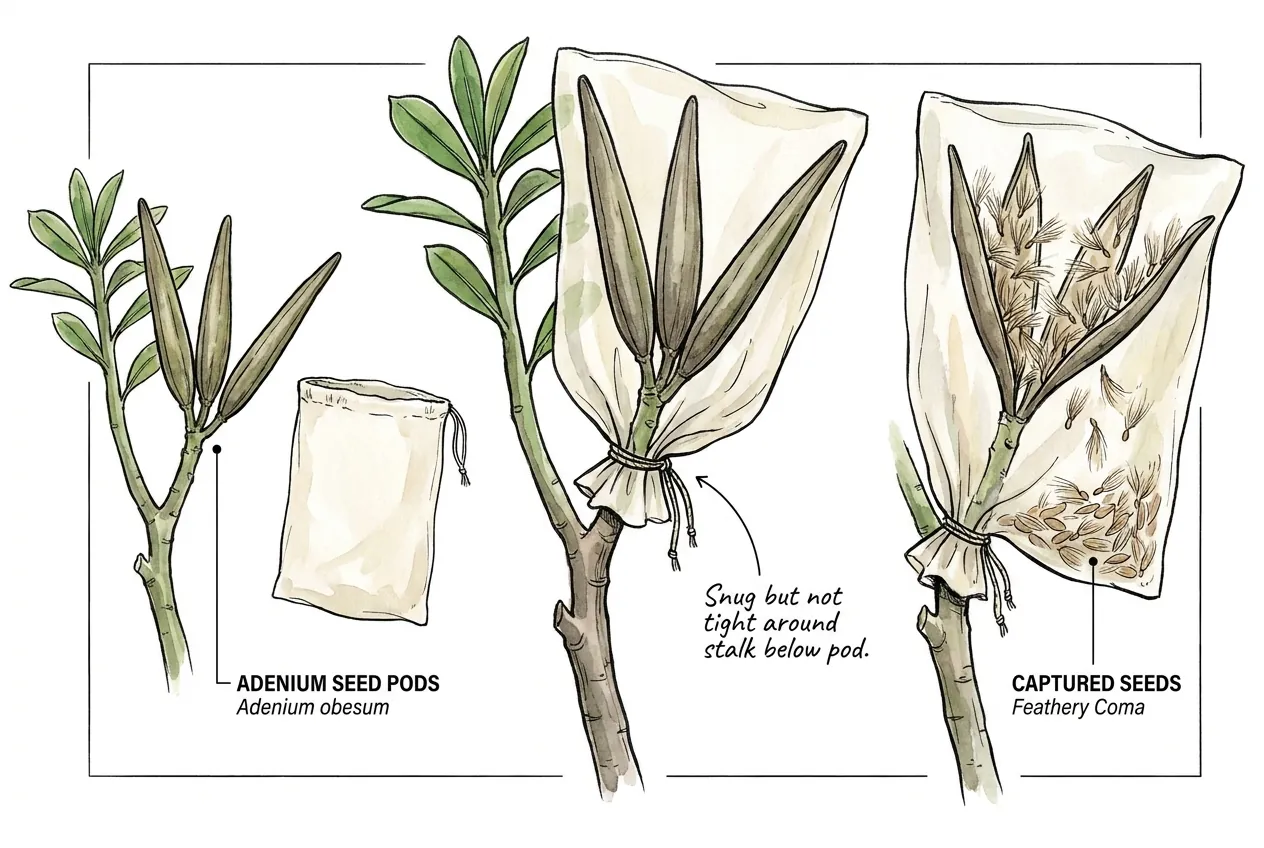
Tie or cinch the bag on the woody stalk below the pod, not around the pod itself.
When the paired follicles split, the loose seeds fall downward into the body of the bag. A closure below them catches everything.
Use the bag’s drawstring or a soft tie. Keep it snug enough that seeds cannot escape and loose enough that you do not girdle the stem.
If the pod sits high on a leggy plant, secure further down on woody stem and the falling seeds still land in the bag.
At harvest, I support the still-closed bag and clip the stalk below its closure without loosening the drawstring. I carry the sealed catch to a white tray and open it only there. This order contains seeds released by cutting and makes pale, flat seed easy to separate from plump brown seed.
Getting a pod worth bagging
If you have no pod yet, the catch window is moot. Most Adeniums will not set seed on their own, so reliable pollination comes first.
Adeniums are generally self-incompatible, so two different plants usually have to exchange pollen. Some cultivar pairings simply do not take. Keep at least two unrelated Adeniums flowering together if seed is your goal.
Hand pollination is the dependable route indoors. The flower is receptive about two to three days after it opens, and the pollen should be slightly sticky.
Placing that pollen on the correct part of the stigma is the step that most often decides success.
Log the day you first see a small chili-pepper-shaped pod as your pod set date. A successful pollination makes the flower droop and drop within about four to five days.
The tiny pod then appears within about seven to ten days, and that date starts your maturation clock.
What the pod and seed actually look like
A little anatomy makes every cue above obvious. The fruit is a pair of follicles, often fused at the tips and shaped like two curved horns.
Each carpel of the flower becomes one follicle, and each opens along its own seam.
The pods are long but narrow. In a two-year seed study, fruits averaged 18.7 to 20.0 centimeters long and 12.9 to 13.3 millimeters in diameter.
Each follicle can hold anywhere from 28 to 118 seeds, so a single successful catch is worth real effort.
Each seed is a slender brown cylinder about 9 to 12 millimeters long and about 2 millimeters across.
At both ends sits a coma of fine bristles, giving each seed twin parachutes. That bilateral coma is why the seeds fly and, usefully, why fine mesh can still trap them.
This also tells you what a real seed looks like in the bag. Keep the plump brown cylinders wrapped in fluff. Discard the pale, flat, or empty wisps, which are immature or unfertilized.
After the catch, sow while the seed is fresh
A caught seed is only valuable if you use it well. Fresh Adenium seed is the whole prize here. It germinates fast and at high rates, and both fall as the seed ages.
Fresh seed often sprouts within about a week. Reported emergence runs from roughly 85 percent up to 98 percent on suitable fast-draining substrates, and near 100 percent on some commercial mixes.
Aim to sow within days to a few weeks of the catch.
If you cannot sow now, storage buys time. Cool, dry, airtight storage holds viability up to about 12 months, best in an airtight container in the refrigerator. Warm or humid storage shortens that sharply.
Sow shallow in a warm, fast-draining mix and keep it damp rather than wet. Press seeds onto the surface and barely cover them, at about 25 to 30 degrees Celsius.
The coma can stay on or be pinched off, since it does not block germination.
Use the caudex seed germination setup to choose the medium, heat, and moisture, then sow the catch while it is fresh.
When the catch goes wrong
Even a good plan loses a pod now and then. The failures are predictable, and each one teaches the fix for the next pod. Here is how to read them.
An empty split husk with coma wisps at the rim means the bag went on too late. The seeds already dispersed. The fix is to move to daily seam checks near day 55 to 60 and bag on the first color break.
Fuzzy growth on the seeds inside the bag means trapped humidity. A sealed or poorly ventilated bag held condensation and molded the seed. Switch to open mesh, discard the moldy seed, and check weekly for condensation.
A small pod that yellows early and drops likely aborted, and sometimes only one follicle of the pair sets.
Bag any surviving horn, since a single follicle can still carry viable seed. Re-pollinate on the next flush for a better set.
Pale, flat, or thin seed is usually immature or unfertilized, so sow the plump brown cylinders and expect little from the rest. A partial catch still counts.
If the bag caught half the pod, keep that seed and sow it promptly.
The catch, in one line
The pod ripens in roughly 70 days, then can split open with little warning and gives you no second chance.
Watch the seam once the green fades, bag on the first straw-colored break with breathable mesh secured below the pod, and sow the caught seed fresh.
Do that and a single pair of follicles hands you dozens of desert rose seedlings instead of a lawn full of escapees.