
Winter Sunburn on Caudex at a Cold South Window
Winter sunburn hits caudex at a cold south window. Learn why chilled tissue scorches, how to tell scald from rot, and how to place plants safely.
Nathan Brooks · 2026-09-30 · 15 min read
Key Takeaways
- Winter south-window light is low-angle and strong, not weak, and lands hard on plants near the glass.
- Cold tissue cannot spend absorbed light, so the surplus bleaches its own pigments into pale scald.
- Scald tracks the sunlit face and stays dry, while rot is soft and spreads and dormancy drop is slow.
- Set plants back off the cold glass film and diffuse the beam instead of pressing them to the pane.
- Leave dry scarred tissue alone. Cut only when the margin turns soft and rot starts to spread.
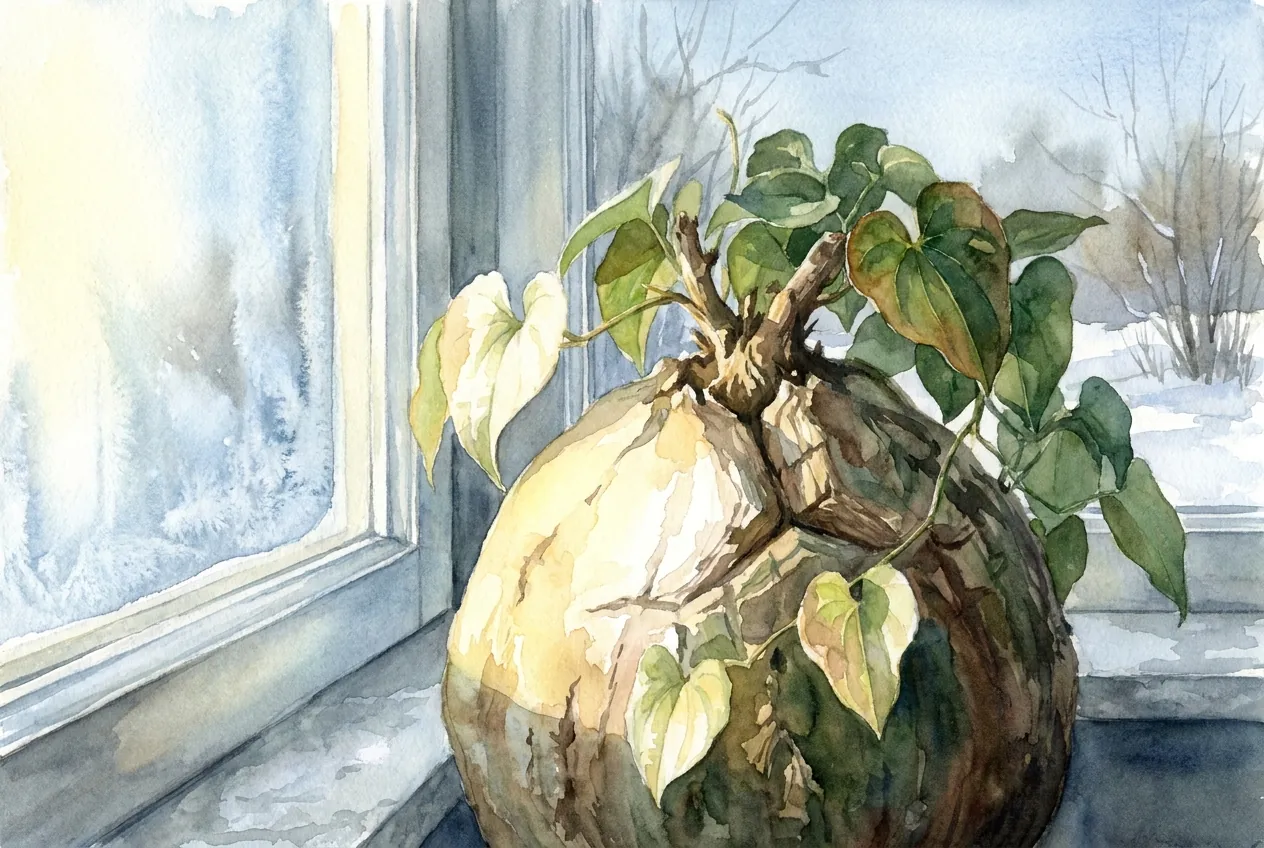
You brought the caudex in before the first hard freeze. You set it in the brightest spot you own. Now a pale bleached patch is spreading across the leaves facing the glass.
The room feels dim and the heater is running. Sunburn is the last thing you would suspect. That instinct is exactly what gets these plants scorched.
Winter light through a south window is low, not weak. When it lands on tissue chilled by the cold pane, the plant cannot use or safely dump the energy it absorbs. The surplus turns destructive.
This is winter-glass scald. It looks and behaves differently from summer sunburn, from rot, and from ordinary dormancy leaf drop.
Understanding how the damage happens is the first step to telling it apart, placing a plant so it stays bright without getting chilled, and dealing with tissue that already burned.
Why a cold bright window burns tissue that summer sun would not
A leaf handles bright light by spending the absorbed energy. In warm conditions it runs carbon fixation fast and keeps its antioxidant enzymes active. Excess light energy then has somewhere safe to go.
Chill that same leaf and both drains slow down while the light stays just as strong.
Photoinhibition is the light-induced drop in photochemical activity when absorbed energy outruns the machinery plus its protective systems. It depends on both temperature and light.
That damage rises nonlinearly as temperature falls and linearly as light intensity climbs. Cold does not dim the light hitting the leaf. It lowers the leaf’s ability to process that light, so a brightness that was harmless in September becomes damaging in January.
The mechanism is a mismatch of speeds. Cold slows the carbon-fixation enzymes more than it slows the light reactions. Light energy keeps pouring in, but the sink that would consume it is throttled.
Energy then leaks from the electron-transport chain onto oxygen. That leak generates reactive oxygen species such as singlet oxygen, superoxide, and hydrogen peroxide. These oxidants bleach the plant’s own pigments.
The pale bleached scald on the glass-facing leaves is photooxidative pigment damage from light energy the chilled tissue could not spend. In chilling-sensitive plants below roughly 10 degrees Celsius, this light- and oxygen-driven bleaching has its own name, chilling-enhanced photooxidation.
Not every plant burns equally. Photoinhibition in chilling-resistant plants runs about half that in chilling-sensitive plants under the same stress. The difference comes largely from keeping antioxidant defenses working in the cold, and a pampered indoor caudex sits at the vulnerable end.
Winter south-window light is stronger than it looks
This catches people out because the room looks dim while the beam on the plant is intense.
Your eyes adjust to the average brightness of the whole scene. The plant pressed to the glass sits in concentrated direct radiation, not in the room average.
The winter sun sits low in the sky. Its beam strikes a south pane at a more head-on angle and drives deep into the room.
South windows still deliver plenty of direct light in winter, and the low angle simply throws it farther onto anything near the glass.
Passive-solar house design relies on exactly this effect to heat rooms through the cold months. That tells you how much energy the low beam actually carries. So the intuition that indoor winter light is too feeble to hurt anything fails in the one spot where growers most often park their plants.
A clear south window in midwinter can put a hard direct beam onto a chilled plant even while the rest of the room looks gloomy.
Telling winter-glass scald apart from rot, cold shock, corking, and dormancy drop
Four different problems show up on plants after the autumn move. The wrong diagnosis leads to the wrong fix. Location, color, texture, and timing separate them cleanly.
The scald pattern tracks the beam
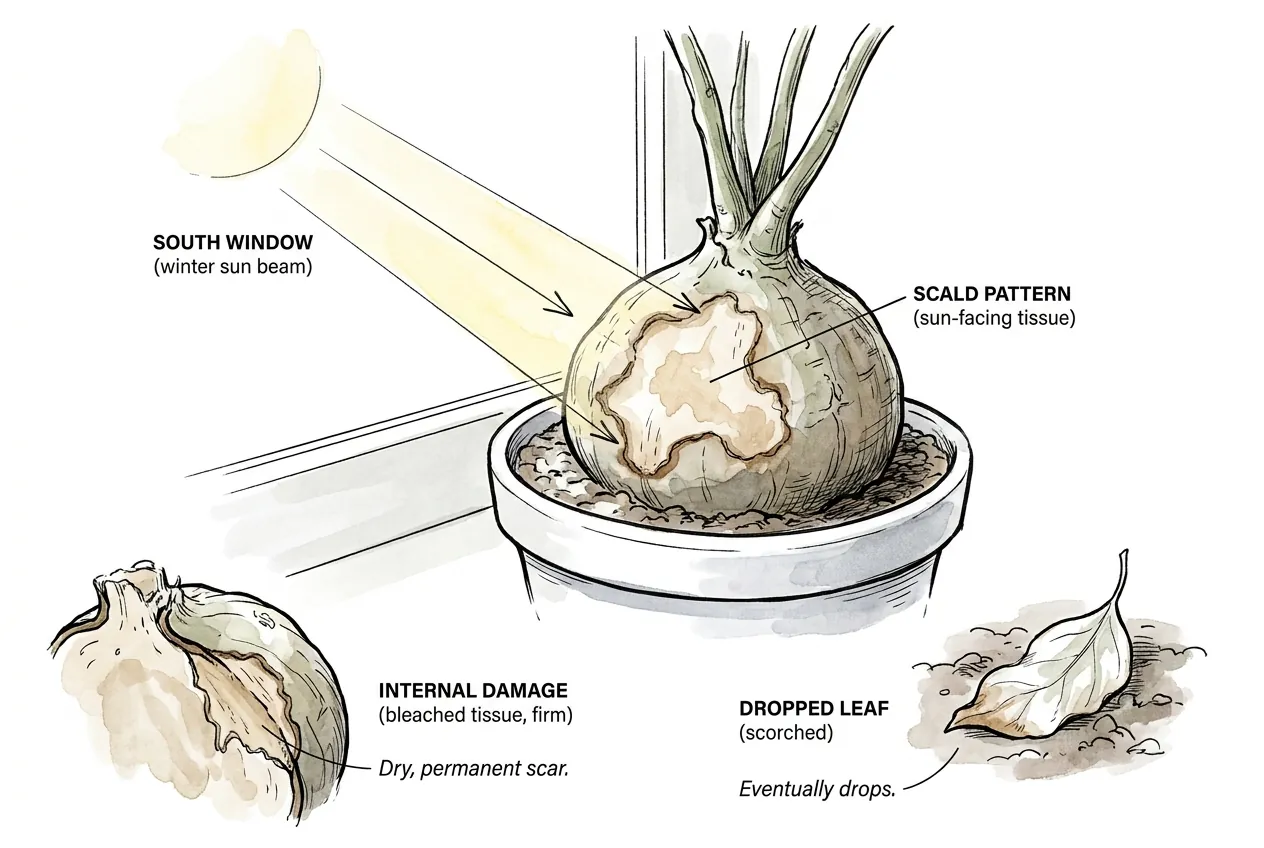
Light scald appears on the sun-facing surface, the exact tissue the beam hits. It starts pale, whitish, or bleached from lost pigment. It can dry to a tan or brown patch that is firm, not wet.
The dead area does not turn green again. Scorched leaves often drop eventually, and damaged stem or caudex tissue calluses into a permanent scar. This one-directional, dry, sun-facing pattern is the signature of light damage.
Rot tracks water and spreads
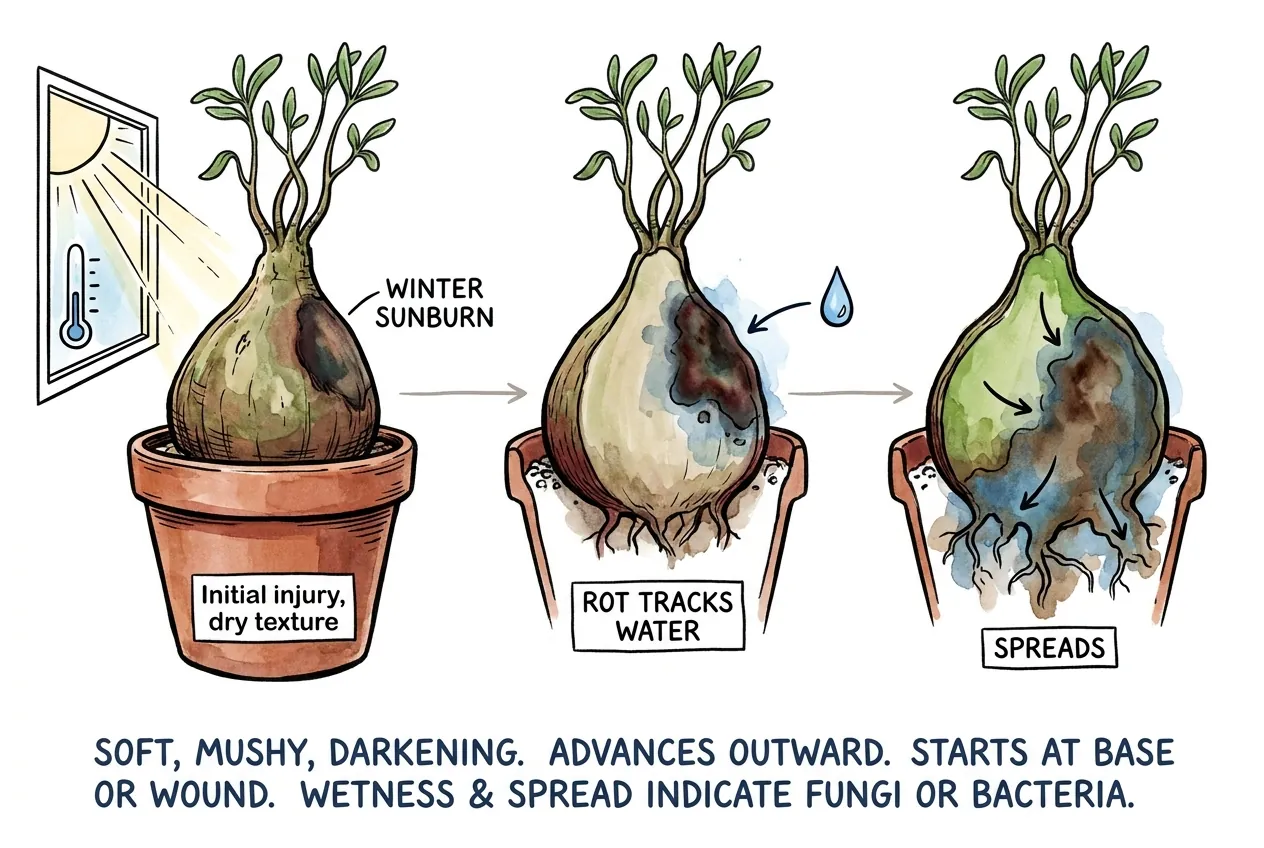
Rot is soft, mushy, and darkening, and it advances outward over days. It usually starts at the base, the roots, or a wound rather than only on the lit face. The tell is wetness and spread.
A scorched spot that turns soft or starts creeping into healthy tissue is no longer simple scald.
It is fungi or bacteria moving through the injured tissue. That needs a different response.
Cold shock, corking, and dormancy drop each have their own tell
Cold-shock damage lands on the coldest tissue, the leaves and tips nearest the glass and in the draft. It is not confined to the lit face. Corking is normal dry brown roughened bark that builds slowly with age and is tied to no recent event.
Acclimation leaf drop after the move is whole intact leaves yellowing and falling over weeks. The plant is adjusting to lower total light and dormancy cues. It is not a bleached patch on one face.
Scald tracks the beam, cold shock tracks the cold, rot tracks water and spreads, and corking and dormancy drop unfold slowly. Hold a suspect plant to that four-way test before you reach for a knife.
Why chilled roots and closed pores make it worse
The cold does more than slow the leaf chemistry. It shuts the plant’s cooling systems at the same time.
Low temperature and cold-induced water stress push stomata toward closure. Cold root-zone temperature also lowers root hydraulic conductivity, which limits how fast water moves from a chilled root system into the leaves.
A caudex leaf already runs on limited transpirational cooling, so a chilled succulent at a bright window has little way to shed the energy it absorbs.
Many succulents make this worse by design. Crassulacean-acid-metabolism plants such as cacti and many caudiciforms open their stomata at night and keep them largely closed by day.
Their pores are already shut during the exact hours the cold window beam is strongest.
Under a bright cold window a succulent has almost no way to spend or shed the energy it absorbs. That dead end feeds straight back into the photooxidation that bleaches the tissue.
A water-thrifty leaf cannot sweat off a strong beam the way a thin garden leaf can.
Which plants burn first at cold bright glass
Chilling sensitivity decides which plants on a shared windowsill actually bleach. A hardy rosette and a tropical caudex can sit in the same beam, and only the tender one scorches.
So the practical question is where each plant falls on the cold-tolerance scale.
Cold-hardy succulents such as many Sempervivum and Sedum tolerate hard freezes down to 0 degrees Fahrenheit or lower and shrug off a chilly pane.
Tropical caudiciforms and soft succulents do not share that tolerance. Guidance for tropical succulents such as Euphorbia commonly sets a preferred minimum near 50 to 60 degrees Fahrenheit, well above the temperature a single-pane surface can reach.
That gap matters for placement. A Sempervivum can sit closer to cold glass than an Adenium, a Pachypodium, or a tropical Euphorbia can.
When you group plants at one window, put the tropical caudex furthest from the pane and let the truly hardy species take the coldest edge.
Newly imported or freshly repotted caudex plants deserve extra caution. A plant still rebuilding roots moves water even more slowly, so it has less capacity to spend a strong beam. Give it the gentlest spot until it is clearly re-established.
Sort your plants by cold tolerance before you sort them by light, because the coldest bright spot is only safe for a genuinely cold-hardy species.
Placing a plant so it stays bright without getting chilled
The fix is a placement problem, and it turns on one fact about windows. The cold lives in a thin film right at the glass. The light fades far more slowly with distance, and that gap is your lever.
The cold air film sits right against the glass
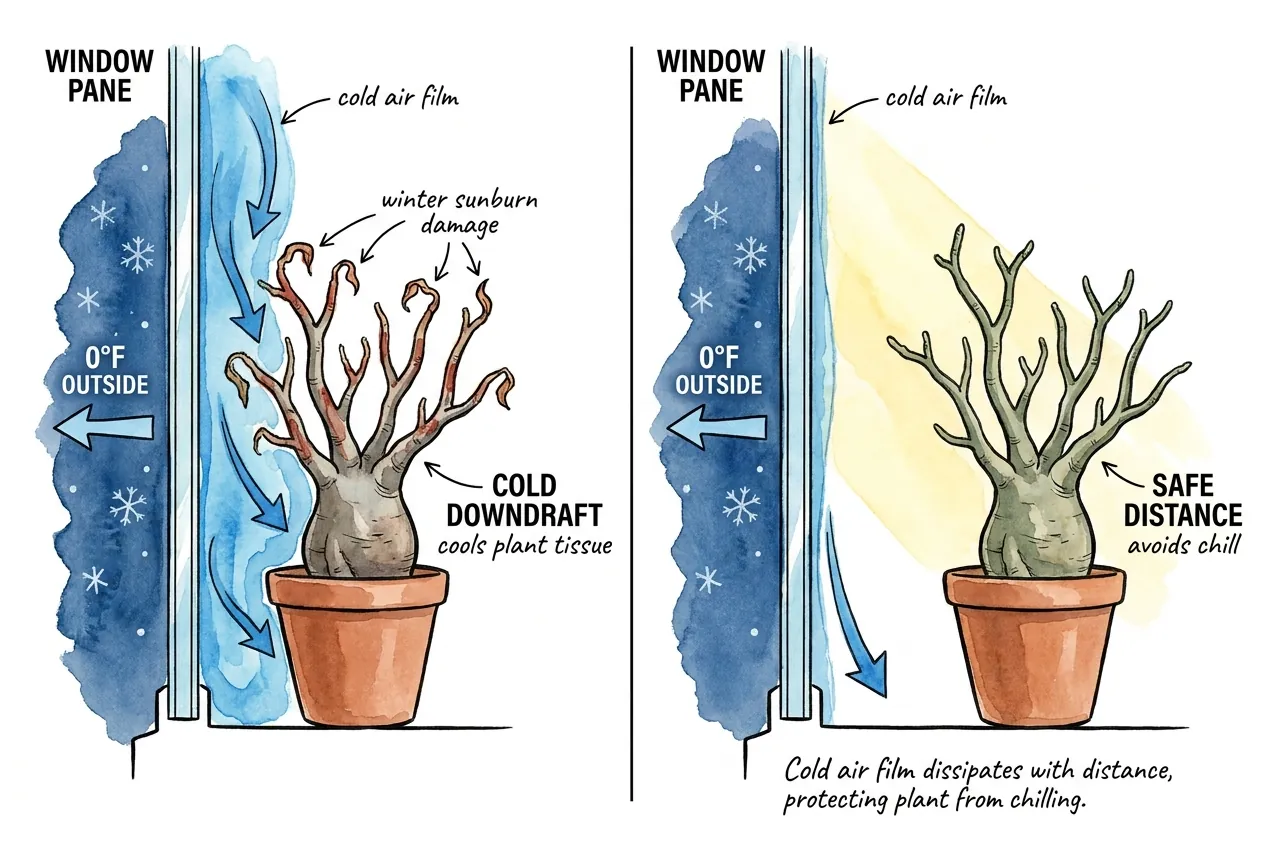
The interior surface of a single-pane window in cold weather can fall far below room temperature.
Glass conducts heat away roughly ten times faster than an insulated wall. On a hard winter night that inside face can drop toward the outdoor temperature.
That cold glass chills the air right against it. The cooled air sinks and slides toward the floor as a cold downdraft, and a plant pressed to the pane sits inside that film.
Move the plant back a modest distance and most of the cold film falls away while most of the usable beam stays.
Measure the chill gap before you trust a spot
Distance is easy to eyeball by light and easy to get wrong by temperature, because the cold film is invisible. I read it directly instead. I clip one min and max probe at the leaf tip closest to the pane and a second probe at the same height about 30 centimeters into the room.
I read both at the coldest clear pre-dawn hour and again under the midday beam. If the near-glass probe runs more than 4 degrees Celsius below the room probe at the pre-dawn low, I move the plant back.
I keep moving it until that gap closes to about 2 degrees or less before trusting the spot for a chilled, high-light plant.
The 4-degree gap is my own conservative working rule, not a published standard. I use it because single-pane surfaces sink toward outdoor temperature. The near-glass air deficit that follows is what turns strong winter light into scald.
Diffuse, buffer, and time the move
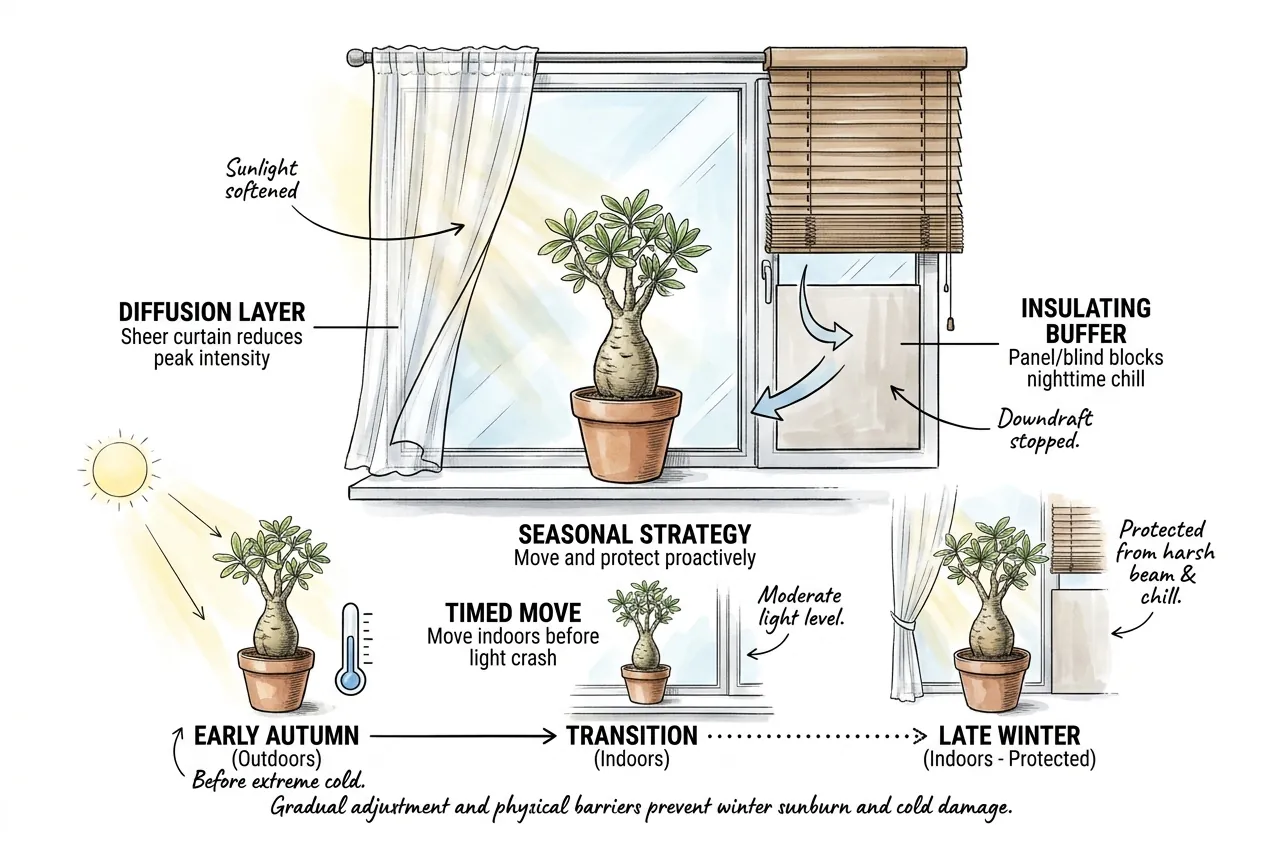
Two more moves cut the risk. A sheer layer over the pane during the risky first weeks trims peak direct intensity without darkening the room much. That is exactly what a chilled plant rebuilding its defenses needs.
A closed blind or a panel between plant and glass at night raises the surface temperature the plant faces and blocks the downdraft.
Timing matters too. Move plants indoors before outdoor light and cold have fully crashed. The plant then steps between two moderate light levels instead of slamming from collapsed autumn light into a hard winter beam.
Sometimes the honest answer is that your only bright spot is a cold single pane. Then the plant needs light without the chill, and the decision moves to gear. The site’s winter grow-light and overwintering setup guide covers supplemental light and overwintering gear for that case.
Acclimating a plant to a bright cold window without scorching it
A plant grown at lower autumn light has stopped building its full set of protective pigments.
So a sudden jump to a hard direct beam is what scorches it. Acclimation is a real biological process with real timing.
Fast photoprotective responses run in minutes. Full dynamic acclimation of the photosynthetic apparatus takes about a week, and the chronic damage that scald represents can take days to appear and weeks to repair.
Cold stretches all of that out, because the repair and pigment building depend on enzyme activity that slows in the cold.
So I ramp exposure rather than dropping the plant straight into full sun. I start it at roughly one third of the spot’s peak daily direct-beam window, using a sheer diffuser over the pane.
Then I remove the diffusion in steps across about two weeks while watching the most exposed leaf face.
At the first sign of a pale or bleached patch on that face, I hold the current level or step back one. The two-week pace is my conservative working rule. It is built on the roughly one-week acclimation window plus the days-to-weeks repair time, stretched because cold tissue adjusts more slowly.
Published hobby ramps for the reverse move use a similar shape. They give a few days in bright indirect light, then direct sun near 20 to 30 minutes a day that increases every couple of days. That is a reasonable anchor for the pace.
Watch the plant, not the calendar, and let the first bleached patch stop the ramp.
A checking cadence for the first weeks indoors
Scald can take days to show, so a fixed rhythm of checks catches it before it spreads.
I run a tighter cadence for the first two weeks and then ease off as the plant proves the spot is safe.
For the first three days after the move, I look at the glass-facing leaves once each day under the midday beam.
That is the window when a fresh placement error shows first. I lift the sheer diffuser only long enough to read the exposed face, then set it back.
From day four through day fourteen, I check every second day and note the most exposed leaf face against the last look.
The signal I watch for is any new pale or bleached area that was not there before.
A patch that appears between two checks is the cue to stop advancing the ramp until the face stays clean.
I also touch-test any suspect spot at each check. A firm dry patch is settled scald that I leave alone. A spot that feels soft or looks darker than the last check is the rot cue that moves me from watching to cutting.
Once two weeks pass with no new bleaching at full exposure, I drop to a weekly look for the rest of winter. A short daily check in the first three days is the cheapest insurance against a scald patch you cannot undo.
What to do with tissue that already scorched
The first instinct after finding scald is to cut it off. Resist it. If the damaged area is dry and firm, leave it in place.
It will never green up again. Dry scald tissue acts as a protective barrier while the plant walls off the injury and grows around it.
Cutting it opens a fresh wound in cold, low-transpiration conditions that heal slowly, and partially damaged firm leaves should stay because they keep funding the recovery.
The one exception is spreading wet rot. If a scorched area turns soft, mushy, or starts creeping into healthy tissue, fungi or bacteria have entered the wound.
Cut back to clean firm tissue with a sterile blade and let the cut callus in dry air before you water normally again.
The place to watch is the margin, not the center. A dry sealed unchanging edge is a healed scar. A darkening softening advancing edge is the rot signal that triggers cutting.
Match your response to what the tissue is. A leaf with a firm bleached patch but a still-green base keeps photosynthesizing on its healthy area, so leave the whole leaf attached.
A leaf that has gone fully crisp and papery has stopped contributing, so let it abscise on its own rather than tearing it and opening the stem.
Caudex or stem scald is the case where patience pays most. The chilled, low-transpiration plant seals a dry lesion into corky scar tissue slowly, and every cut you make competes with that same slow healing budget.
Leave a firm dry stem lesion alone and let it callus, and reserve the blade for tissue that has already turned soft.
When you do have to cut into soft rot, cut in dry conditions and stop at clean firm tissue with no discoloration in the exposed face.
Let the cut dry and callus before the plant meets water or the cold beam again.
A fresh wet cut in cold mix is the exact setup that invites the next round of rot.
Move the plant out of the cold beam so surviving tissue can recover. Keep it in gentler light while it rebuilds pigment, and resist the urge to overwater into cold mix. Recovery is limited and one-directional, so the real win is preventing the next patch rather than fixing the last one.
The short version
Winter-glass scald is not a light-intensity problem. It is a cold-tissue problem meeting strong low-angle light. The beam through a clear south window is powerful even when the room looks dim.
A plant chilled by the cold pane cannot spend or shed the energy it absorbs, so the surplus bleaches its own pigments. Diagnose it by the sun-facing dry pattern. Keep it apart from rot, cold shock, and dormancy drop, and fix it with placement rather than a knife.
Set the plant back off the cold film and measure the chill gap if you want to be sure.
Give the coldest bright spot only to a genuinely cold-hardy species and keep tender caudex plants back from the pane.
Diffuse and ramp the light over about two weeks, and leave dry scarred tissue alone unless the margin goes soft.
Check the glass-facing leaves daily for the first three days and then ease off as the spot proves safe. Prevent the next patch, because the last one is already permanent.