
Adenium Caudex Soft in Late Summer? Fix Desert Rose Rot
Is your adenium caudex soft in late summer? Learn to tell rot from dormancy, apply a fungicide-free drench, and cut above the rot line to save it.
Derek Kim · 2026-08-13 · 12 min read
Key Takeaways
- Soft and mushy near the soil line with a sour smell means rot, not dormancy. A dormant plant deflates evenly but stays firm underneath.
- Late summer rots caudexes because warm wet soil meets a plant that has slowed its water use. Watering on the July schedule leaves the pot soggy and low on oxygen.
- Pour on dilute 3% peroxide only as short-lived first aid, because no drench un-rots dead tissue. The oxygen boost fades in minutes and mostly adds water the soil did not need.
- Cut above the rot line to firm white tissue, then callus and re-root dry to stop the spread. Any soft brown left behind keeps rotting upward.
- Prevent recurrence with a gritty fast-draining mix, a draining pot, and less water as days shorten. A pot that never sits in water starves the water molds that cause rot.
A firm desert rose caudex should feel like a slightly underripe avocado. When you press it in late August and your thumb sinks into something soft, the plant is telling you the root zone has gone wrong.
That squish is almost never dormancy. It is usually the first sign that rot has moved from the roots into the base of the trunk.
Use the symptoms to separate active rot from seasonal softness before treating anything. Late-summer warmth can leave a slowing plant in wet soil. A fungicide-free drench may limit immediate risk, while cutting back to firm tissue may be necessary once rot has spread.
One promise up front. Rotted tissue does not un-rot, and nothing you pour on the soil turns brown mush back into living wood.
What a good rescue does is halt the advance and protect the healthy caudex above and around the damage.
Is a Soft Caudex Actually Rot, or Just Dormancy?
Press the caudex near the soil line and read what it tells you. Firm and heavy means healthy, while soft, wrinkled, and light usually means thirst or dormancy. Soft, mushy, and darkening at the soil line, especially with a sour smell, means rot rather than dormancy.
A dehydrated or dormant Adenium deflates evenly and stays firm underneath. NC State Extension describes the desert rose as quite drought tolerant, built to dry out between waterings and store water in that swollen stem.
A caudex that wrinkles after a dry spell but springs back after a careful drink was never rotting.
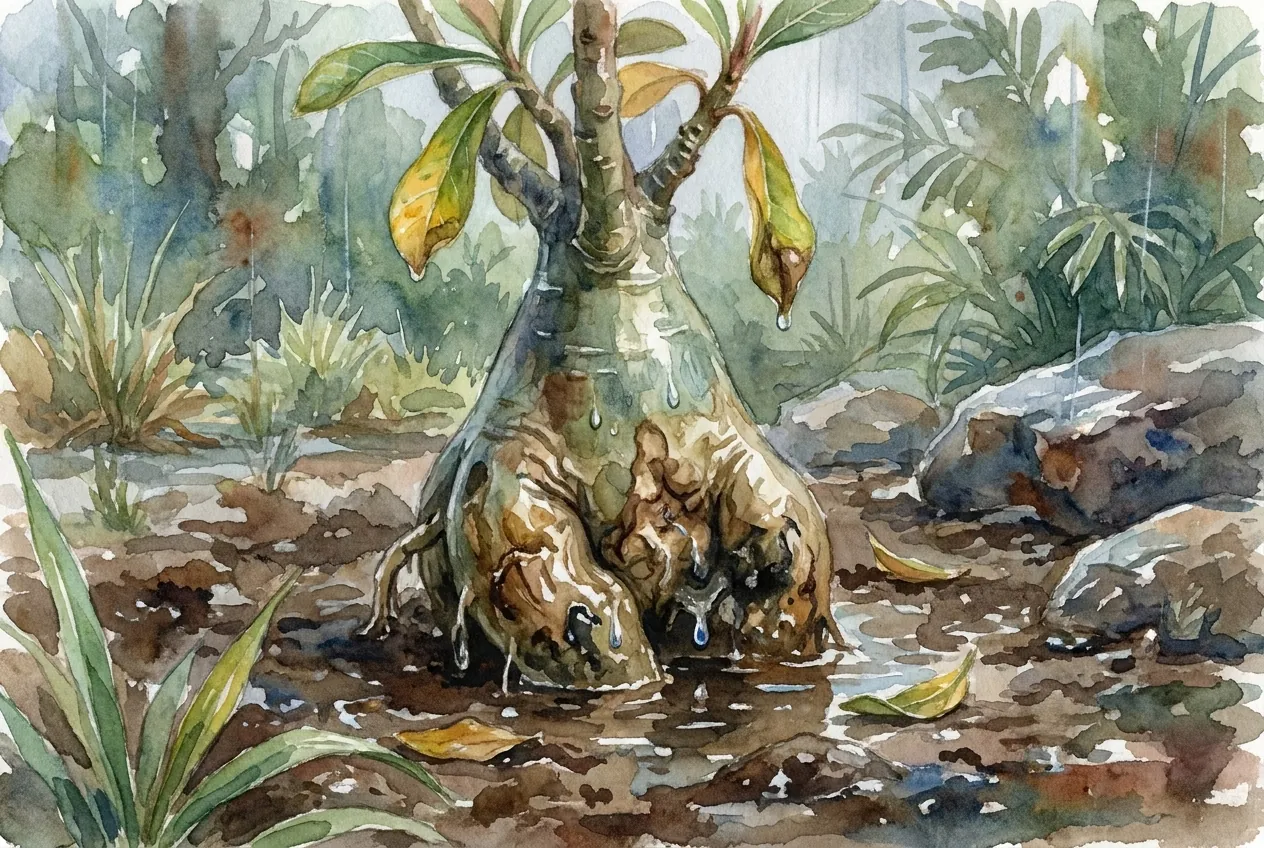
Rot behaves differently. The softening starts low, near the soil line where roots meet stem, and the surface may look bruised, feel wet, or weep.
Michigan State University notes that root rot symptoms overlap so much that even experts often confirm the pathogen with a lab, so trust the physical signs over guesswork.
The Quick Home Field Test
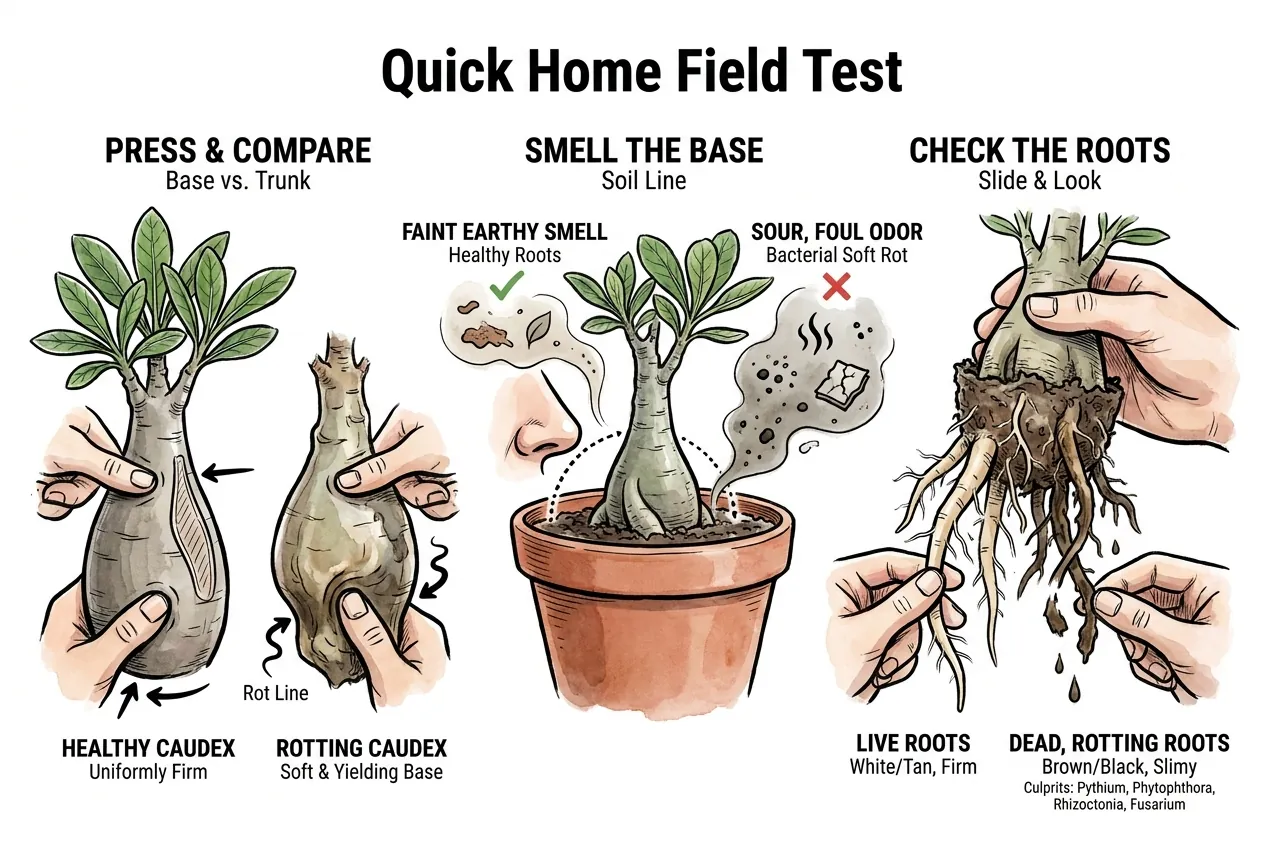
Do these three checks before you cut anything. They take five minutes and tell you whether to act or wait.
Press and Compare
Press firmly near the base, then press higher up the trunk. A healthy caudex feels uniformly firm. A rotting one is soft and yielding low down and firmer higher up, marking a rot line you can feel with your thumb.
Smell the Base
Lean in and smell the soil line. Healthy roots and stem smell faintly earthy or of nothing at all. A sour, foul, or sewage-like odor points to bacterial soft rot, which breaks tissue into a wet mush.
Check the Roots
Slide the plant out of the pot and look. White or tan firm roots are alive, while brown or black roots that feel slimy and slough off between your fingers are dead.
The University of Wisconsin lists Pythium, Phytophthora, Rhizoctonia, and Fusarium as the usual culprits behind that collapse.
Why Late Summer Is the Danger Window
Late summer combines three things that favor rot. The soil is still warm from summer heat, yet days are getting shorter, so the plant slows down.
Many growers keep watering on the July schedule, and the roots can no longer drink it fast enough.
That leftover water is the whole problem. Warm soil plus standing water plus a plant that has stopped drinking hard equals a soggy, low-oxygen root zone that rot exploits.
Clemson Extension notes that prolonged standing water and water-soaked soils drop soil oxygen sharply, and that root rot organisms take advantage of roots injured by excess moisture.
The pathogens waiting for that moment are water molds. Pythium and Phytophthora are oomycetes that spread through free water in saturated soil. Give them a warm, waterlogged pot in September and they move from the fine roots up into the caudex.
Bacterial soft rot piles on when tissue is already wet and warm. The University of Wisconsin reports that soft rot bacteria do their worst damage between roughly 70 and 80 degrees Fahrenheit, thrive when oxygen is limited, and enter through wounds.
A late-summer pot that stays wet checks every one of those boxes.
What a Drench Can and Cannot Reverse
Be clear-eyed about the word reverse. Dead, browned, mushy tissue is gone and will not regenerate. No drench rebuilds collapsed cells, so anyone promising to reverse an already-rotted caudex is overselling.
What you can actually reverse is the trajectory. Catch the softening early and you can stop the rot from climbing further and let the still-firm tissue seal itself off.
That is the real, honest win, and it is worth fighting for.
Think of it like a cavity in a tooth. You cannot regrow the decayed part, but you can remove the decay and protect what remains. Everything below is aimed at that outcome, not at a miracle.
The Fungicide-Free Drench, and Its Honest Limits
The popular fungicide-free option is a dilute hydrogen peroxide soil drench. The idea is simple. Hydrogen peroxide breaks down into water and oxygen, briefly raising oxygen in a soggy root zone and knocking back some surface pathogens.
There is real chemistry here, but also a real ceiling. Garden Myths points out that peroxide degrades within minutes, so the oxygen boost is fleeting. Treat a dilute peroxide drench as one-time first aid, not a cure, because it mostly adds water to soil that already had too much.
How to Mix and Apply It Safely
Use ordinary drugstore 3% hydrogen peroxide and dilute it before it touches soil. Reported plant-safe drench strengths land near 0.5 to 1%, made by mixing 1 part 3% peroxide with roughly 2 to 5 parts water.
Stronger than about 3% risks burning tissue, so do not pour the bottle in straight.
The plain first-aid peroxide from any drugstore is exactly the right product, with no added stabilizers you would not want near roots.
It only does anything as a one-time diluted drench after you have already fixed drainage. Skip it entirely if the caudex is already deeply mushy, because at that point cutting, not soaking, is the fix.
Apply it once, then stop and reassess. The drench is a supporting move that buys time while the soil dries, not something to repeat every week.
The far more powerful lever is letting the root zone dry out, which is what actually starves a water mold.
When I find a soft caudex, I do not add water merely to deliver a home remedy. I record current pot mass, hours since irrigation, delivered volume, 30-minute post-drain mass, root-zone temperature at the marked probe depth, collar appearance, and odor. I compare current mass with the same elapsed-time point from three healthy cycles because raw heaviness alone cannot identify slow dry-down.
I keep the treatment record separate from the rescue record. A saturated pot that improves after drying does not prove that any additive cured the problem.
In my rescue notes, a plant that worsens after another drench has also lost more time in the same risky condition. The immediate aim is to stop uncontrolled moisture and preserve evidence for the next decision.
Cutting Above the Rot Line
When the caudex is already soft, no soak will save it. You have to physically remove the rot until only firm, clean tissue remains. This is the step that actually stops the spread.
Grower consensus on desert rose rescue is consistent. Cut above the soft area and keep slicing thin sections upward until the exposed flesh is uniformly white, firm, and free of brown streaks.
Any soft brown you leave behind will keep rotting, so err toward removing a little extra.
The Salvage Steps
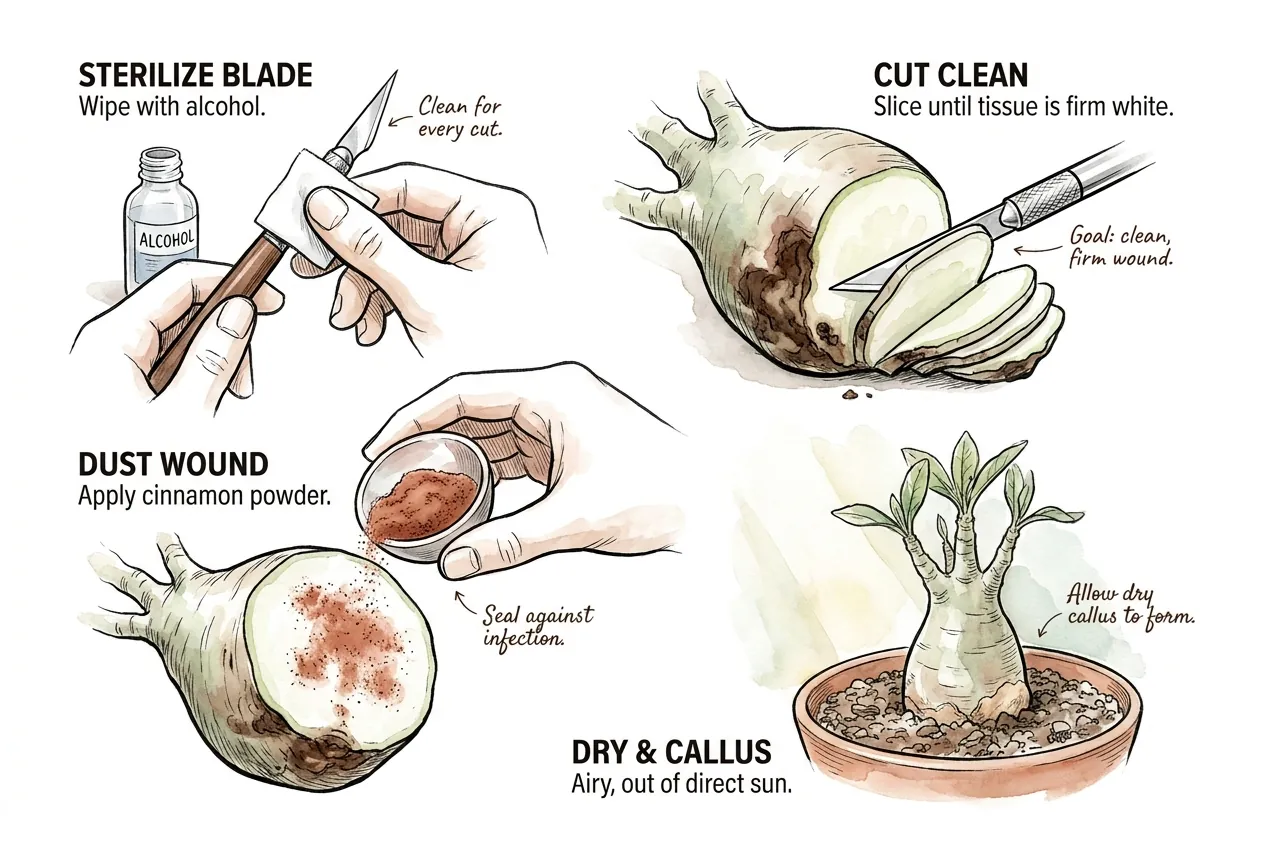
Work clean and unhurried. The goal is a clean wound on living tissue, then a dry callus that seals the plant against re-infection.
Wear gloves and wash your hands after, since adenium sap is a skin and eye irritant and is toxic to pets.
Sterilize the Blade
Use a sharp, clean blade and wipe it with alcohol between cuts so you do not carry rot back into clean tissue.
A thin craft or hobby knife gives cleaner cuts than kitchen scissors, which crush and bruise the edges.
A very thick mature caudex may need a proper pruning saw instead, wiped down the same way.
Cut to Clean White Tissue
Slice above the rot line in thin passes. Stop only when the whole cut face is uniformly white or pale green and firm, with no soft or discolored spots.
If brown reaches higher than you can cut and stay on the plant, that specimen may not be salvageable.
Dust and Dry the Wound
Dust the clean cut with cinnamon and set the plant somewhere dry, airy, and out of direct blazing sun to callus.
Larger cuts need more drying time before they touch soil again. Cinnamon is a popular, gentle wound powder, though its antifungal effect is modest, so keeping the wound dry matters more than the dusting.
Re-root and Repot
Once the cut has hardened into a dry callus, repot into fresh, dry, fast-draining mix and wait before watering.
New roots form from the callused base over the following weeks. Resist the urge to water immediately, since a fresh wound in wet soil simply invites the rot back.
Once cutting becomes necessary, I number each cut and photograph it under the same diffuse light with a metric ruler showing 1 mm divisions. Firmness, discoloration, odor, and cut direction go into the matching numbered record. The ruler reveals whether a dark boundary actually expands between photographs.
After the cut face is dry and hard and watering resumes, I use a scale that reads to 1 g. I record mass before watering, after 30 minutes of drainage, and at the same time daily. Two consecutive irrigation cycles must return within 2 g of their own prewatering mass before I call the dry-down repeatable.
I also require two photographs seven days apart with no wider discolored boundary and no new soft tissue. New leaves remain supporting evidence because a shoot can draw on stored caudex reserves. Requiring both stable tissue and repeated moisture behavior prevents one warm, windy dry-down from being mistaken for root recovery.
Preventing the Next Soft Caudex
The rescue is triage. Prevention is the actual cure, and it comes down to a gritty substrate, a draining pot, and a watering schedule that respects the season.
Substrate and Pot
Desert roses want soil that drains almost like a sieve. NC State Extension recommends a cactus and succulent mix in a pot with several drainage holes, because standing water at the base is exactly what rot needs.
A gritty, fast-draining medium is the single best insurance. A mix heavy in pumice, perlite, or coarse grit holds enough moisture for roots while draining fast enough that the caudex is never sitting in water.
Gritty mixes do dry out faster, so in peak summer you may water a bit more often, which is a far safer failure mode than staying wet.
Terracotta beats glazed or plastic for a nervous grower. The porous walls wick moisture out of the soil, so the root zone dries faster between waterings.
Always empty the saucer, because a pot standing in runoff undoes every other good choice.
Watering by Season, Not by Calendar
This is where late-summer rot is won or lost. As days shorten and the plant slows, stretch the interval between waterings and let the mix dry deeper each time.
The July cadence is simply too much water for a September plant.
Water only when the mix is dry well below the surface and the caudex is firm.
If the caudex is plump and the soil still holds moisture, wait. When in doubt in late summer, underwater, because a thirsty desert rose recovers in a day and a waterlogged one may not recover at all.
Aftercare and When to Give Up
A salvaged caudex needs patience, not fussing. Keep it warm, bright, and dry while the callus holds, and water sparingly only once new roots have clearly taken.
Watch the cut face for any returning softness or darkening, which means rot you missed.
Know the point of no return, too. Stop cutting and discard the plant if rot has climbed through most of the caudex or every fresh cut still reveals brown.
The University of Wisconsin bluntly notes that discarding a badly rotted plant is often the most sensible and cost-effective choice.
There is no shame in that call. A soft caudex caught early and cut clean often recovers into a healthy plant. One caught too late was lost before you ever picked up the knife, and recognizing the difference is the real skill.
Key Takeaways
- A firm caudex is healthy, but soft and mushy near the soil line with a sour smell means rot, not dormancy.
- Late summer rots caudexes because warm wet soil plus a slowing plant starves the roots of oxygen.
- No drench un-rots dead tissue, so a dilute 3% peroxide drench is short-lived first aid, not a cure.
- Real rescue is cutting above the rot line to firm white tissue, then callusing and re-rooting dry.
- Prevent recurrence with gritty fast-draining mix, a draining pot, and less water as days shorten.