
Stephania Erecta Not Waking Up? A Careful Year-2 Diagnosis
How to assess a quiet Stephania pierrei (often sold as S. erecta) tuber, separate dormancy from dehydration or rot, and choose a low-risk recovery path without treating one season or temperature rule as universal.
Maya Ellison · 2026-06-09 · Updated 2026-08-07 · 21 min read
Key Takeaways
- Early growth can draw on reserves held in the tuber, so a bare tuber may leaf out in a water bowl. That first flush does not prove roots and reserves are rebuilding.
- Build the second season on a gritty, free-draining mix, with light once in leaf and conservative feeding. A quiet Year-2 plant has several possible causes, and no precise reserve threshold is established.
- Use gentle checks (lift the tuber for weight, look and smell for soft or foul tissue, and note whether it stays firm). Avoid deep scratches or hard squeezes that wound a living tuber.
- Recovery can take months, so rehydrate only when the evidence supports dehydration, remove clearly rotten tissue with clean tools, repot in a gritty mix, and monitor. Do not force a schedule.
- This plant is not CITES-listed, but phytosanitary and other import rules still apply, and it is a wild-harvested medicinal of conservation concern. Prefer documented nursery-propagated stock.
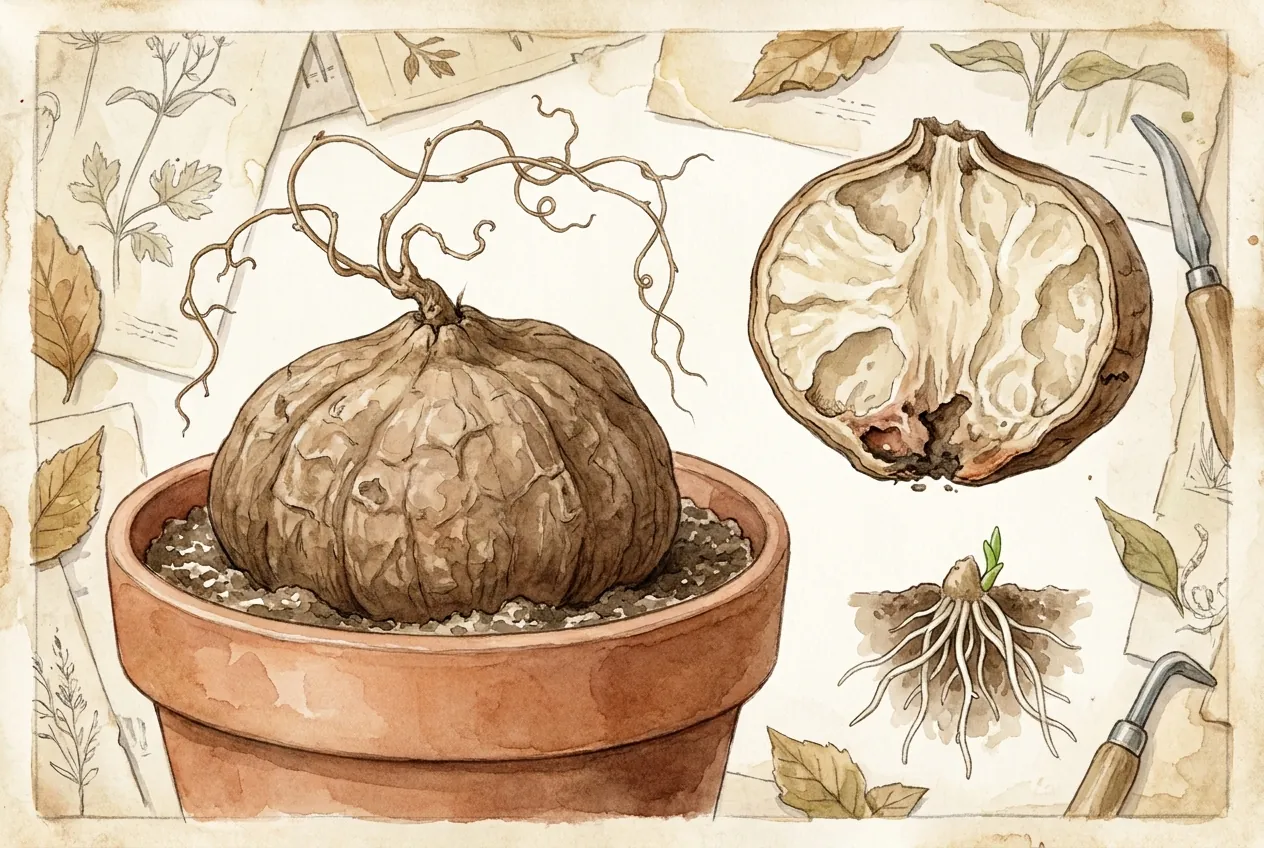
A hemispherical tuber that pushes a vine and peltate leaves in one season, then stays quiet the next, can reflect dormancy, dehydration, root loss, rot, or a mismatch between the plant and its new conditions. The currently accepted botanical name is Stephania pierrei. S. erecta is a widely used horticultural synonym retained here where it matches reader search language. The practical question is how to distinguish a quiet second season from dehydration, root loss, or rot before changing the setup.
What is Stephania erecta actually, biologically?
Start with the Tuber's Biology
Stephania erecta is a deciduous, dioecious climbing vine in the Menispermaceae family.
Keep the native range in context
It is native to seasonally dry forests of Thailand, Cambodia, Laos, and Vietnam.
Read the tuber as a reserve organ
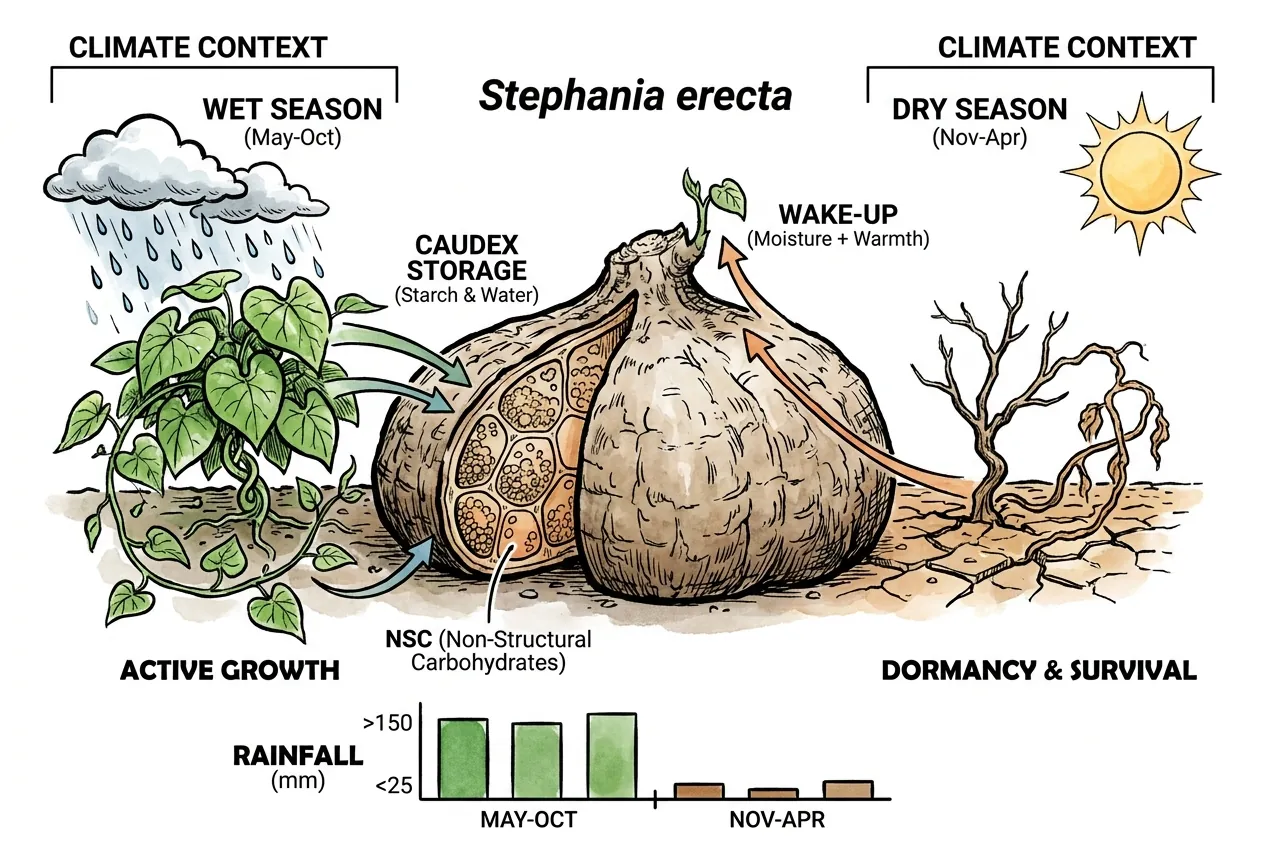
The hemispherical storage organ holds water and carbohydrates, but its anatomy and seasonal response should not be reduced to a single starch battery model.
Expect variable pauses in growth
Plants may shed leaves and pause growth under dry or cool conditions. The length and depth of that pause vary with provenance, roots, temperature, and care.
Use family traits as background
The Menispermaceae family contains roughly 81 genera and around 440 species of mostly twining, dioecious, woody climbers concentrated in tropical lowlands.
Keep the unusual vine direction descriptive
Stephania is unusual in twining clockwise where the family default is anticlockwise.
Do not turn specimen size into a threshold
The hemispherical caudex on hobbyist specimens typically reaches 5 to 10 cm in diameter, though mature wild plants can hit 20 to 25 cm.
Why does the caudex even exist?
Read habitat diversity before using a calendar
The storage organ fits an environment with seasonal changes in moisture, but the species range includes more than one habitat and climate pattern.
Use local observations as the cue
Use local observations and the plant's condition rather than a fixed rainfall calendar.
Separate stored reserves from current uptake
Stored carbohydrates can support new growth after a pause, while current leaves and roots also contribute once the plant is active. The balance depends on plant size, root health, light, and temperature.
Treat moisture as one wake-up cue
Moisture and warmth may contribute to a wake-up response, but photoperiod, temperature history, root condition, and the plant's prior stress can also matter indoors. Treat a change in soil moisture as one cue to evaluate, not a complete control signal.
Where does it come from and what does the import pipeline do to it?
Separate Trade Status from Plant Health
The genus Stephania is not on a CITES Appendix in the cited search, but that status can change and does not replace national plant-import requirements.
Keep conservation risk visible
Regional conservation assessments have raised concern about collection for traditional medicine, while the proportion of nursery versus wild stock in international trade is not established here.
Use arrival condition as evidence
Understanding whether a tuber arrived rooted, dehydrated, wounded, or stressed helps explain later behavior. It does not make Year 1 a guaranteed free pass or Year 2 a predetermined test.
Is Stephania erecta CITES-listed?
Check the current CITES database
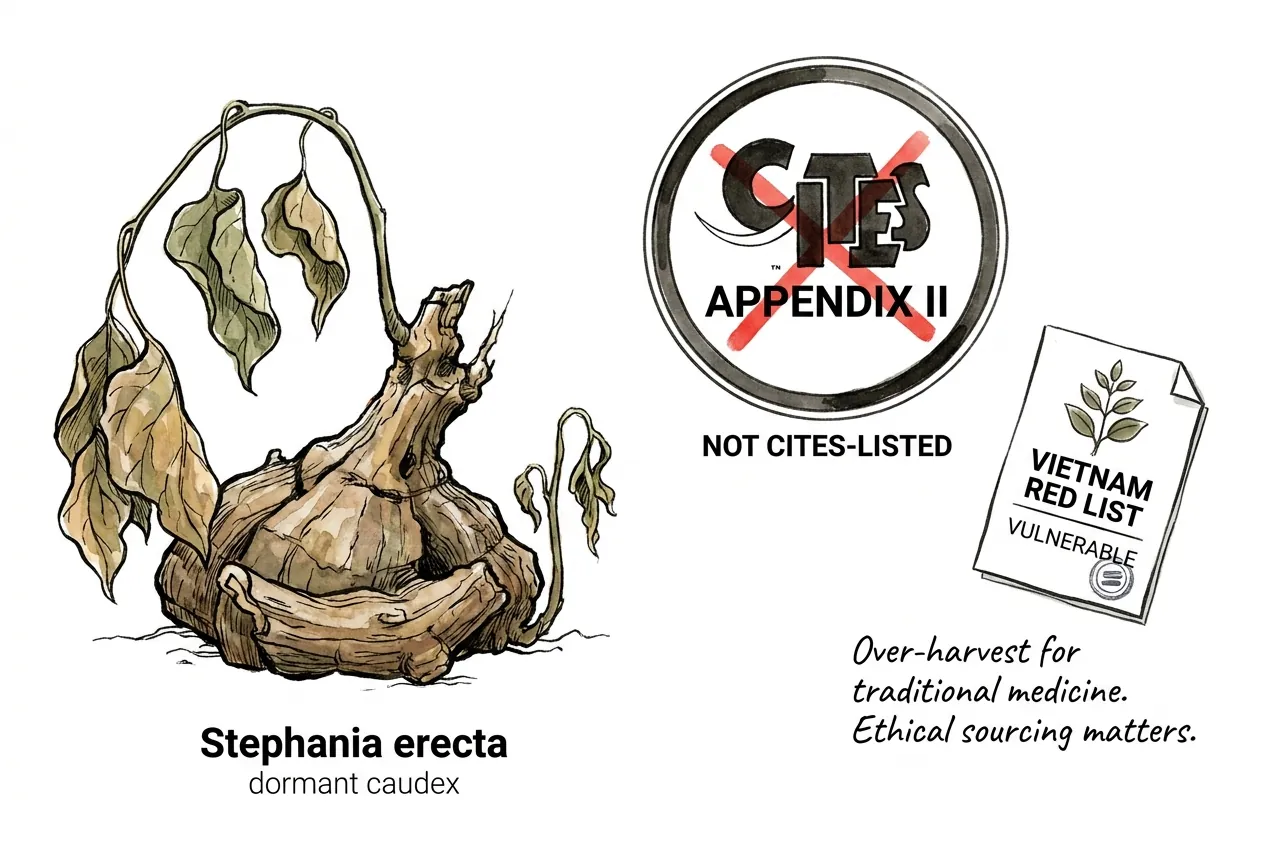
No. A persistent piece of hobbyist folklore claims Stephania erecta is CITES Appendix II protected.
Keep the database result narrow
A search of the Species+ CITES database returns no Stephania results, and commercial trade documentation confirms the same.
Separate CITES from conservation status
The conservation flag that does apply is the Vietnam Red List vulnerable status, driven by over-harvest for traditional medicine.
Check phytosanitary requirements separately
Not being CITES-listed removes one layer of control, but it does not mean anything goes. In the US, buying plants from overseas makes you the importer, and plant-health (phytosanitary) rules generally still apply (typically an import permit or exemption, a phytosanitary certificate, and inspection).
Do not equate no CITES with no restrictions
So not CITES is not the same as automatically legal to import. Check the current requirements.
Prefer documented nursery stock
Beyond legality, this is a wild-harvested medicinal plant assessed as of conservation concern (it has been listed as Endangered in the species literature and Vulnerable on a regional medicinal-plant red list), so favor documented, nursery-propagated stock over wild-collected material.
What actually happens to a tuber between Thai field and US doorstep?
Read the seller's shipment record
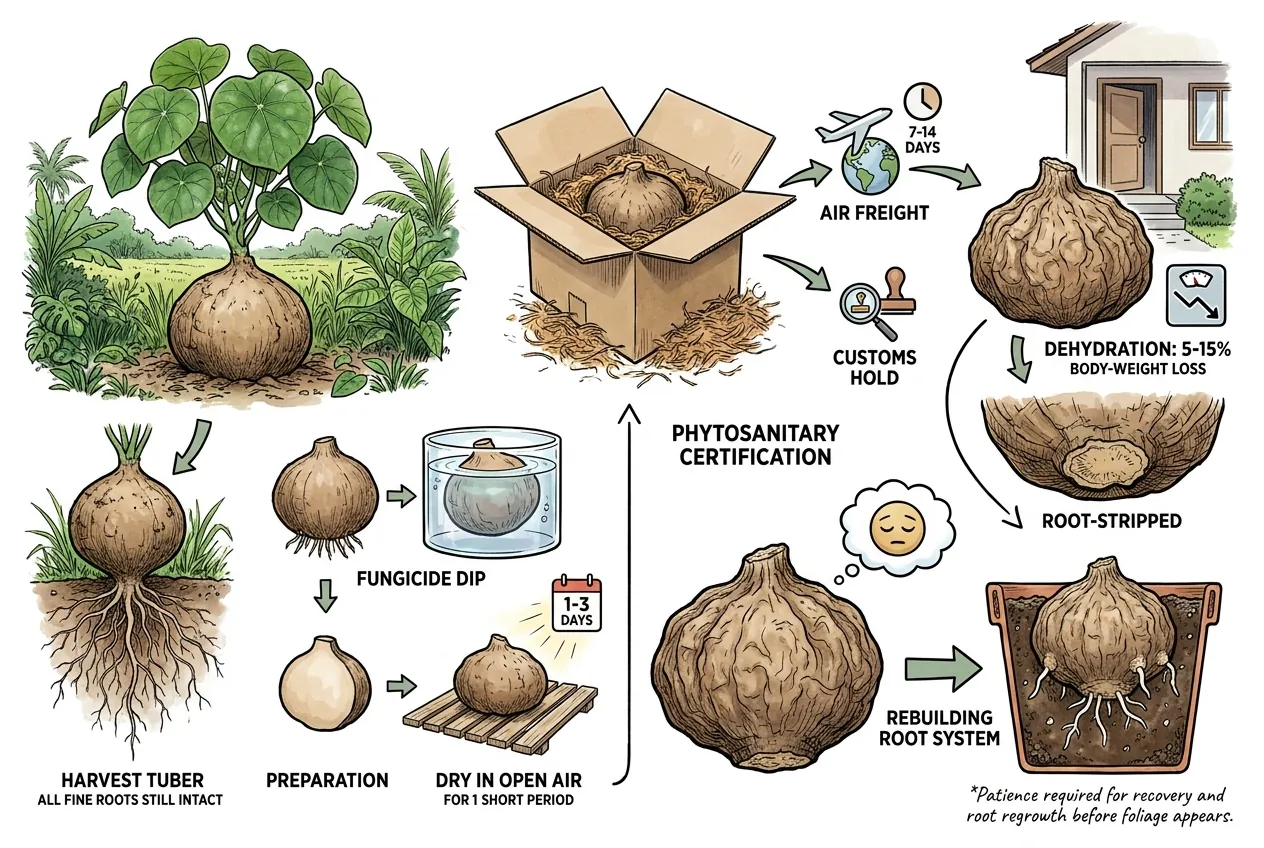
Import condition varies by seller and shipment. Some plants arrive bare-root with fine roots removed, while others arrive with more tissue or a different packing method. A seller's protocol and the inspection record are the evidence to use.
Keep transit variables visible
Transit length, packing moisture, temperature, and customs handling can all change the starting condition. Do not infer a fixed percentage of weight loss or a standard fungicide-and-dry-down sequence without shipment-specific documentation.
Confirm documents before ordering
Plant-import permits, phytosanitary certificates, and inspection requirements are separate from CITES status. Check current government guidance before ordering, and treat missing documentation as a procurement risk.
Why does Year 1 always look successful?
Why First-Year Vigor Can Mislead
Year-1 vigor can be supported by carbohydrate reserves already held in the storage organ, especially before a new root system is established.
Separate reserve use from root recovery
Once leaves and roots are functioning, current photosynthesis and uptake also contribute to growth and reserve recovery.
Recognize the water-bowl illusion
This is also why the widely circulated set your tuber in a saucer of water approach can look great the first year. The plant is spending stored reserves.
Move a growing tuber into a real pot
It is not a good long-term setup. Standing water invites rot and does not help the plant rebuild, so pot it into a proper gritty mix rather than leaving it in a bowl.
Why does a tuber in plain water still leaf out?
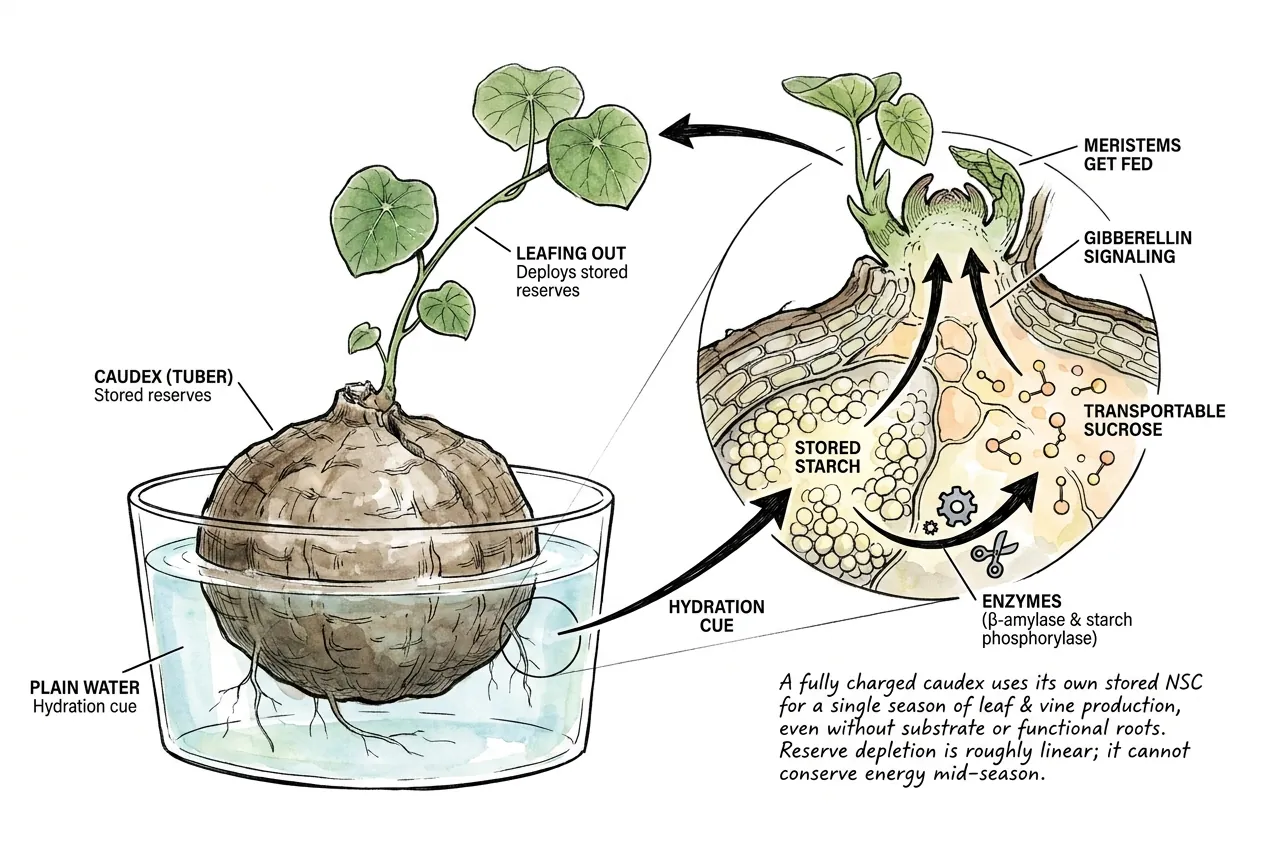
Moisture can coincide with a bud-break response even before roots are visibly established, which is why a tuber in a water bowl may leaf out. Other storage-organ plants show similar reserve-supported starts, but that comparison does not prove a fixed mechanism for Stephania.
Stored starch and soluble sugars can support meristem activity, while hormone signaling and current conditions influence whether growth continues. The timing and reserve cost are not measured well enough here to support a universal budget.
By the end of a season, a tuber may have rebuilt reserves, remained depleted, or suffered root or pathogen damage. A quiet second season is therefore a diagnosis to investigate, not a predetermined consequence.
What does the failure trajectory actually look like at end of Year 1?
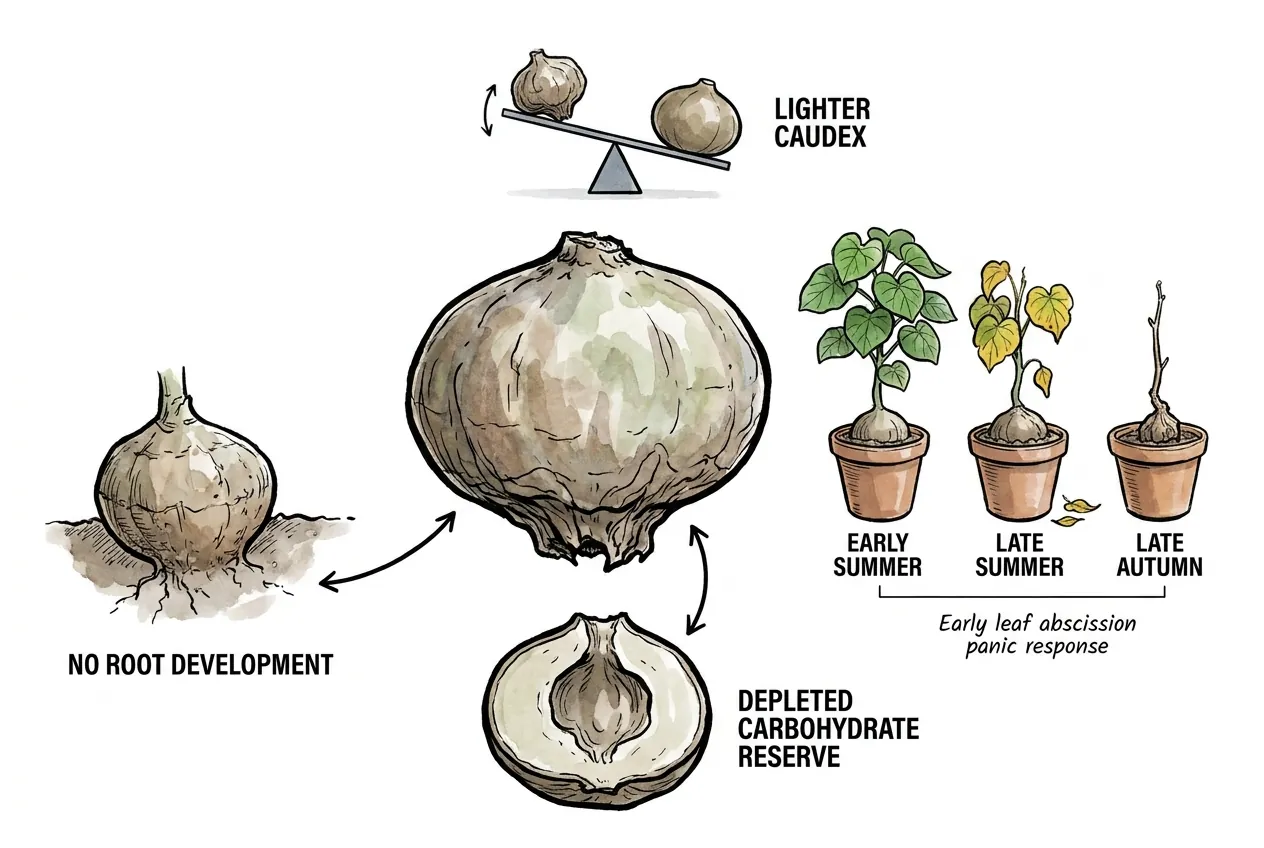
Use warning signs as prompts
Potential warning signs include a meaningful loss of weight, little evidence of root establishment, persistent shriveling, or leaves that yellow earlier than the plant's previous pattern.
Compare against the plant's own baseline
Each sign is non-specific. Normal dormancy, dehydration, root disturbance, heat, low light, and disease can overlap. Compare with the plant's own baseline and inspect the base before assigning a reserve-depletion explanation.
What does Year-2 stall actually mean, mechanically?
Keep a Quiet Second Season Broad
A quiet second season can reflect depleted reserves, but it can also reflect root loss, temperature history, water stress, rot, or an ordinary dormancy interval. The plant must balance maintenance costs with the demands of new growth, yet no species-specific reserve threshold is established here.
Why does it stay silent rather than just trying?
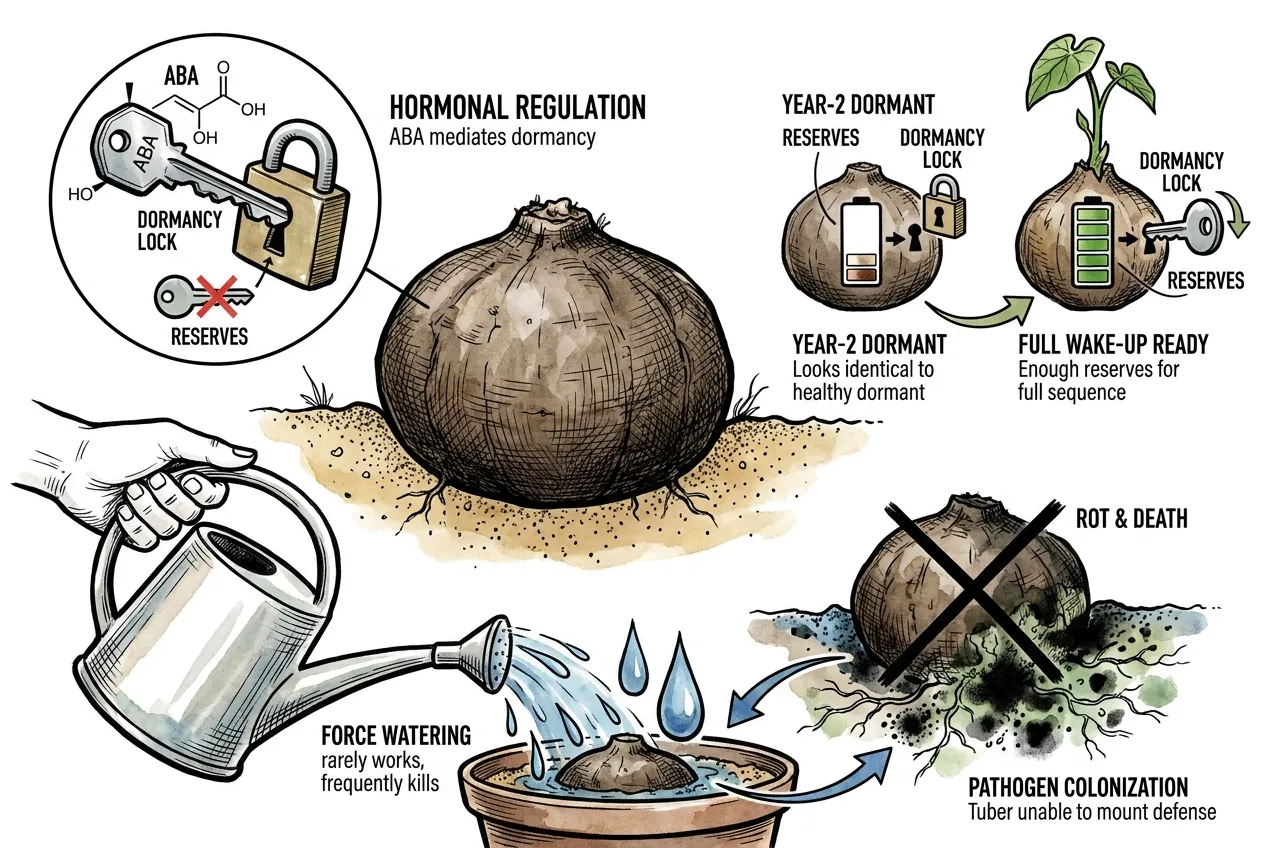
Keep the physiological explanation broad
Plants can pause or resume growth gradually, and hormone signaling is only one part of that response. A quiet tuber can look similar whether it is healthy and dormant, dehydrated, rootless, or beginning to rot.
Avoid force-watering a quiet tuber
That is why force-watering is risky. Adding moisture without checking the base, substrate, temperature, and root condition can increase pathogen pressure rather than solve the underlying problem.
What sealed the failure was the Year-1 setup
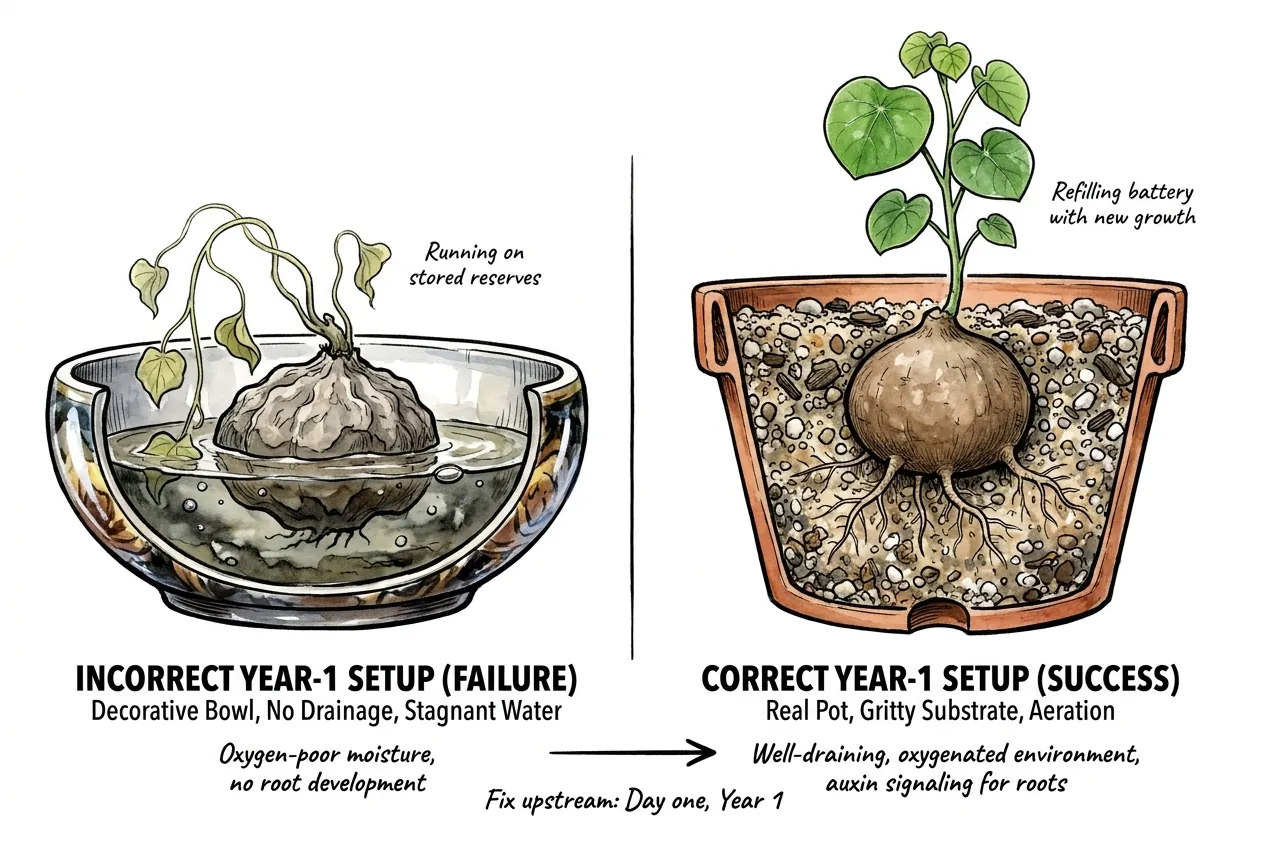
Recognize low-oxygen setup risk
A decorative bowl with no drainage or a stagnant water layer keeps the base in low-oxygen conditions and makes root health difficult to assess. It may also allow a first flush to run on stored reserves without providing a stable rooting environment.
Stabilize the pot before adding remedies
Use a real pot and a free-draining substrate when the plant is ready to root, then adjust moisture, light, and feeding to observed growth rather than a fixed calendar.
Fix the setup before adding a remedy
The fix is upstream. Use a real pot and gritty substrate from the first day of Year 1 so the tuber has a stable chance to refill its reserves.
Keep the substrate decision functional
The substrate question is not aesthetic. It is whether the tuber gets to refill its battery before next year.
How do I tell if my silent Year-2 tuber is dead, dormant, or recoverable?
Use Four Checks Without Forcing a Verdict
Run the four checks in order. They provide a cautious starting picture, not a guaranteed go-or-no-go diagnosis.
Step 1. Weight check
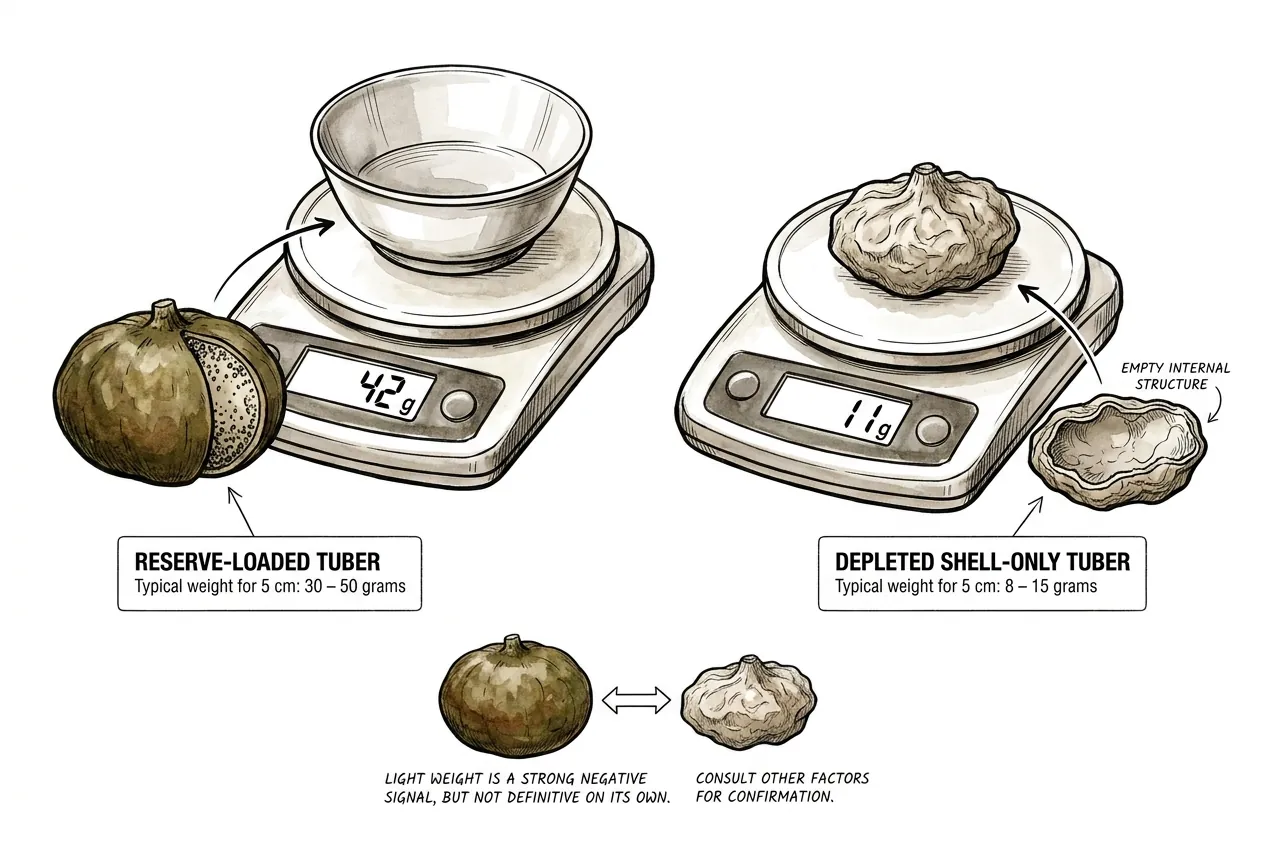
Compare the same tuber with itself
Use weight as a relative signal for the same tuber and pot. Published hobby examples sometimes show large differences between a hydrated tuber and a depleted shell, but no species-specific gram threshold distinguishes recovery from failure.
Use weight loss as a prompt
Weigh on a kitchen scale and compare with the plant’s own baseline.
Do not diagnose from grams alone
A meaningful loss is a reason to inspect further, not a definitive diagnosis on its own.
Step 2. Squeeze test
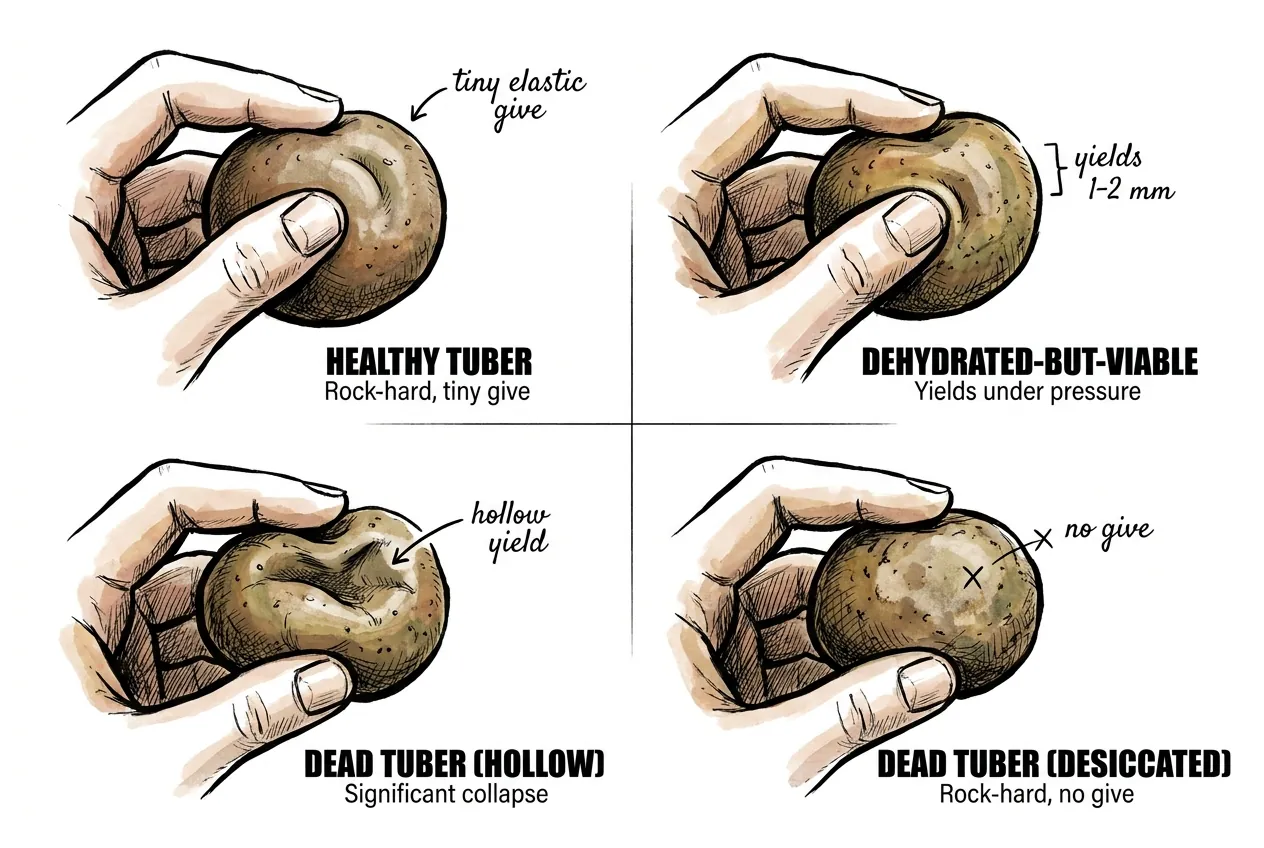
Use a light touch
Press gently, don’t crush.
Read firmness as one clue
A firm, solid tuber is encouraging. A clearly soft, mushy, or hollow-feeling one is concerning.
Keep pressure below the injury threshold
Firmness is only a clue. Dehydration can reduce give, and early internal rot can hide under a firm surface. Pressing hard enough to dent living tissue can bruise it, so keep this light.
Step 3. Look and smell, rather than scratch deep
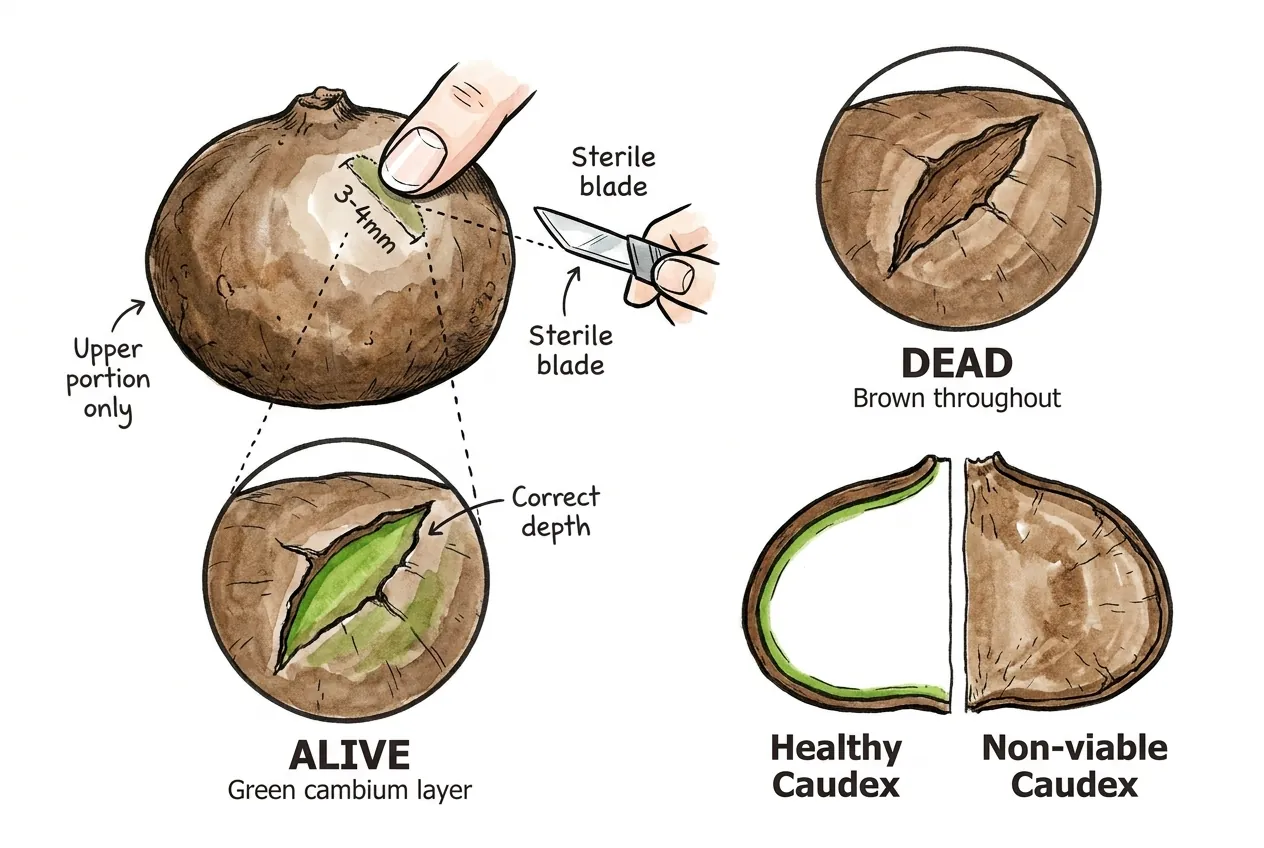
Do not overread a scratch test
Be cautious with the popular scratch to green test here.
Remember the tuber anatomy
This storage organ is a root tuber, not a woody stem, so the green cambium under the bark rule doesn’t apply the way it does to a tree branch. A green patch in one spot doesn’t prove the whole tuber is alive, and a brown patch doesn’t prove it’s all dead.
Avoid deep gouges
A deep 3–4 mm gouge with a fingernail (not sterile) or blade also opens an infection route on a plant you’re trying to save.
If needed, make one shallow nick
If you feel you must check tissue, make one shallow nick with a clean, disinfected blade on the upper body (never the base) and treat what you see as a single data point, alongside weight, firmness, and especially the smell and feel of the base, not a definitive verdict.
Accept uncertainty when the plant is stable
There is no single foolproof alive/dead test. When unsure, a lower-risk move is to pot it up correctly and give it time.
Step 4. Base inspection
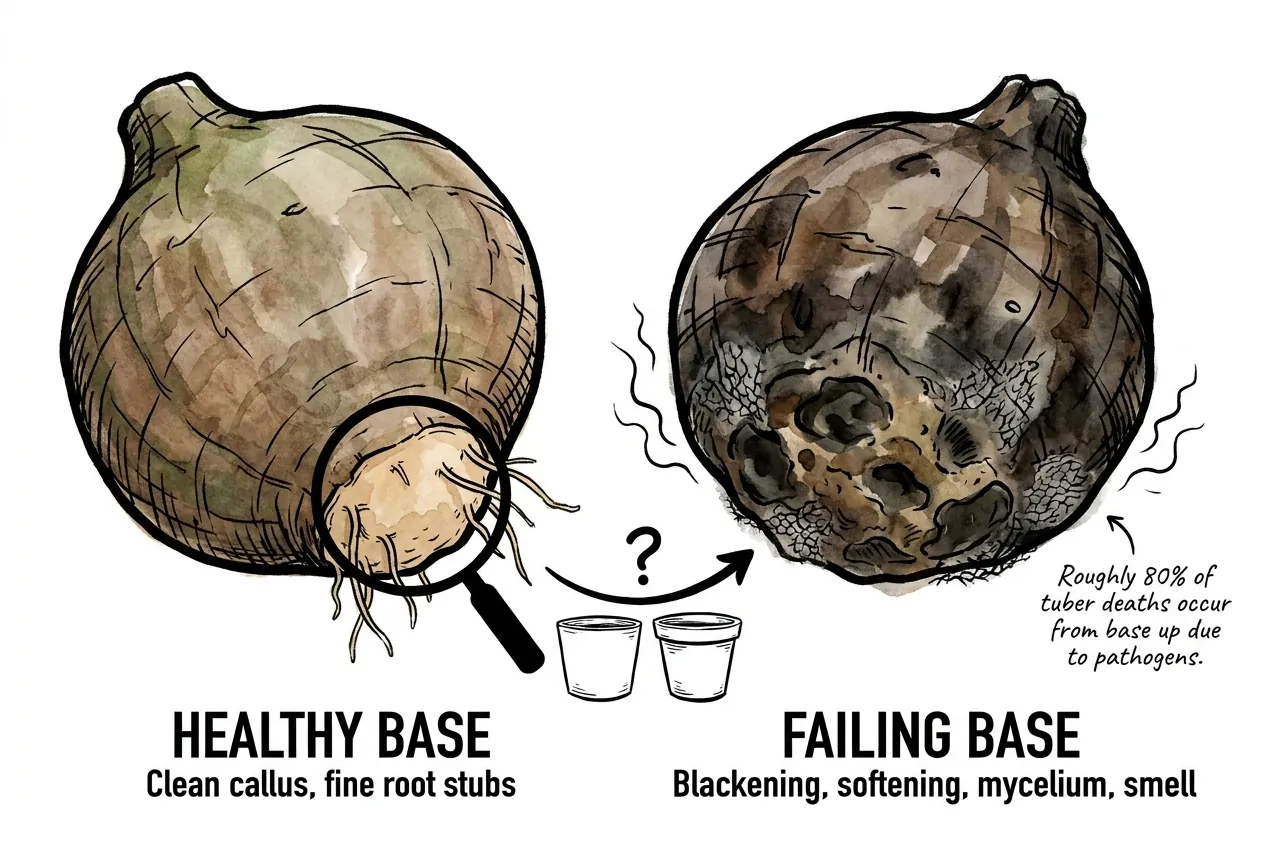
Start at the substrate interface
The base is a common place for rot to start, since it sits in the substrate.
Read firmness, odor, and color together
Unpot and inspect. A healthy base shows clean, firm tissue and maybe fine root stubs, while soft, dark, foul-smelling tissue signals rot.
Keep pathogen identity uncertain
Several organisms can be responsible. These include water molds such as Pythium and Phytophthora, which are oomycetes rather than true fungi, as well as fungi such as Fusarium and Rhizoctonia. You cannot identify the cause from appearance alone, so treat rot generically rather than diagnosing a specific pathogen by eye.
Escalate when the base is failing
A failing base shows black or brown softening, foul smell, or visible mycelium.
How do I revive a stalled but recoverable tuber?
Use a Cautious Recovery Sequence
If the tuber remains firm and the base is salvageable, use a cautious recovery sequence.
Allow a long recovery window
Rooting and regrowth may take months, and a quiet season can still occur even when the plant survives.
Step 1. Warm-soak rehydration
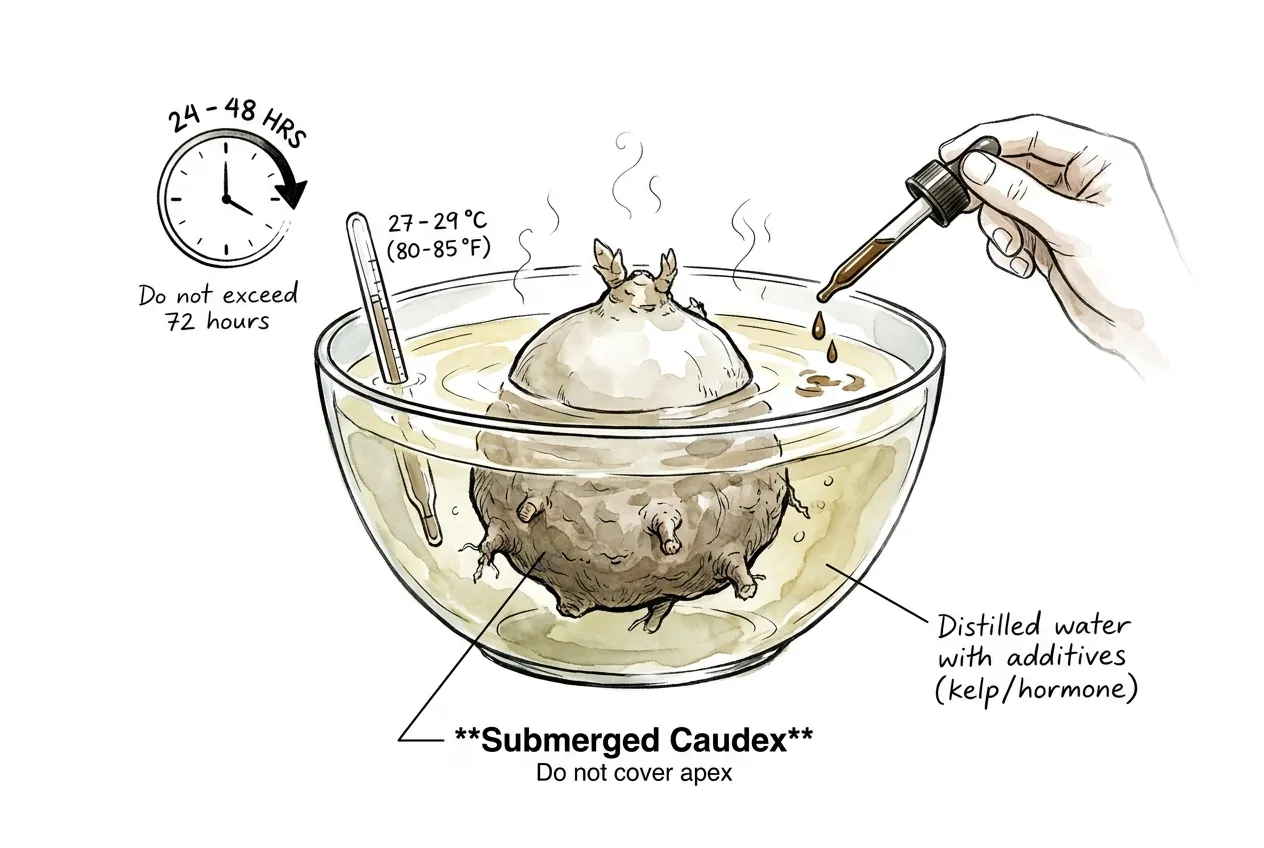
Rehydrate only after checking the base
If a tuber is genuinely dehydrated (light and persistently shrivelled), a brief clean-water rehydration may help it take up water, but only after the base has been checked for rot.
Keep any soak short and oxygenated
Warm, still water becomes low in oxygen when a tuber is left submerged, so keep any soak short, observe the tissue, and never use it as a routine step for a firm, healthy tuber.
Let the plant determine when to stop
There is no established species-specific soak duration or water formula. The plant's condition should determine whether to stop.
Step 2. Address rot or pathogen pressure
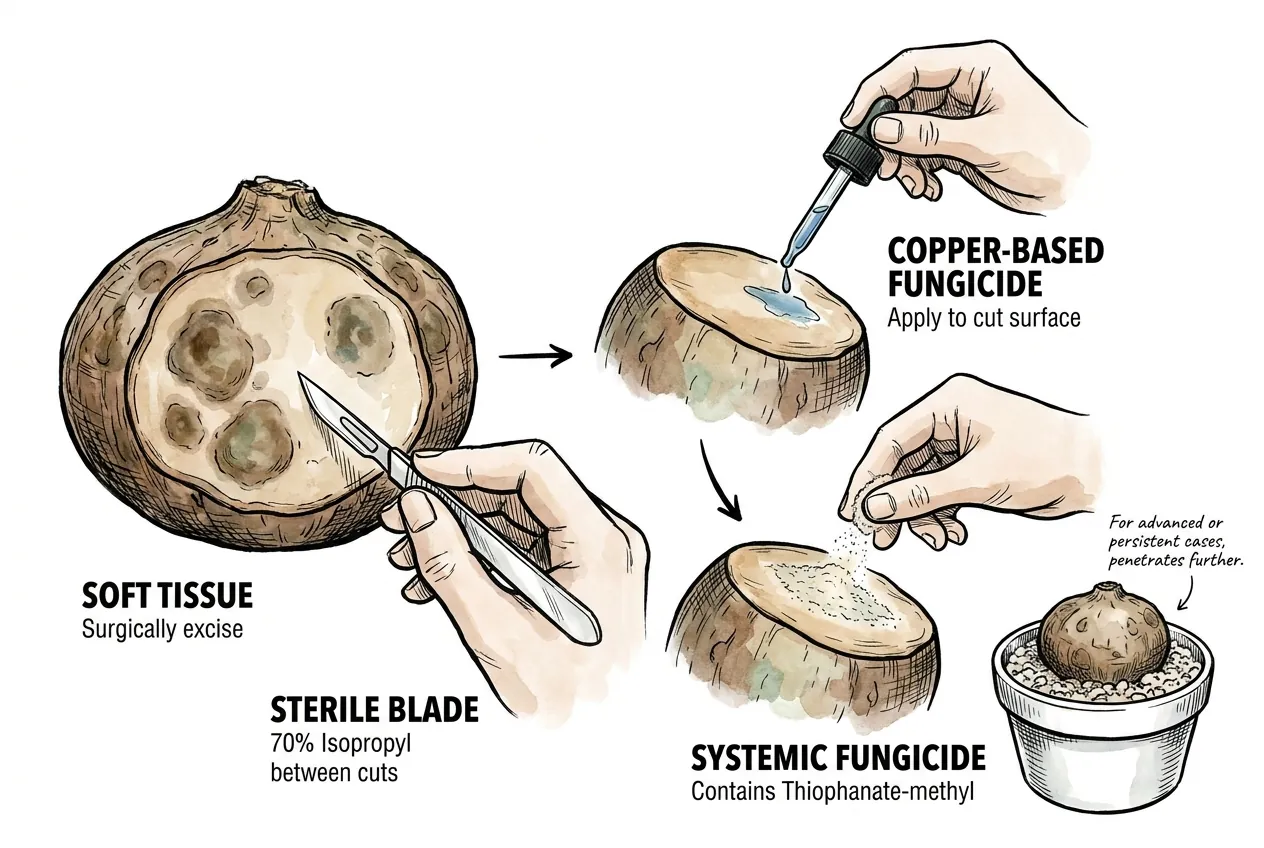
Cut only clearly rotten tissue
If the base shows clearly rotten tissue, cut back only to firm, clean tissue, removing as little healthy tuber as possible, using a sharp blade disinfected between cuts.
Contain tools and discarded tissue
Protect yourself and the plant. Wear gloves and eye protection, keep the work area and discarded tissue away from your other plants, bag and bin the diseased material, and disinfect tools and the pot afterward.
Recognize when salvage may fail
If rot is extensive or keeps advancing, a badly affected tuber may not be salvageable.
Use fungicide only as label-supported backup
If you choose to use a fungicide, use one whose label actually covers your situation, and follow that label for the target organism, plant, rate, and PPE.
Separate oomycete and fungal claims
Don’t assume any single product works on everything. The common rots here can be water molds (oomycetes) or true fungi, and many products control only one group. For example, some thiophanate-methyl products explicitly do not control Pythium or Phytophthora, while fosetyl-aluminum targets oomycetes rather than Fusarium or Rhizoctonia.
Treat chemicals as supporting tools
Since you usually can’t identify the organism by eye, treat fungicide as a supplement to clean cutting and good conditions, not a guaranteed cure.
Step 3. Repot in proper substrate
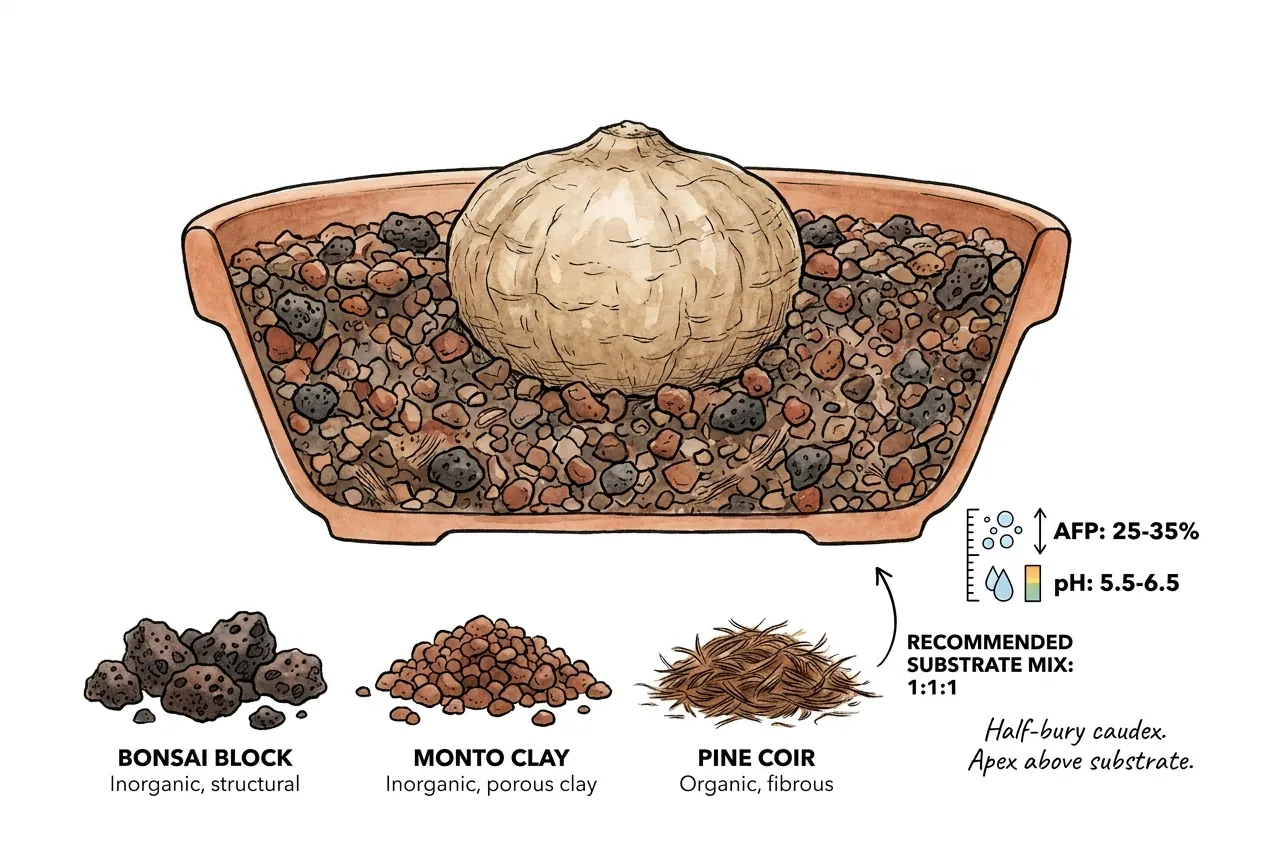
Return the tuber to an open mix
After any rehydration or rot work, let cut tissue surface-dry according to its condition, then pot in a fast-draining gritty mix.
Keep the apex above the substrate
Half-bury the caudex with the apex above substrate.
Judge the mix by dry-down and roots
The substrate should drain freely, retain enough moisture for the developing roots, and remain open after repeated watering. Exact air-filled porosity and pH targets are not established for this species, so use the plant's drying rate and root response to tune the mix.
Use a structure that resists collapse
Use a structural mix of inorganic and organic particles that resists collapse over multiple watering cycles.
What to look for in a pre-blended mix
A pre-blended gritty substrate saves you from sourcing and screening separate components, but judge it on the same criteria as a hand-mixed blend. Look for mostly mineral particles for structure, a smaller organic fraction for moisture, and a particle size that drains fast and holds its shape after repeated watering. Screen out dust and fines so the mix stays open. Water it in carefully, then let it begin to dry before watering again.
Keep the caveats visible
No pre-mixed blend is a proven species-specific optimum for Stephania, and a fast-draining gritty mix dries very quickly, so an import that is still rebuilding roots can dehydrate before you expect it. Watch the actual moisture rather than trusting a fixed schedule, and amend a stock blend, more moisture-holding fraction if it dries too fast, more grit if it stays wet, rather than assuming it fits your plant and climate as-is. To weigh the components yourself, compare options for a gritty mix by drainage and structure.
Step 4: Bottom heat to push root primordia
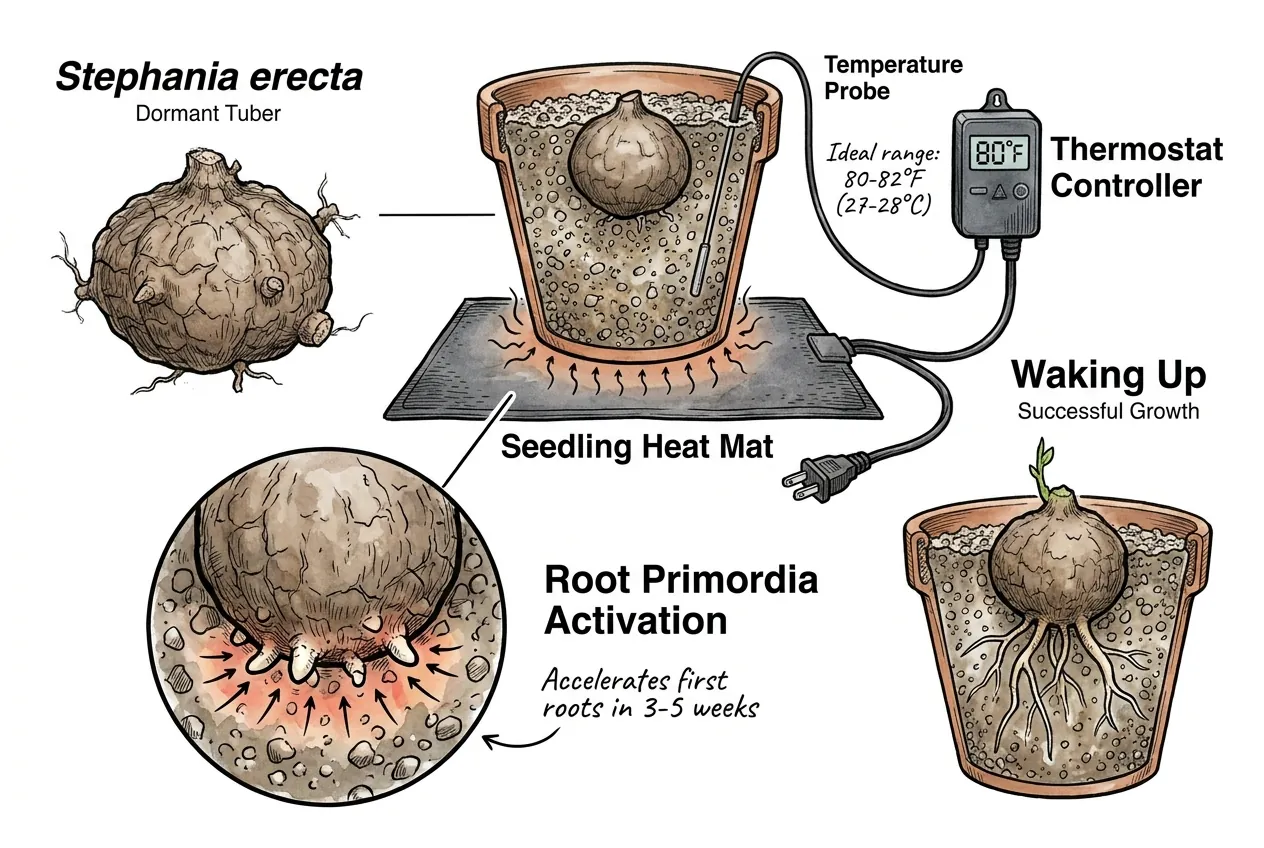
Measure before adding heat
Place the repotted tuber on a thermostatically controlled seedling heat mat only if the measured root-zone temperature is consistently below the plant's active range. Use a thermometer at substrate level and adjust gradually. No Stephania-specific trial supports a universal setpoint or rooting timeline.
Keep the thermostat as the safety control
The thermostat is the critical feature because an uncontrolled mat can overheat a shallow pot and damage tissue.
What to look for in a warming pad
A seedling heat mat is the usual warming-pad option. Look for one carrying a recognized electrical-safety certification (a UL, ETL, or equivalent listing), since it sits under a wet pot for weeks. Most inexpensive mats have no built-in thermostat and simply hold the surface a fixed amount above room temperature, so pair an unthermostated pad with a separate thermostat controller or at least an independent thermometer rather than locking the pot to a universal setpoint. A related heat-mat setup guide covers measurement and control.
Use bottom heat only while measured conditions require it
Use the mat only while measured root-zone conditions are limiting active recovery, then remove or reduce it when the plant and medium no longer need supplemental warmth.
Keep equipment proportional to the project
Honest tradeoff. The mat is reusable across propagation projects, but a single tuber may not justify the equipment.
Step 5: Reintroduce light watering, wait
Settle the mix once
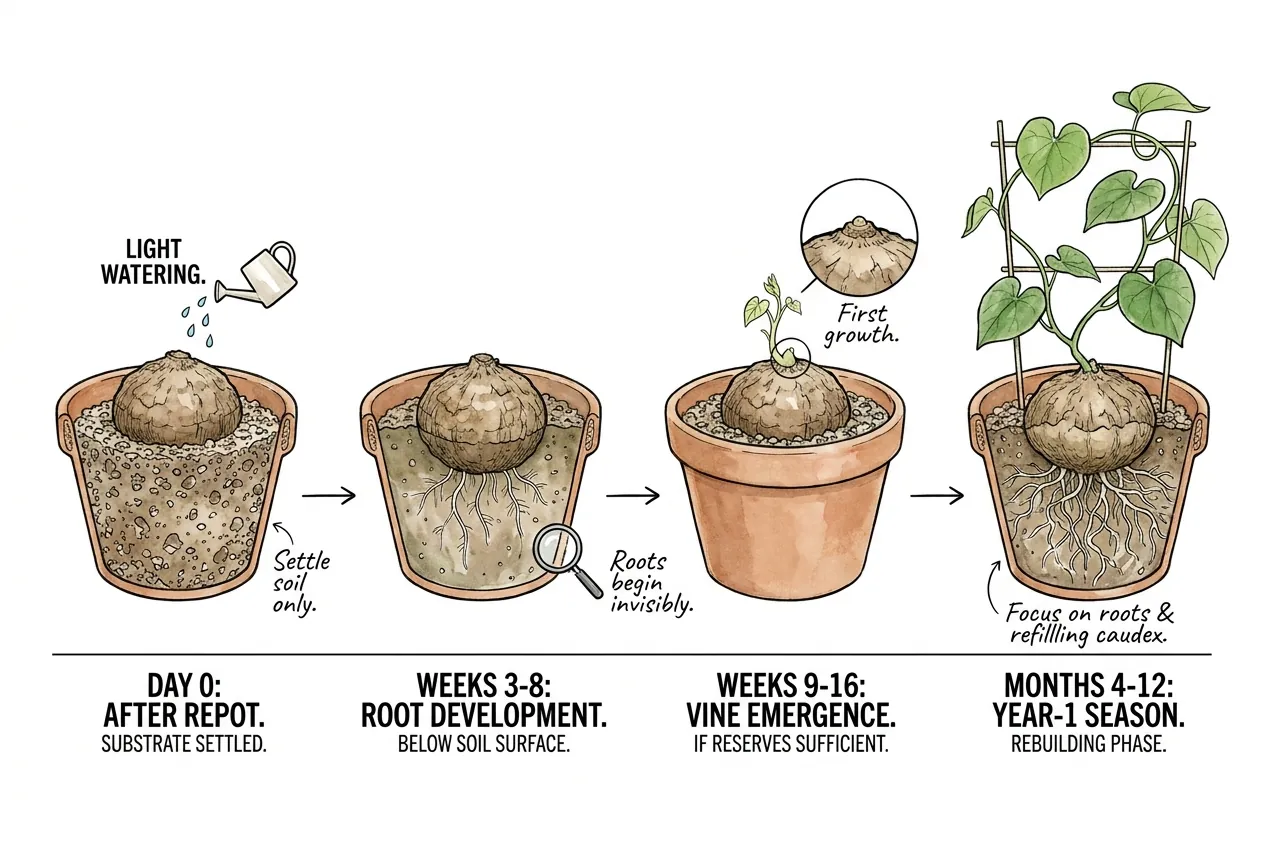
After repotting, water lightly to settle the substrate.
Wait for a growth cue before repeating
Then withhold further watering until you see first vine emergence or leaf primordia.
Log the invisible recovery period
Rooting and vine emergence may be invisible for an extended period. Keep a log of moisture, temperature, and tissue changes, and change one variable at a time rather than expecting a fixed week-by-week sequence.
How do I avoid the problem next time?
Use Prevention as Risk Reduction
Good Year-1 conditions can improve the chance of a second season, but no setup makes a stall fully preventable. The procurement-and-Year-1 checklist below is a risk-reduction plan, not a guarantee.
What should I inspect when the tuber arrives?
Inspect the tuber before potting
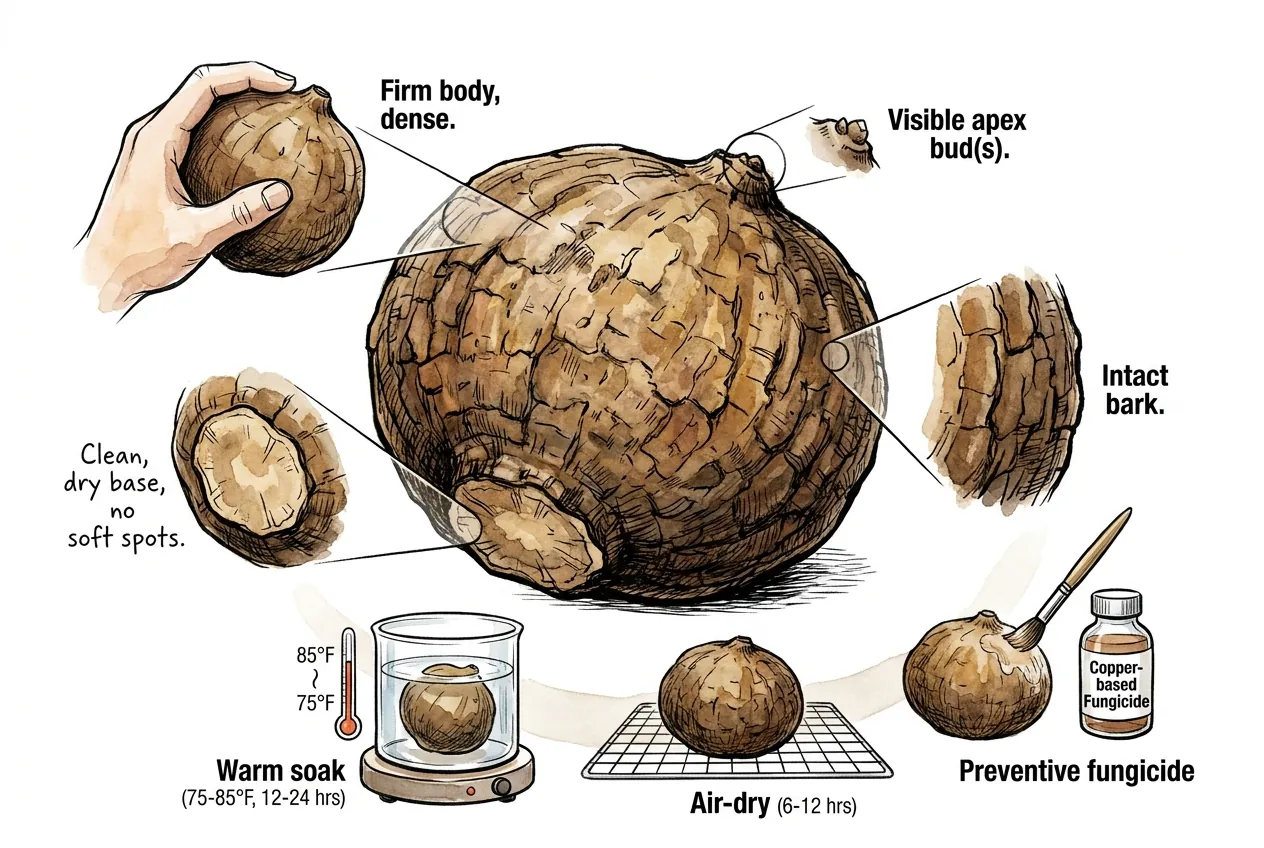
Unpack immediately on arrival.
Check the five arrival signals
Inspect for five things. A clean dry callused base, a rock-hard squeeze, intact bark without cracks, visible apex buds, and weight that feels dense for size.
Use failed criteria as a procurement signal
If multiple criteria fail, dispute the order before any care attempt.
Do not soak a sound tuber by default
If it’s firm and healthy, you can usually pot it up directly without a soak (only rehydrate if it arrives noticeably dehydrated, and then only briefly).
Keep preventive chemistry out of a sound tuber
There’s no need to routinely soak every tuber for many hours or to preventively coat a healthy tuber with fungicide. Doing so mainly exposes sound tissue to unnecessary moisture, low oxygen, and chemical, without a proven benefit.
Reserve fungicide for diagnosed rot
Reserve fungicide for actual rot, used per its label.
What pot, what substrate, what depth?
Size the pot to the roots and dry-down
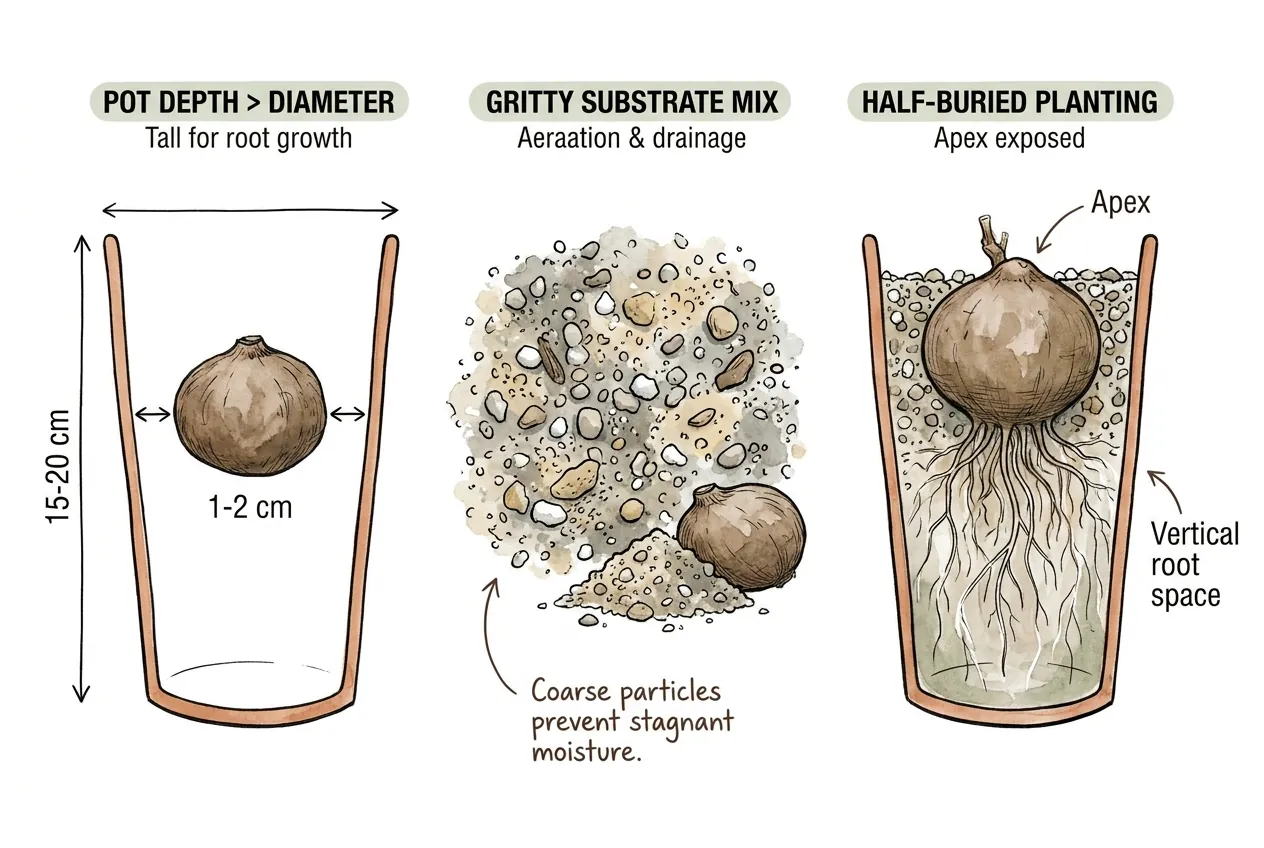
Choose a pot deep enough for the expected root direction and narrow enough that the mix can dry predictably. The exact dimensions depend on tuber size, root condition, and the chosen substrate.
Leave a controlled root volume
Leave enough substrate around the tuber for roots without creating a large, persistently wet volume.
Reuse the functional substrate rule
Substrate is the gritty mix discussed above.
Keep the apex exposed
Half-bury the tuber, apex above substrate.
What about light, temperature, fertilizer?
Match light and warmth to active growth
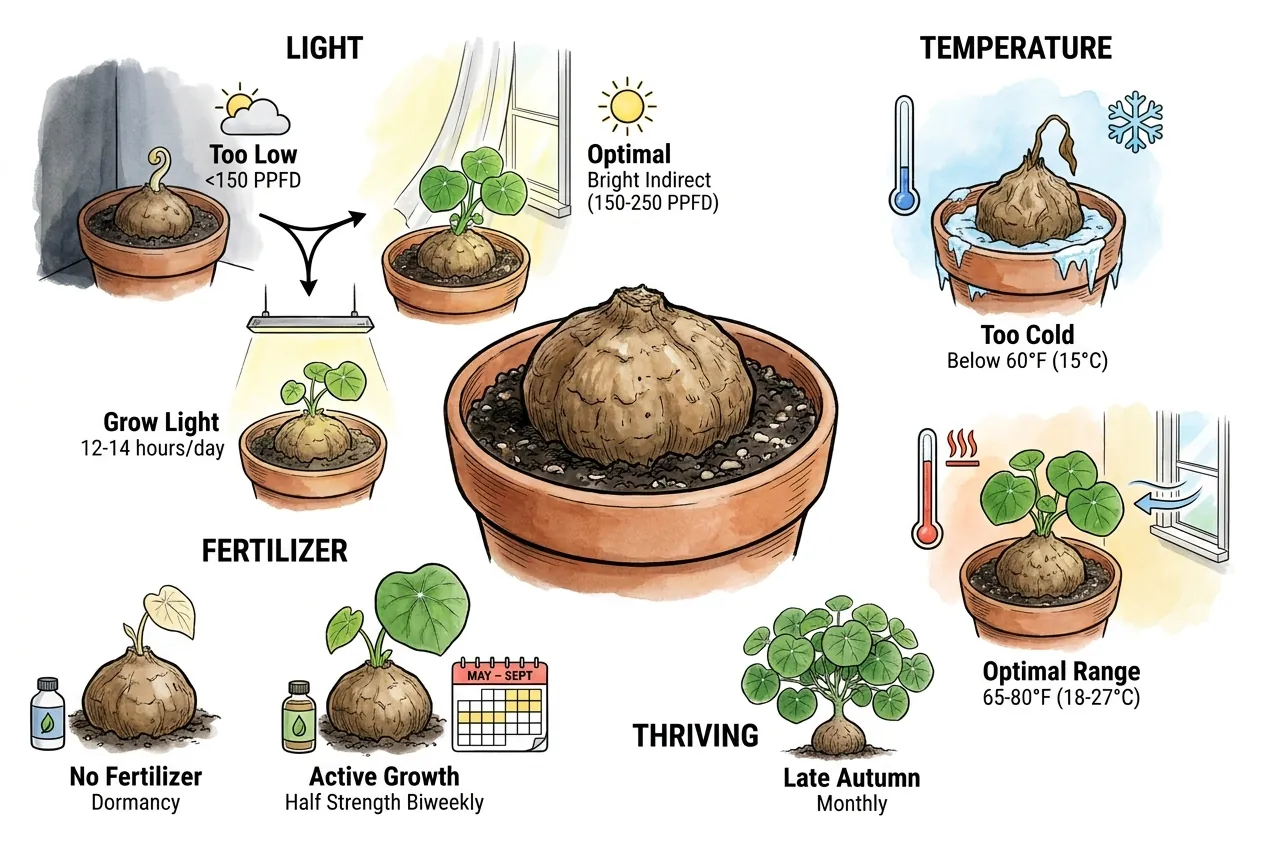
Bright indirect light, roughly a lightly-shaded bright window, or a modest grow light, once it is in active leaf.
Keep the room warm and stable
Ordinary warm room temperatures suit it. Avoid cold drafts.
Measure light before adopting a PPFD claim
Treat any specific PPFD figure as a starting point to confirm with a meter, not a guarantee from a given window.
Water from the mix's actual dry-down
Water when the mix has dried to the depth that matches the pot and roots, then allow free drainage.
Feed only with active growth
Feed lightly only during active growth and reduce or stop when leaves drop. Frequency and strength should follow the label and the plant's response rather than a fixed US calendar.
How do I know Year 1 actually succeeded?
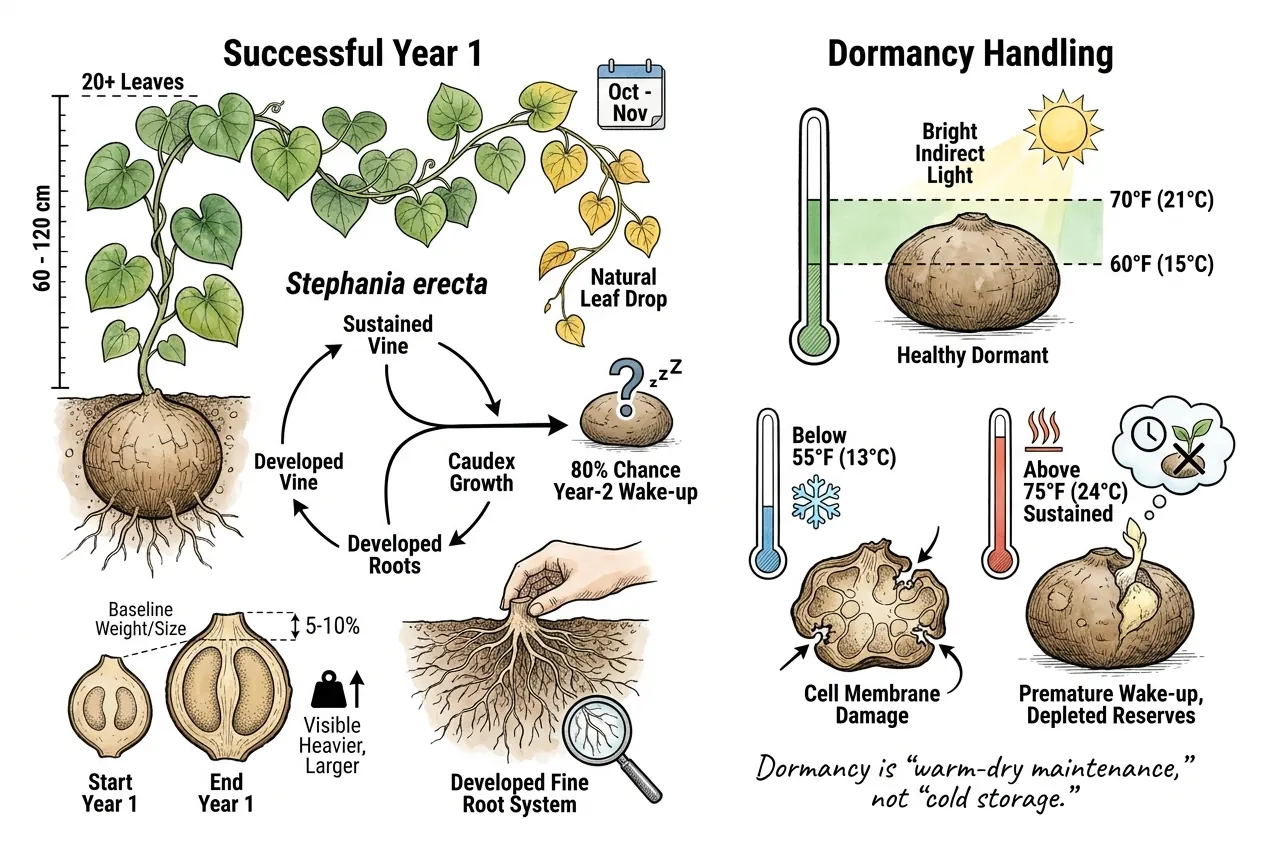
Use multiple Year-1 signals
Useful Year-1 signals include sustained healthy growth, a stable or improving tuber condition, evidence that roots are using the mix, and leaf drop that matches the plant's established pattern.
Keep species-specific thresholds absent
No fixed vine length, leaf count, diameter percentage, or success probability is validated for this species. Treat an early leaf drop or persistent weight loss as a reason to check light, roots, moisture, temperature, and pests.
How do I handle dormancy correctly?
Treat Dormancy as Lower Demand
Dormancy is better treated as a lower-demand period than as a universal warm-dry recipe. Keep the tuber protected from cold injury, extreme heat, and abrupt changes, with light and airflow appropriate to the room.
Measure the active cues
Use an independent thermometer and observe tissue, substrate, and bud activity. A single temperature cutoff does not define dormancy or prove that a wake-up attempt will fail.
Should I water at all during dormancy?
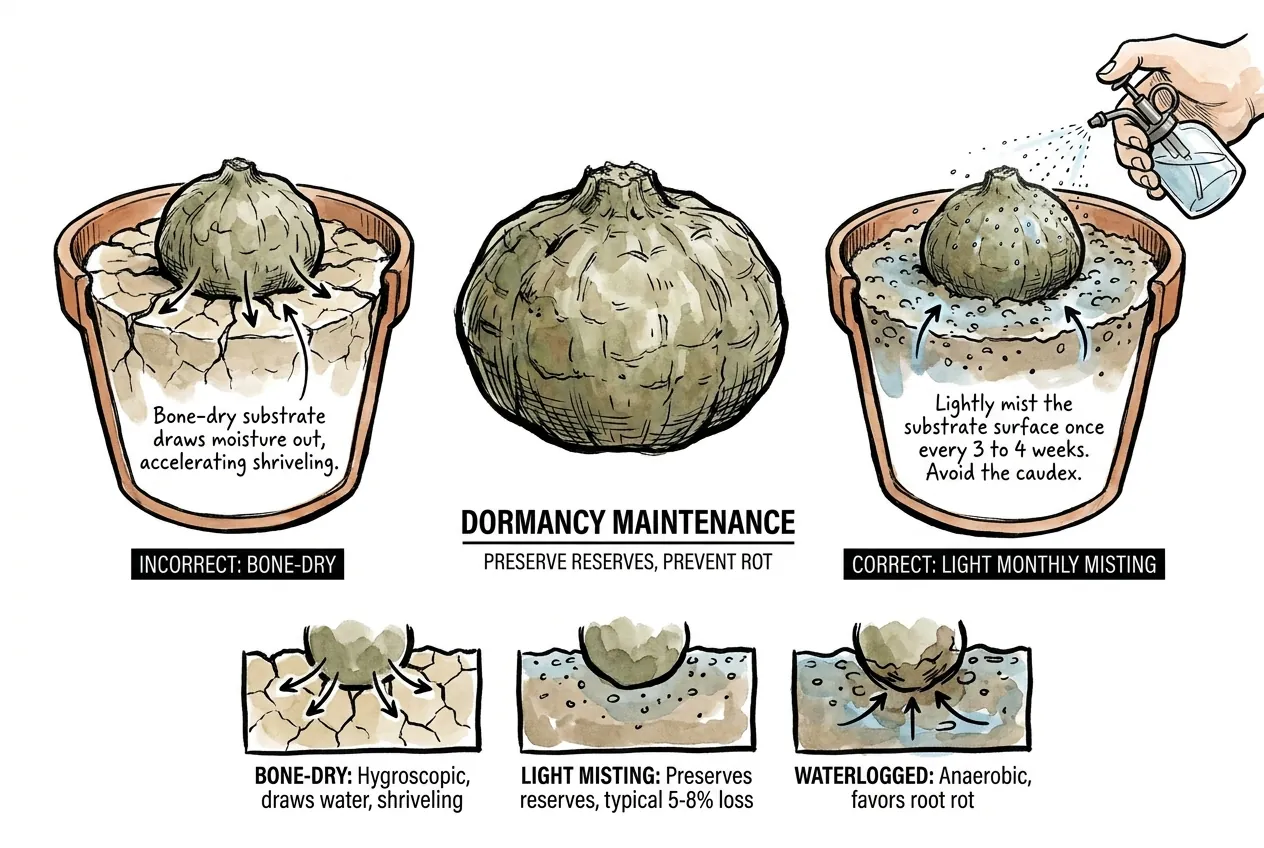
Water from tuber and substrate evidence
Water only when the tuber and substrate show a need, and keep moisture from sitting at the base. Lightly moistening the mix may be appropriate for a truly dehydrated plant, while a firm, cool, or compromised tuber is safer kept drier until the cause is clear.
Balance dryness and oxygen
Very dry air and completely bone-dry conditions over a long dormancy can let a tuber lose more water and shrivel, while constantly waterlogged substrate starves the roots of oxygen and invites rot.
Keep the evaporation explanation simple
Dry medium does not pull water out of an intact tuber by osmosis. The practical loss is mainly evaporation to dry air, so protect the tuber from extreme dryness without keeping the root zone wet.
Use firmness instead of a percentage target
A light touch of maintenance moisture during dormancy is a reasonable middle path. The specific percentage figures for weight loss aren’t established, so judge by the tuber’s firmness rather than a target number.
How long should dormancy last?
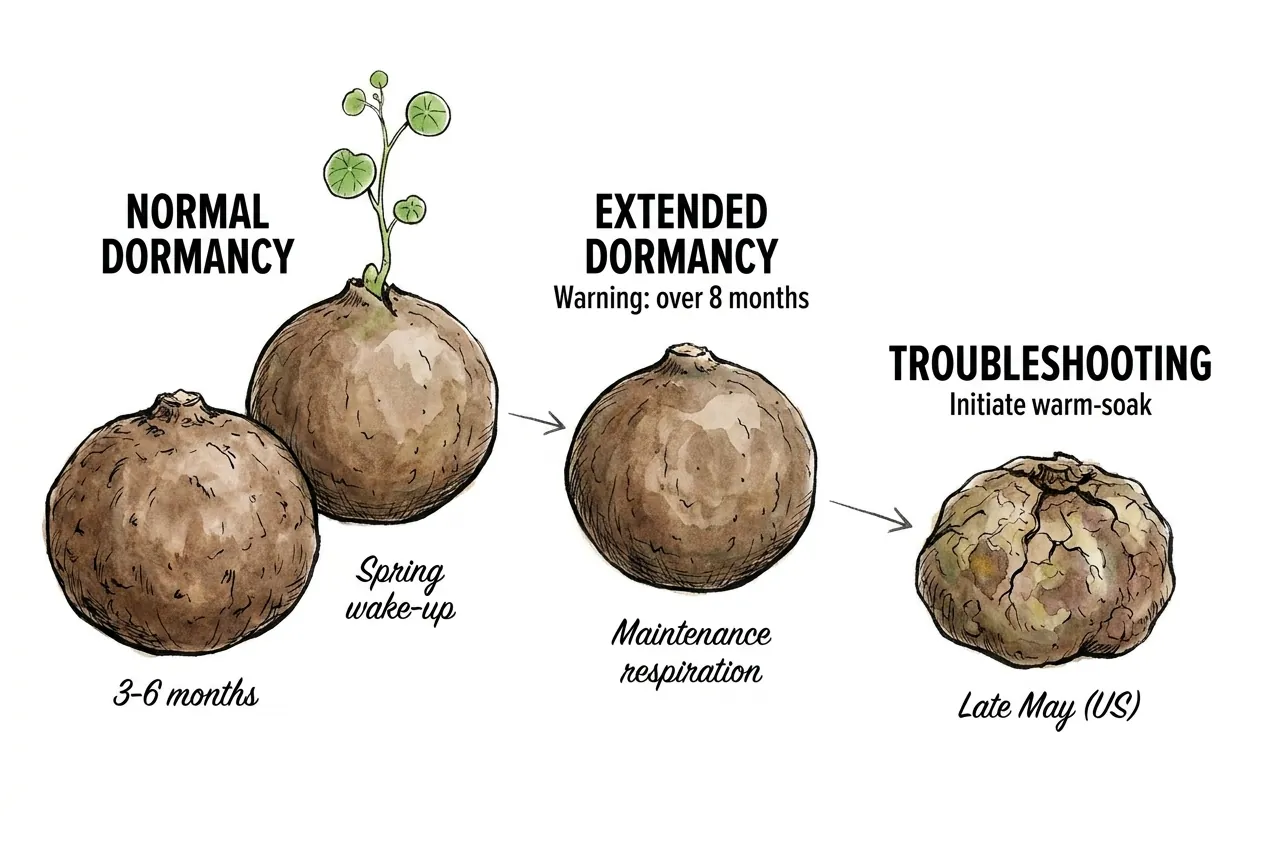
Keep the duration variable
Dormancy length varies with provenance, temperature, light, root condition, and the previous season. A long quiet period is a reason to inspect the plant, not by itself proof of failure.
Escalate when condition worsens
If the tuber remains firm, keep conditions stable and document changes. If it is losing weight, softening, or smelling foul, move to the diagnostic and rot checks before adding water or heat.
Troubleshooting
My tuber shriveled significantly during dormancy
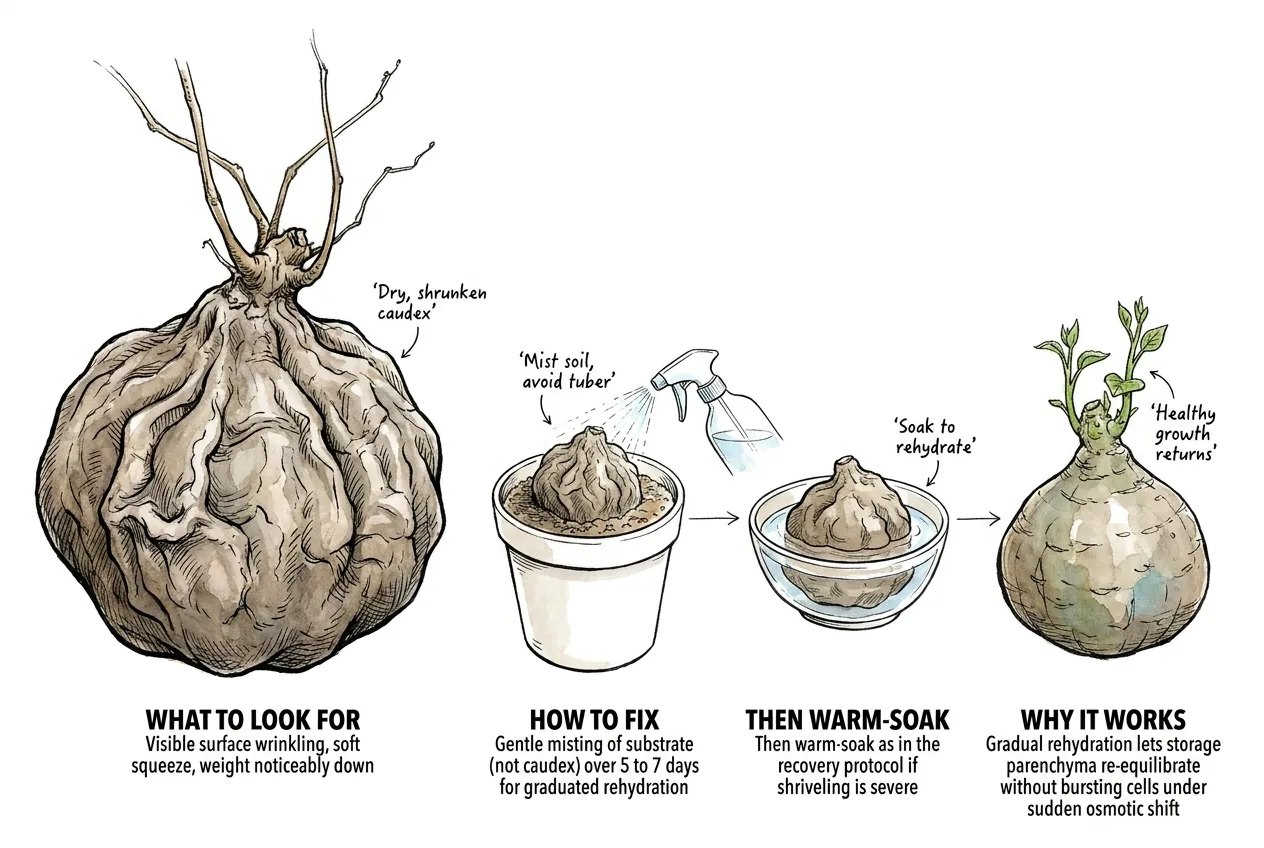
What to look for
Visible surface wrinkling, soft squeeze, weight noticeably down.
How to fix
Rehydrate the substrate cautiously while checking the base and the plant's response. Do not wet the caudex or repeat a soak if the tissue is soft, cool, or foul-smelling.
Why it works
Gradual rehydration may give storage tissue time to re-equilibrate more gently than a sudden soak, but the species-specific response is not quantified.
Base feels soft / smells musty
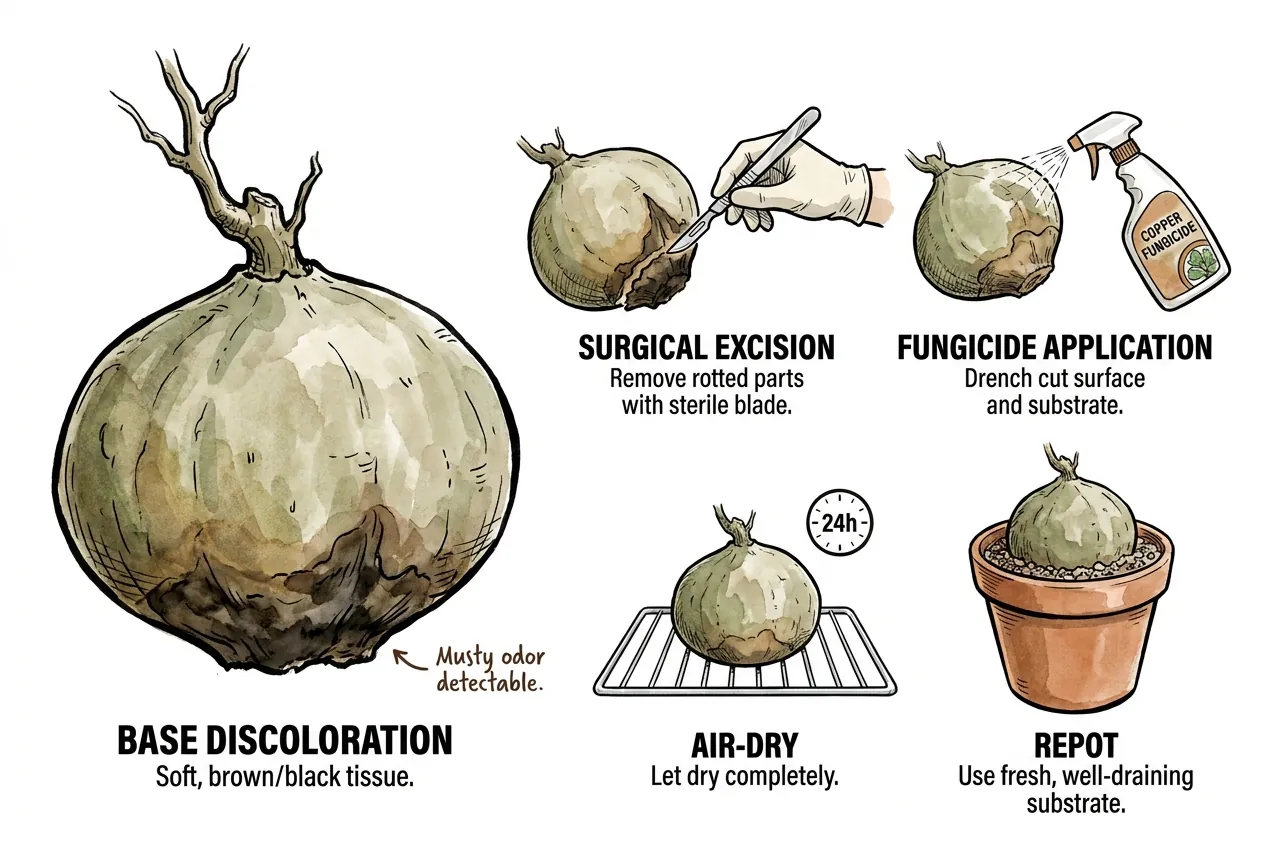
What to look for
Brown or black discoloration at the base, slight give on pressure, musty odor.
How to fix
Unpot promptly when the base is soft or foul.
Excise only clearly rotten tissue
Excise clearly rotted tissue with a sharp, disinfected blade.
Dry the wound before repotting
Keep the wound dry while it calluses, then repot in fresh substrate.
Use products only under their label
If you use a fungicide, choose one labeled for the job and follow its directions and PPE.
Why it works
Removing rotten tissue early limits spread, and fresh substrate reduces the inoculum you repot into.
Keep fresh mix claims bounded
Note that fresh mix reduces but doesn’t guarantee removal of pathogens, disinfect the pot and tools too, and a fungicide is a supplement to clean cutting, not a stand-alone cure.
Spring of Year 2 and absolutely nothing is happening
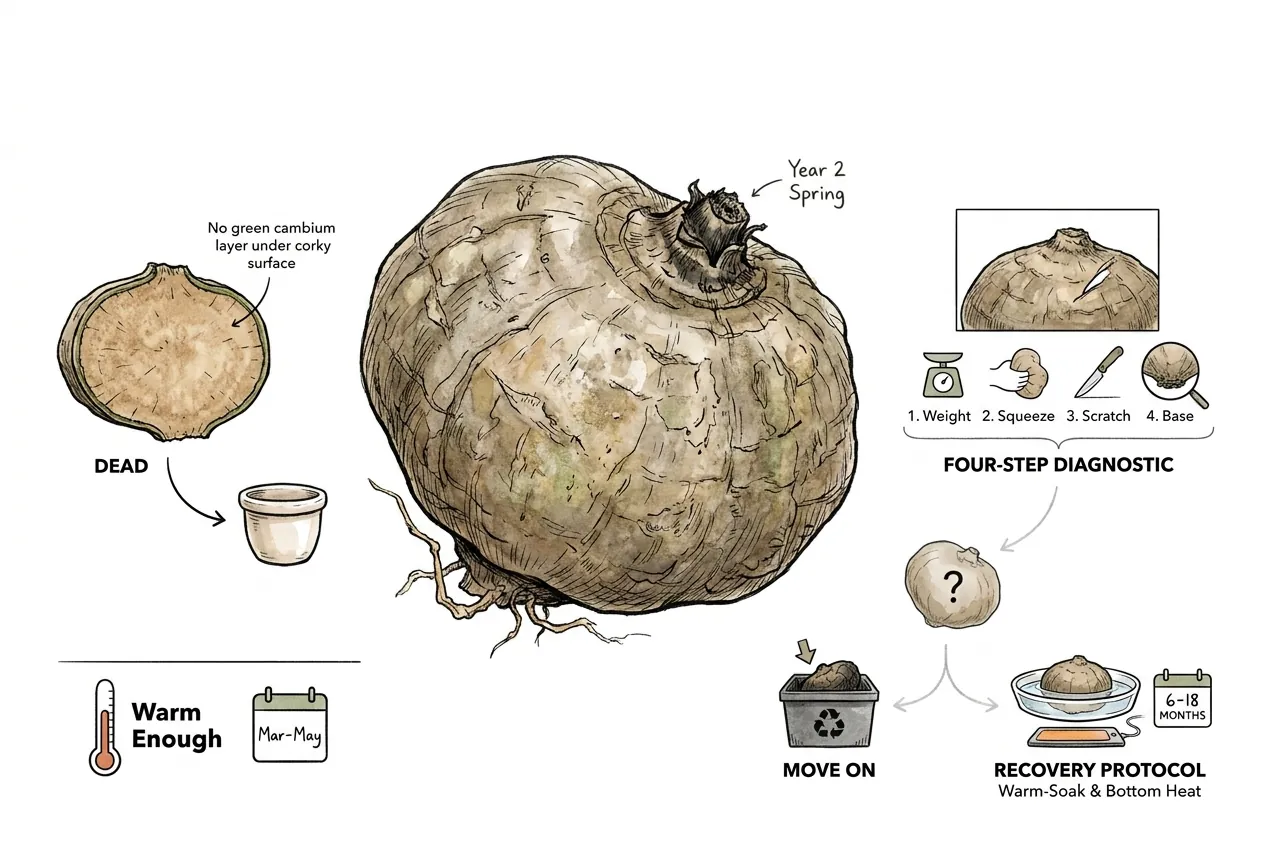
What to look for
No vine or leaf primordia is a cue to inspect moisture, temperature, roots, and the base rather than a diagnosis by itself.
Finish with the least disruptive diagnosis
Run the non-destructive checks first.
Separate dehydration from rot before changing setup
If the tuber appears dehydrated but sound, rehydrate cautiously. If rot is present, address the tissue and substrate before adding heat or water. If evidence remains unclear, seek a plant diagnostic opinion.
Why it works
The order of checks matters because heat and water can worsen an undiagnosed rot. Use measured conditions and the plant's response instead of assuming that one hormone or temperature threshold controls the outcome.
When a Stephania has not moved, I photograph the same tuber face and record pot mass, base color, odor, and visible bud change. A shielded logger at tuber height records air temperature every five minutes from sunset until two hours after sunrise without touching the pot, window, or heat source. I repeat the outside-pot check before adding heat because this preserves the overnight minimum and cold duration without disturbing roots.
That card gives me a timeline without turning impatience into repeated unpotting. It does not prove the tuber is viable, but it makes a new soft area or a true loss of weight easier to judge.
Practical conclusion
Keep Year-1 Vigor in Perspective
Year-1 growth can run on stored reserves, so a water-bowl flush is not proof that the plant has rebuilt its roots. A real pot and gritty substrate give the second season a better starting point.
Use gentle checks for a stalled tuber
Judge a stalled tuber with gentle, non-destructive checks of weight, firmness, base color, odor, roots, and moisture. There is no single foolproof alive-or-dead test.
Allow months for recovery
Recovery can take many months. Rehydrate only when the evidence supports dehydration, remove clearly rotten tissue with clean tools, and prefer documented nursery-propagated stock with the required import paperwork.