
Pachypodium Lamerei Root Rot: Hot, Wet Soil Risks for Imports
Learn why hot, wet soil deprives imported Pachypodium lamerei roots of oxygen, how dark pots overheat, and how to prevent and manage rot.
Maya Ellison · 2026-06-05 · Updated 2026-08-05 · 25 min read
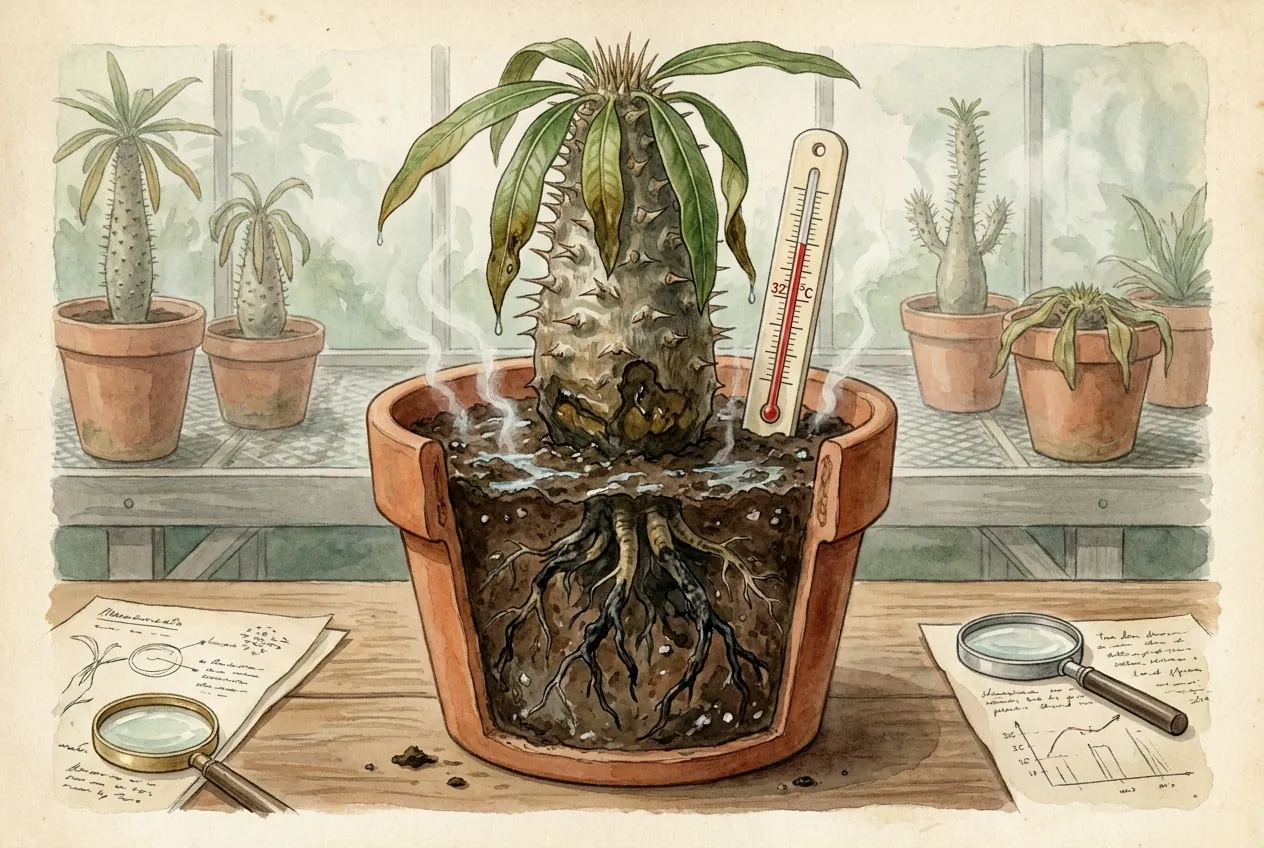
Key Takeaways
- Hot and wet soil together endangers an imported P. lamerei far more than heat or overwatering alone. Warm roots demand more oxygen just as warm, saturated soil holds less.
- Distrust any exact "curves cross at 32 °C" threshold. The takeaway is directional, hotter-and-wetter is worse. Real root oxygen status also depends on wetness, air-filled porosity, pot size, and microbes.
- Fresh imports arrive bare-root with feeder roots lost and reserves depleted, so keep the root zone cooler and well-aerated. A light-coloured or double-potted container cuts radiant heating cheaply.
- Settle a bare-root import dry and ventilated long enough to inspect the wounds before potting into a coarse, fast-draining mix. Measure substrate temperature at root depth, not just the surface.
- A sour, fermented smell signals active rot: unpot, cut back to clean tissue, and use a labelled fungicidal dust only as directed. Odor cannot name the organism or set a countdown, so investigate rather than wait.
Why can hot, wet soil endanger imported Pachypodium lamerei?
A freshly imported Pachypodium lamerei is especially vulnerable in soil that is both hot and wet, because the combined stress can be more damaging than either heat or watering frequency alone.
Two things work against the roots at once as the root zone warms. Warm roots respire faster and so demand more oxygen, while warm water holds less dissolved oxygen.
In a saturated, poorly-aerated pot that squeeze can tip roots into oxygen starvation.
Keep Exact Thresholds in Perspective
You will sometimes see a precise the curves cross at 32 °C claim for this.
Treat any such exact tipping point with skepticism. Oxygen demand (a rate) and dissolved-oxygen concentration are different quantities on different scales, so they cannot literally be plotted as two lines that cross, and the real oxygen status of a root also depends on how wet the mix is, its air-filled porosity, container size, and microbial activity.
The dependable takeaway is directional. Hotter and wetter is worse. There is no magic degree number.
Drought is comparatively survivable because the caudex itself stores water and buffers the plant for a long time.
The dangerous scenario is a warm, wet pot. There the fine roots, not the caudex, are what fail first.
Keep the root zone cooler and well aerated rather than treating hot soil as harmless.
What is the Q10 rule for root respiration?
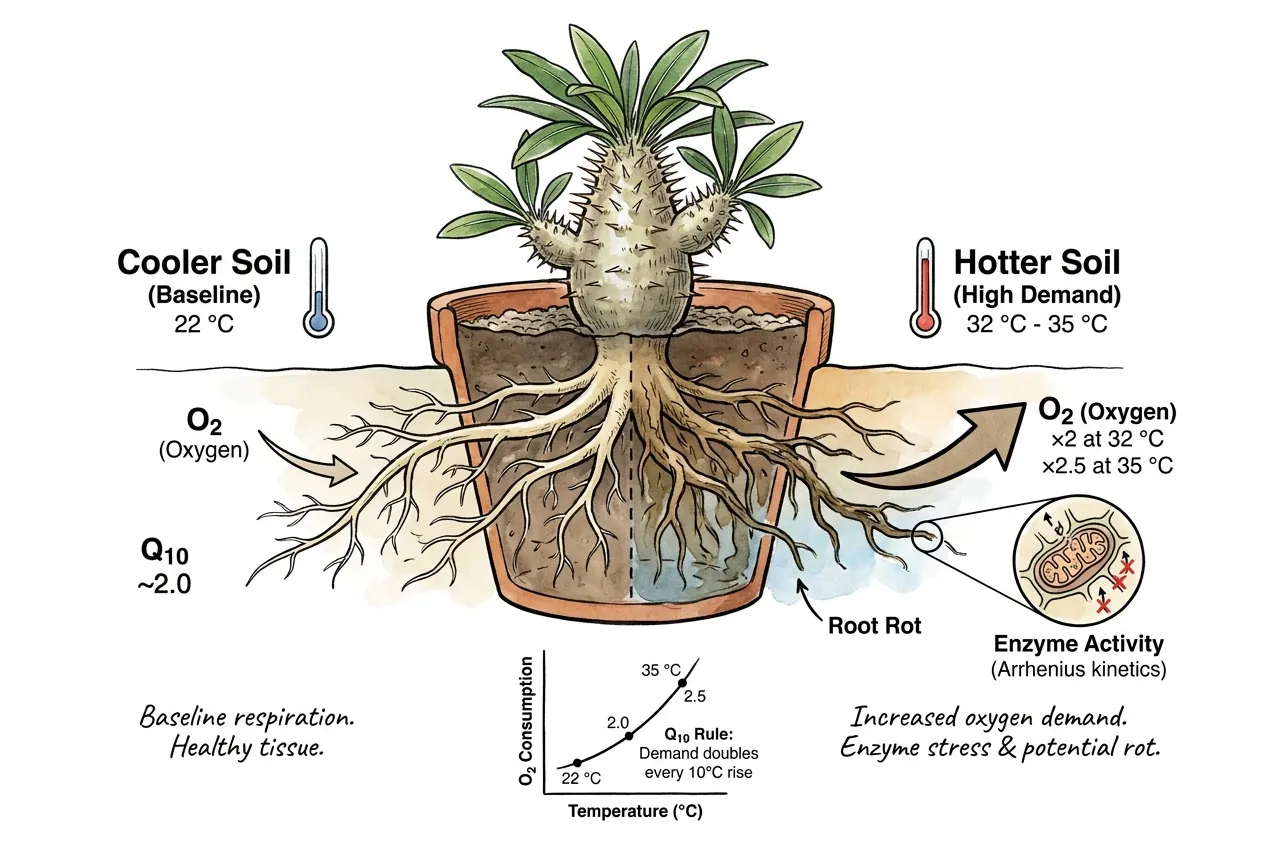
The Q10 rule of thumb says a biological rate roughly doubles for every 10 °C rise, over a limited range.
Reviews of plant respiration commonly assume a Q10 near 2 for the ordinary physiological range, while noting that Q10 is not a fixed constant. It tends to fall as temperature climbs, and plants can acclimate, which lowers the sensitivity.
So doubles per 10 °C is an approximation, not a law, and it should not be extrapolated confidently into the high-temperature, enzyme-stressing range.
What this means in your pot
A root that is warmer respires faster and demands more oxygen.
Going from about 22 °C to 32 °C (a 10 °C rise) is where the about double figure applies.
Smaller steps give proportionally smaller changes. For example, 28 °C to 35 °C is a 7 °C rise, which at Q10 = 2 works out to roughly 1.6×, not 2×.
Use the Q10 estimate as directional context
Modest substrate warming raises root oxygen demand appreciably, even though the exact response varies with temperature and acclimation.
That is one half of the hot-and-wet problem. The other half is that warm water carries less oxygen, covered next.
How does dissolved oxygen in soil water drop with temperature?
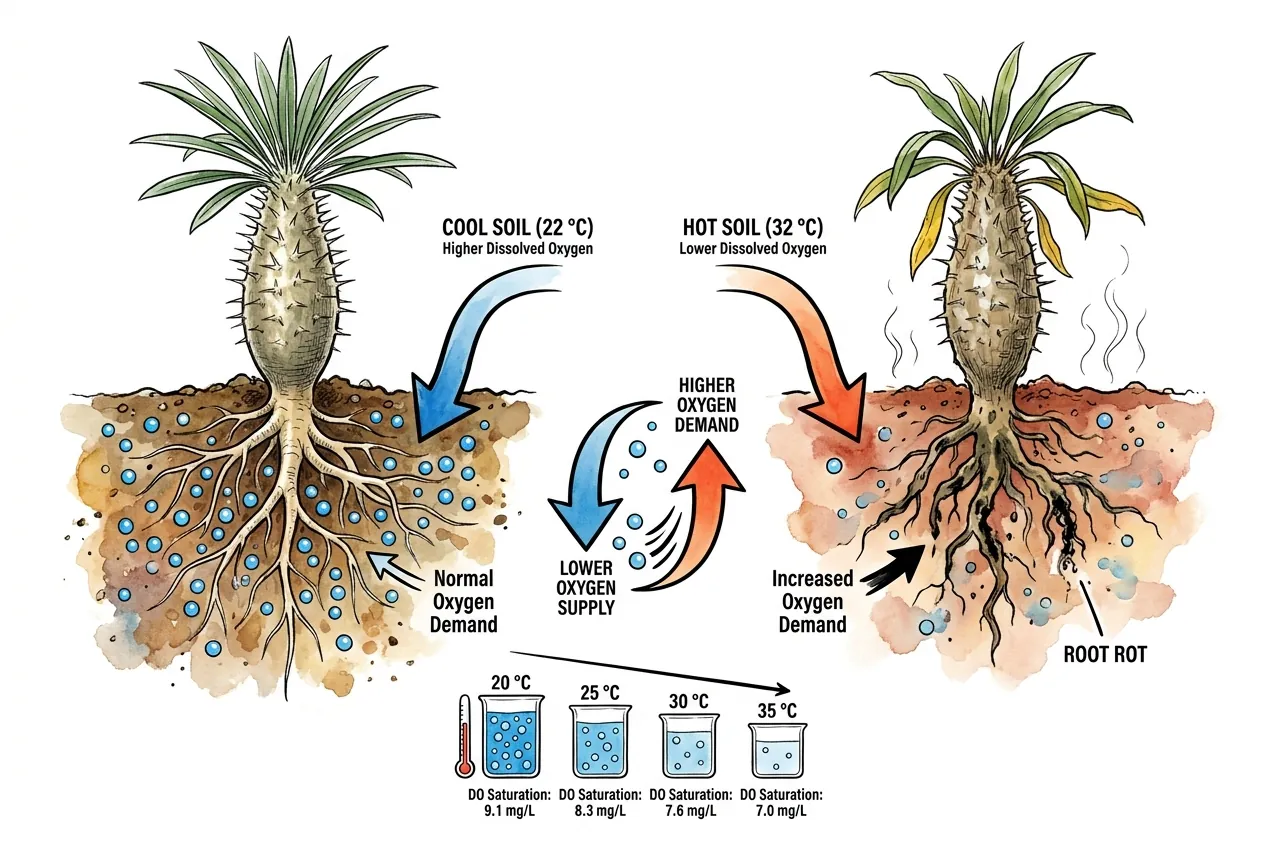
Dissolved oxygen saturation in pure water falls steadily as temperature rises. Standard USGS tables show roughly 9.1 mg/L at 20 °C and about 7.0 mg/L at 35 °C.
That is only the ceiling. In real wet substrate, root and microbial consumption plus slow diffusion drive the actual oxygen at the root surface far below saturation, often into the low single digits within hours of waterlogging.
Below roughly 2 mg/L, many non-wetland roots are forced toward anaerobic metabolism.
The important point is the combination, not a precise calculation. Warming both raises root oxygen demand and lowers how much oxygen the water can hold, so a hot, saturated pot is far more likely to run the roots short of oxygen than a cool or well-drained one.
The numbers below illustrate the direction of each effect. They are not a validated model that pinpoints a lethal temperature, and the demand column is a rough Q10 illustration rather than a measurement on this species.
| Substrate temperature | DO saturation (mg/L) | Relative root O2 demand |
|---|---|---|
| 22 °C | 8.7 | 1.0× (baseline) |
| 28 °C | 7.9 | 1.5× |
| 32 °C | 7.4 | 2.0× |
| 35 °C | 7.0 | 2.5× |
What happens when roots switch to anaerobic fermentation?
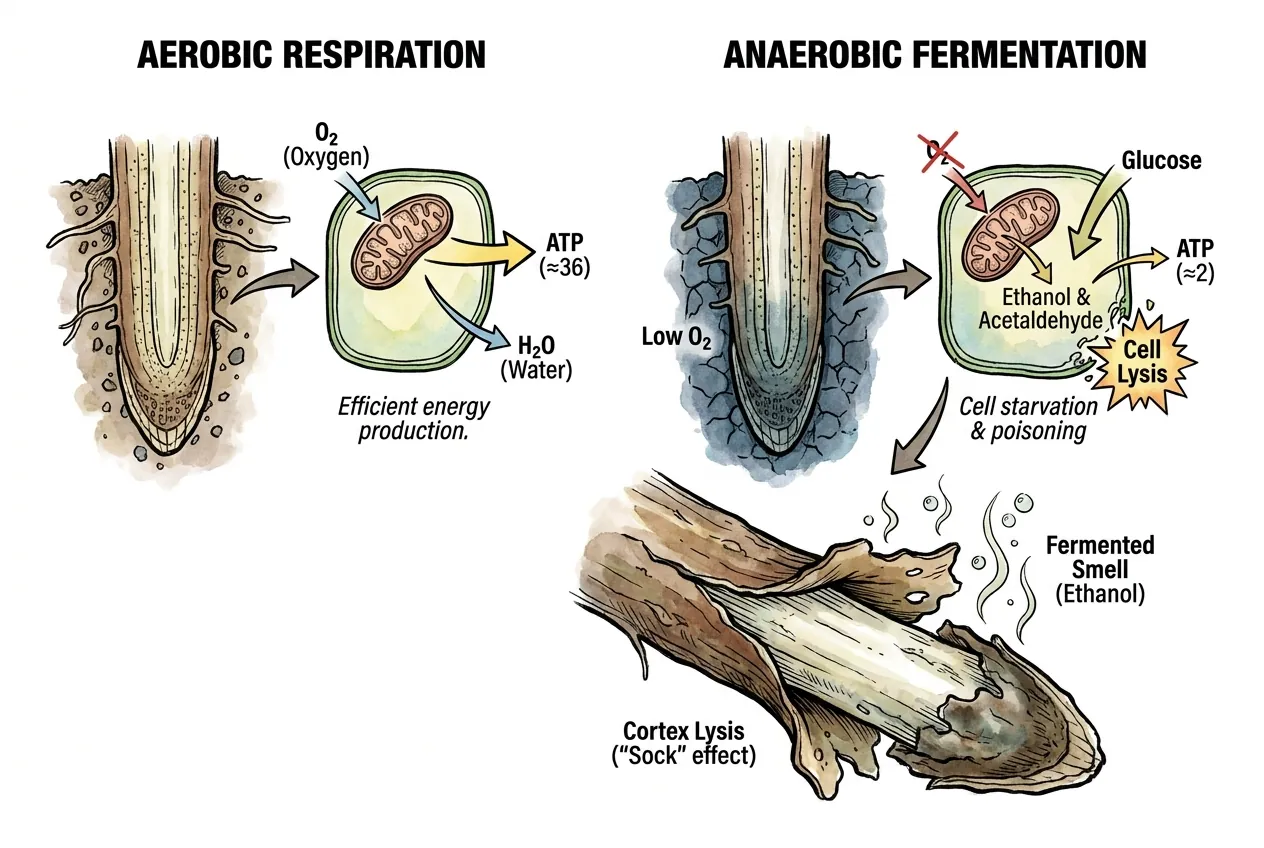
When oxygen at the root drops far enough, cells shift toward fermentation, using enzymes like pyruvate decarboxylase and alcohol dehydrogenase, and ethanol and acetaldehyde build up.
Fermentation yields far less energy than aerobic respiration (the textbook comparison is on the order of a couple of ATP per glucose versus dozens), so the tissue is energy-starved.
Plants do have adaptive responses to low oxygen and can, up to a point, tolerate and clear these byproducts, so treat the cell poisons itself as a simplified picture, not a fixed 48-to-72-hour countdown.
In practice, roots that have been warm and waterlogged often show soft, darkened, foul-smelling tissue, and in advanced rot the cortex can slough off the central core with light pressure.
A sour, fermented or vinegary smell from the substrate of a freshly imported caudex plant is a genuine warning sign that something is rotting.
If you notice that, act promptly, unpot, inspect the roots, and cut back to clean tissue, but understand that odor alone does not tell you exactly which organism is involved or precisely how long you have. It signals investigate now, not a guaranteed hours-long deadline.
Why are freshly imported Pachypodium lamerei more vulnerable?
Freshly imported Pachypodium lamerei often arrive with feeder roots removed or damaged, limited leaf area, and little buffering against pot-temperature swings.
That combination makes a hot, wet root zone especially risky. The exact response still depends on the plant, container, substrate, and local weather.
What does the import process do to the root system?
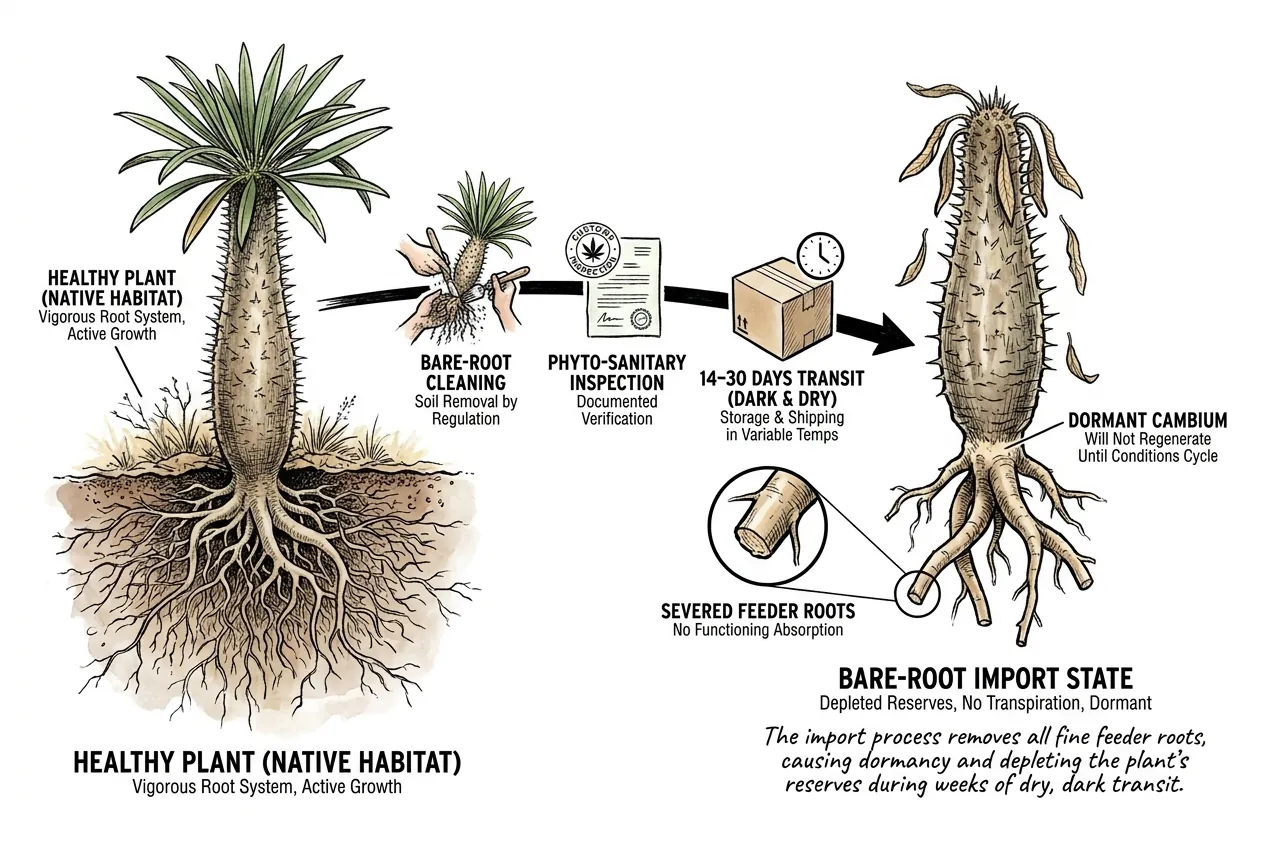
Separate plant-health rules from CITES rules
Plant-health (phytosanitary) rules generally require imported plants-for-planting to arrive free of soil and other growing media, with inspection, which in practice means bare-rooted and washed.
Separately, CITES governs trade in listed species. Most Pachypodium are on Appendix II (three Malagasy species are Appendix I), so legal trade needs the right CITES and export/import paperwork.
Being CITES-listed is not itself the reason a plant is bare-rooted, and nothing requires deliberately cutting off every healthy feeder root. The point is simply that imports typically arrive washed bare-root and with many fine roots lost or damaged.
Buy artificially propagated, documented stock and check the paperwork.
Transit can keep a plant dry and dark for an extended period, with temperature and duration varying by shipment.
Inspect the actual specimen rather than assuming a fixed transit window.
By the time the plant reaches you it may have few functioning feeder roots, dormant cambium, little leaf area for transpiration, and depleted reserves after a dry shipment. Root regrowth depends on the actual tissue condition and on restoring suitable temperature and moisture cycles.
What is the native substrate Pachypodium lamerei evolved on?
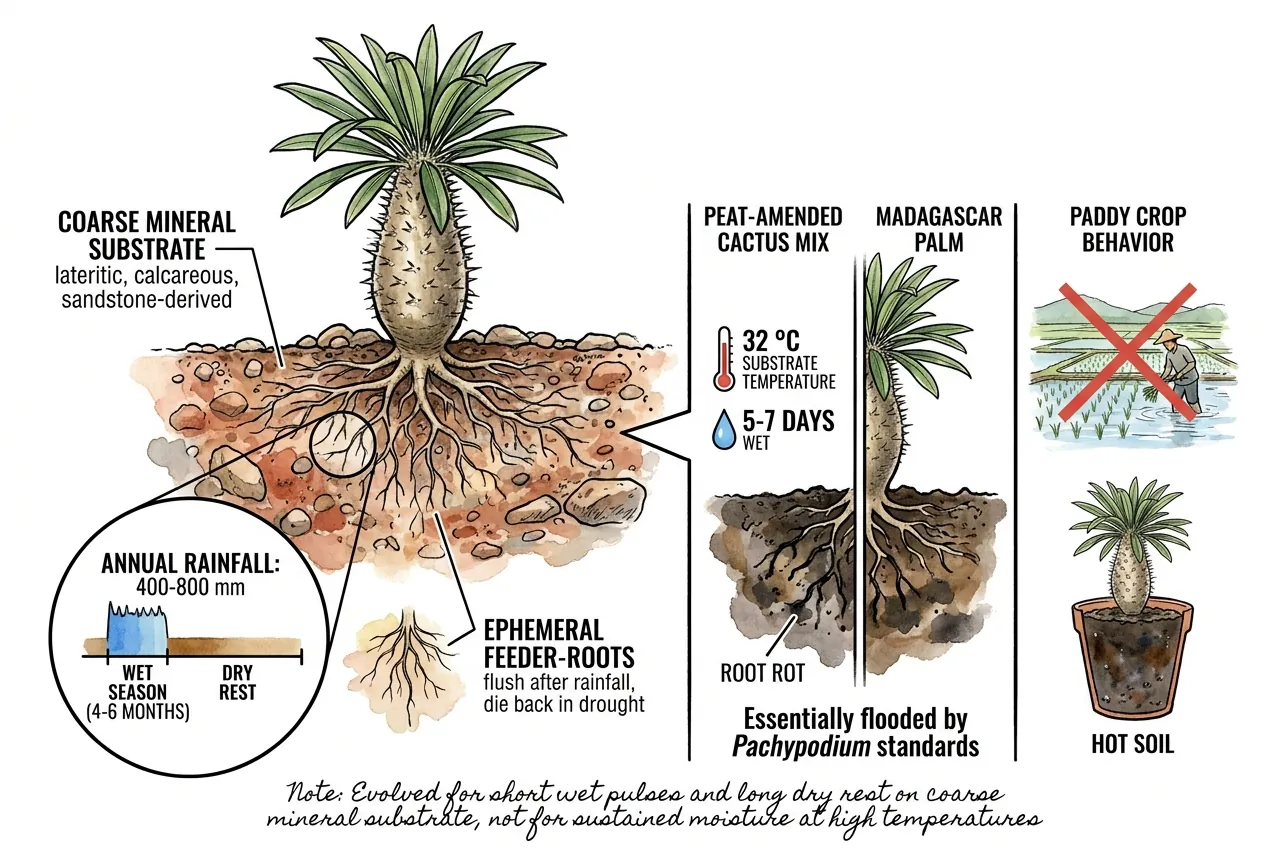
The IUCN Red List places P. lamerei in southwestern Madagascar dry-deciduous forest and subarid thicket biomes.
Annual rainfall is roughly 400 to 800 mm concentrated in a 4 to 6 month wet season.
Substrates are lateritic, calcareous, or sandstone-derived. Coarse, free-draining, and holding very little gravimetric water.
The Rapanarivo monograph documents that P. lamerei roots are shallow and laterally spreading on adult plants, with a coarse main framework and a fine ephemeral feeder-root system that flushes after rainfall and dies back during drought.
The plant evolved for short wet pulses and long dry rest on coarse mineral substrate.
A peat-amended cactus mix that retains moisture for several days in hot conditions may leave too little air around recovering roots.
Match the mix to the plant’s dry-down and root-zone measurements rather than copying a generic houseplant medium.
What soil temperatures can summer pots reach, and why does it matter?
Dark plastic containers in strong summer sun can reach substrate temperatures high enough to damage fine roots. Nursery measurements of black pots in full sun commonly land in the 45 to 55 °C range at the sunlit wall.
Switching to a white or light-coloured pot is a simple passive control, and container-colour research shows it can reduce peak substrate temperature substantially in some setups.
Root damage rises as temperature and exposure time increase, but the species-specific curve has not been published.
Avoid treating any precise X% dead at Y °C figure as established.
Because root damage happens below the surface, it is best to act on temperature before the top of the plant shows symptoms, by the time leaves drop, root damage may already be done.
How hot do black plastic pots actually get in summer sun?
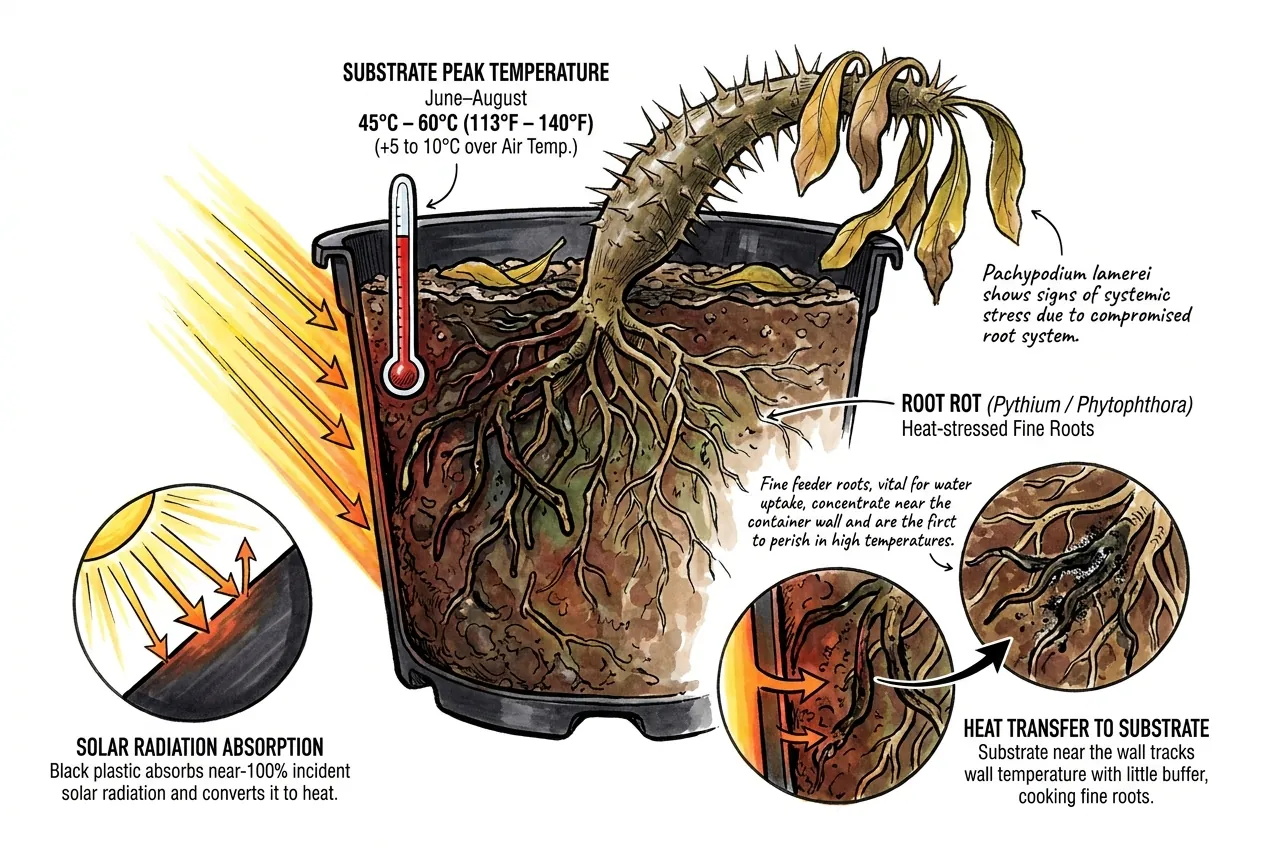
Nursery substrate-temperature trials in hot, sunny climates can measure peak afternoon substrate temperatures of roughly 45 to 55 °C at the wall of 1- to 3-gallon black plastic containers in full sun.
The sun-facing pot wall may run several degrees hotter than air temperature.
Actual peaks vary with latitude, pot size, wind, and exposure, so use local measurements when possible.
Why the pot wall heats the mix
Dark plastic absorbs a large share of incident solar radiation and converts it to heat at the pot wall.
Substrate near the wall can track that temperature with little buffer, although root distribution varies by plant and pot.
Does pot color really matter that much?
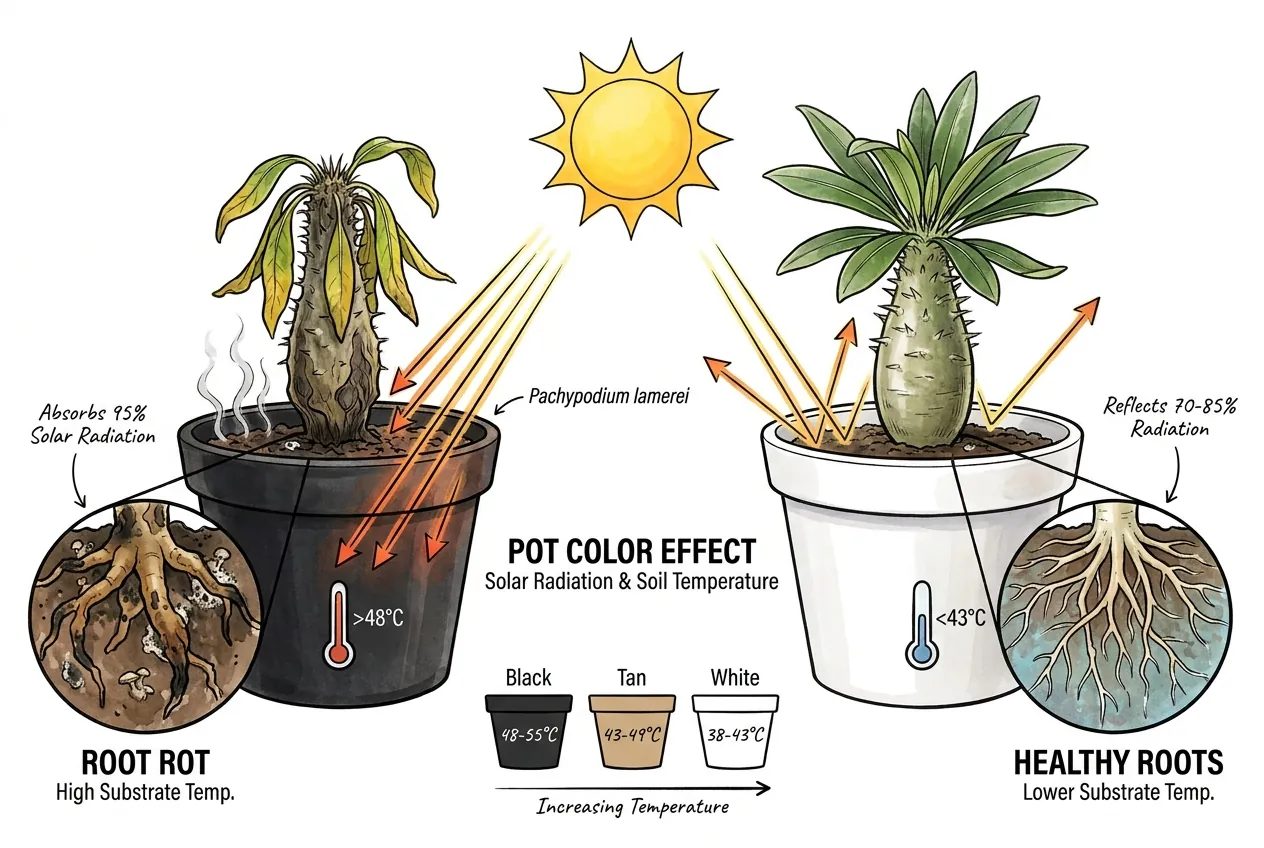
Pot colour can matter substantially in direct sun.
Container trials in southern US nursery production report lower peak substrate temperatures when switching from black to light-coloured containers, although the size of the reduction depends on pot, sun, wind, and measurement location.
The mechanism is albedo. Light-coloured surfaces generally reflect more incoming radiation than black plastic, reducing heat absorbed at the wall. The exact reflectance is material- and finish-dependent.
| Pot configuration | Peak substrate temp (Austin, TX June, 92 °F air) |
|---|---|
| Black 1-gal, full sun | 48 to 55 °C |
| Tan 1-gal, full sun | 43 to 49 °C |
| White 1-gal, full sun | 38 to 43 °C |
| White 1-gal, 50 % shade cloth | 33 to 38 °C |
| White 1-gal, 50 % shade, double-potted | 30 to 35 °C |
A light-coloured outer pot or a ventilated double-pot is a low-complexity way to reduce radiant heating for an imported P. lamerei.
Measure the actual root-zone response rather than assuming that one colour creates a universal safe or lethal zone.
What does root-heat damage look like above moderate temperatures?
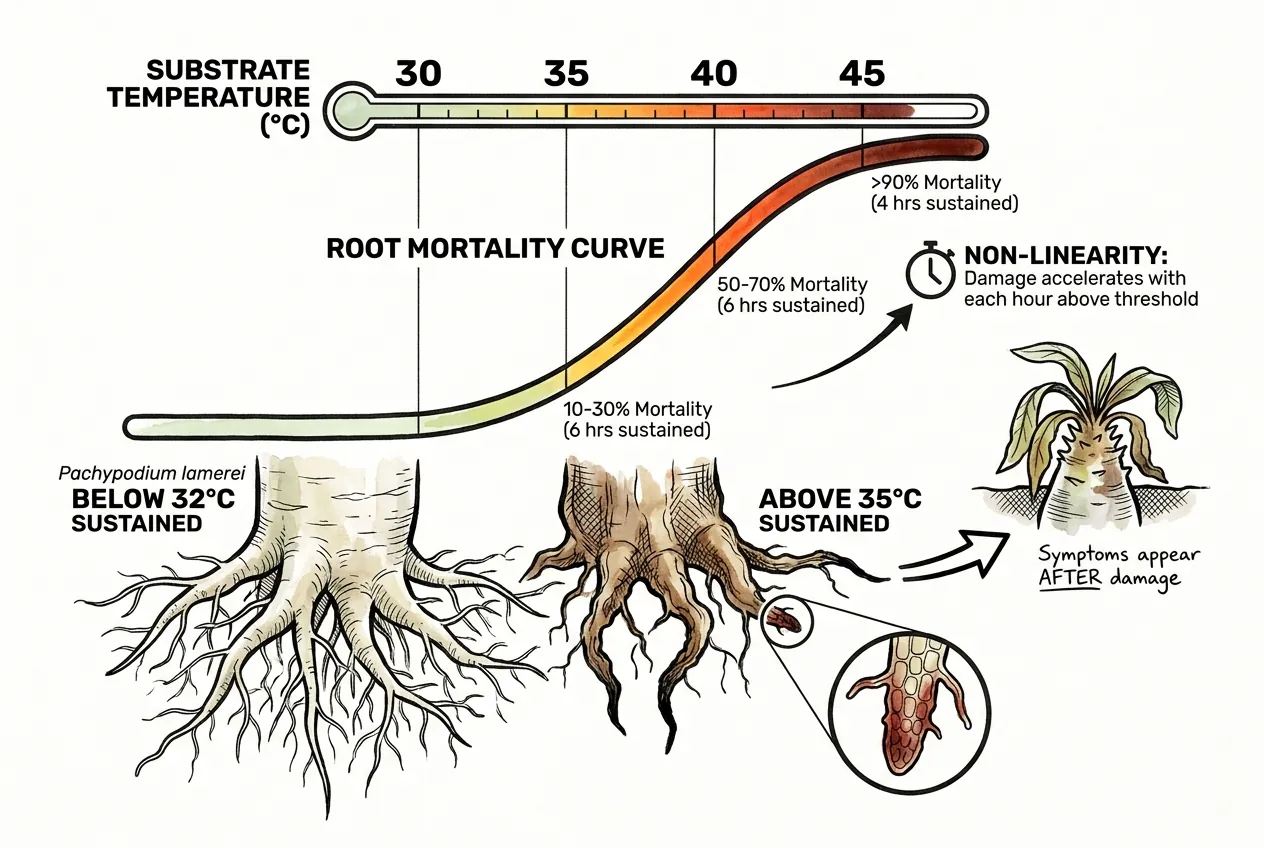
Container root-heat research (on various nursery species, not Pachypodium) consistently shows that fine-root damage climbs steeply once substrate temperatures push into the mid-40s °C and above, and that the critical temperature depends heavily on exposure time. A brief spike is tolerated better than hours of sustained heat.
The specific percentages sometimes quoted for this species are not from a published P. lamerei study, so read them as illustrative of the shape (damage rises sharply and non-linearly with both temperature and duration), not as measured values.
Cool early because damage starts below the canopy
Damage accumulates with time above threshold and happens underground before the canopy reacts, so prevention and early cooling beat waiting for visible symptoms.
How do I keep substrate temperature in a lower-risk range?
Use a staged dry settling period followed by a monitored introduction to substrate.
The duration depends on wound condition, tissue firmness, shipment history, and the local environment. Do not turn a calendar into a universal protocol.
After potting, keep the root zone monitored and make any light or watering increase gradual.
Use a coarse, airy mix adjusted to the local climate and pot size. The example proportions are starting points, not a validated recipe for every import.
What substrate ratio actually works?
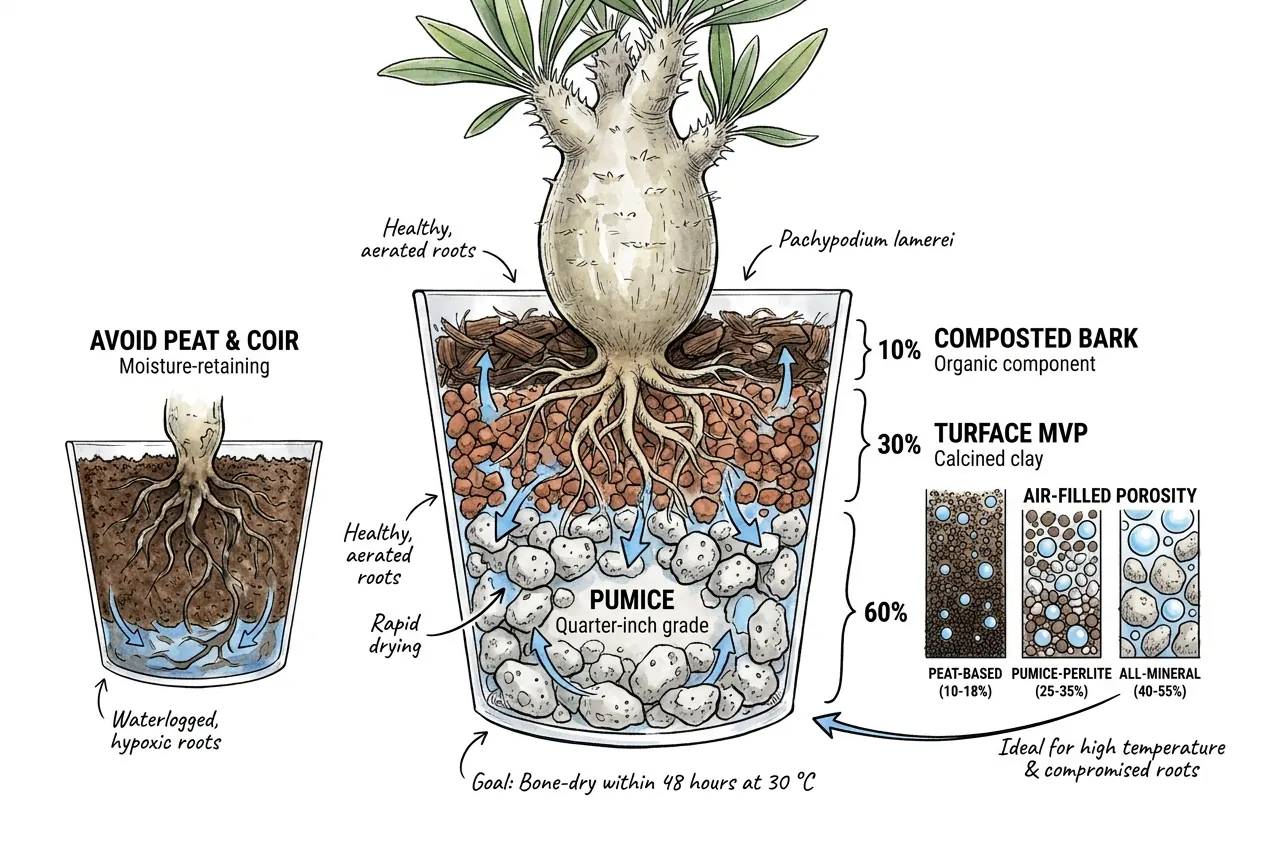
A coarse, mineral-heavy substrate that drains fast and holds plenty of air is the goal.
Substrate-physics research shows peat-based mixes hold relatively little air while coarse mineral mixes hold much more. Typical recommended container air space often falls in roughly the 10–30% range, and very high air space also means you must water more often.
For a compromised import facing hot spells, erring toward a coarse, airy, quick-draining mix helps the roots get oxygen when the mix is briefly wet. The exact air-filled porosity depends on the actual materials and pot, so test and adjust rather than trusting a fixed number.
A mineral-heavy mix with a modest moisture buffer is a reasonable starting point. Adjust the proportions to pot size, climate, and measured dry-down.
Avoid high-retention amendments when they keep a compromised root zone wet for too long.
During the import window, aim for a predictable dry-down and adequate air space rather than a fixed bone-dry deadline.
Why does the dry-storage phase matter?
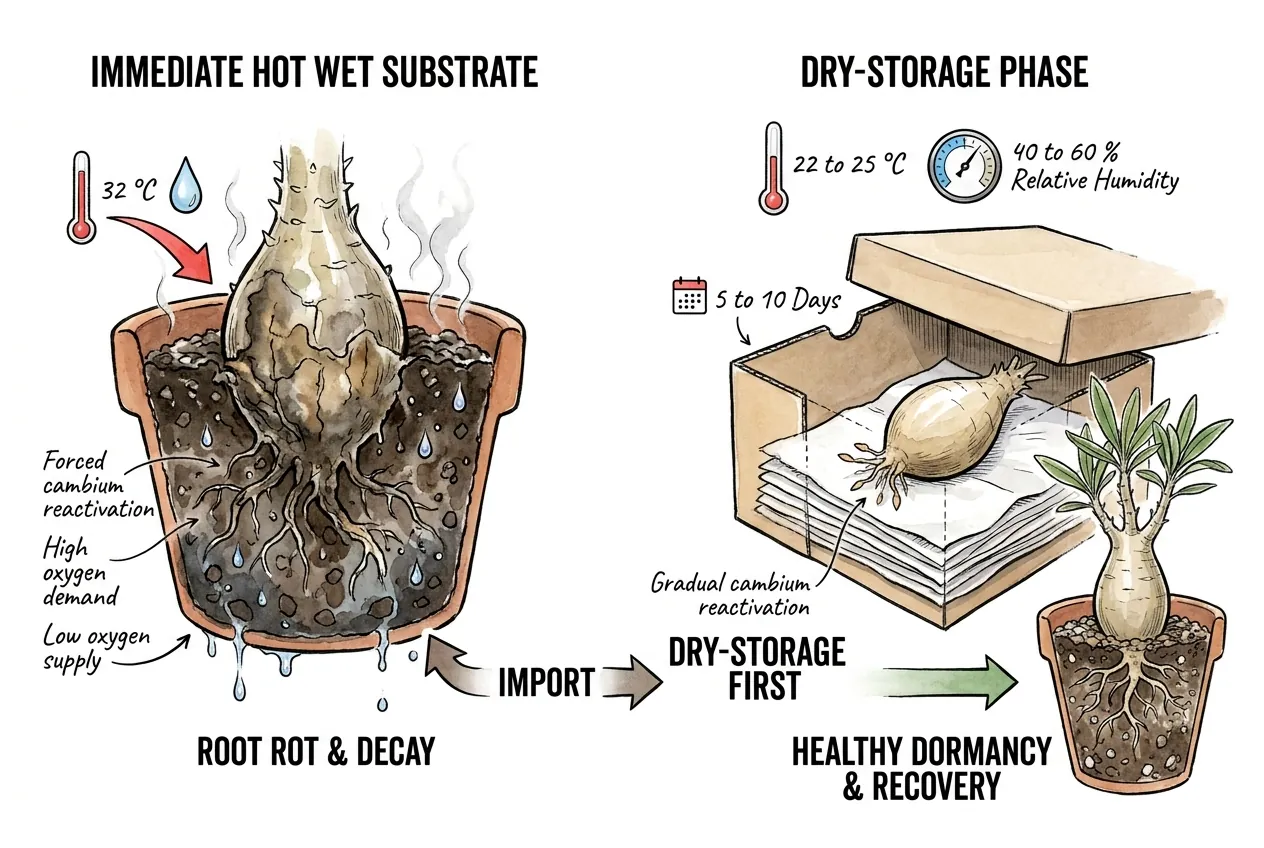
Giving a bare-root import a short dry settling period before potting is sensible. It lets you inspect and clean the roots and avoids dropping a dormant, rootless plant straight into wet substrate.
General plant physiology supports the idea that dormant tissues resume activity gradually with warmth and modest humidity rather than instantly, but the specific day-counts here are rules of thumb, not a measured Pachypodium protocol.
Imported caudex plants are in deep cambium dormancy after weeks of dry transit.
Dropping them into a 32 °C wet substrate forces cambium reactivation under simultaneous high oxygen demand and low oxygen supply.
A cool-to-warm, shaded, ventilated dry-storage location can give the plant time for inspection before substrate contact.
Use the tissue condition and wound surface to decide when to proceed rather than a fixed number of days.
During the first days, keep wounds clean and ventilated and monitor the chosen pot location before committing the plant to it.
If a pesticide or fungicide is used, follow its current label and safety directions.
What active cooling tactics buy more margin?
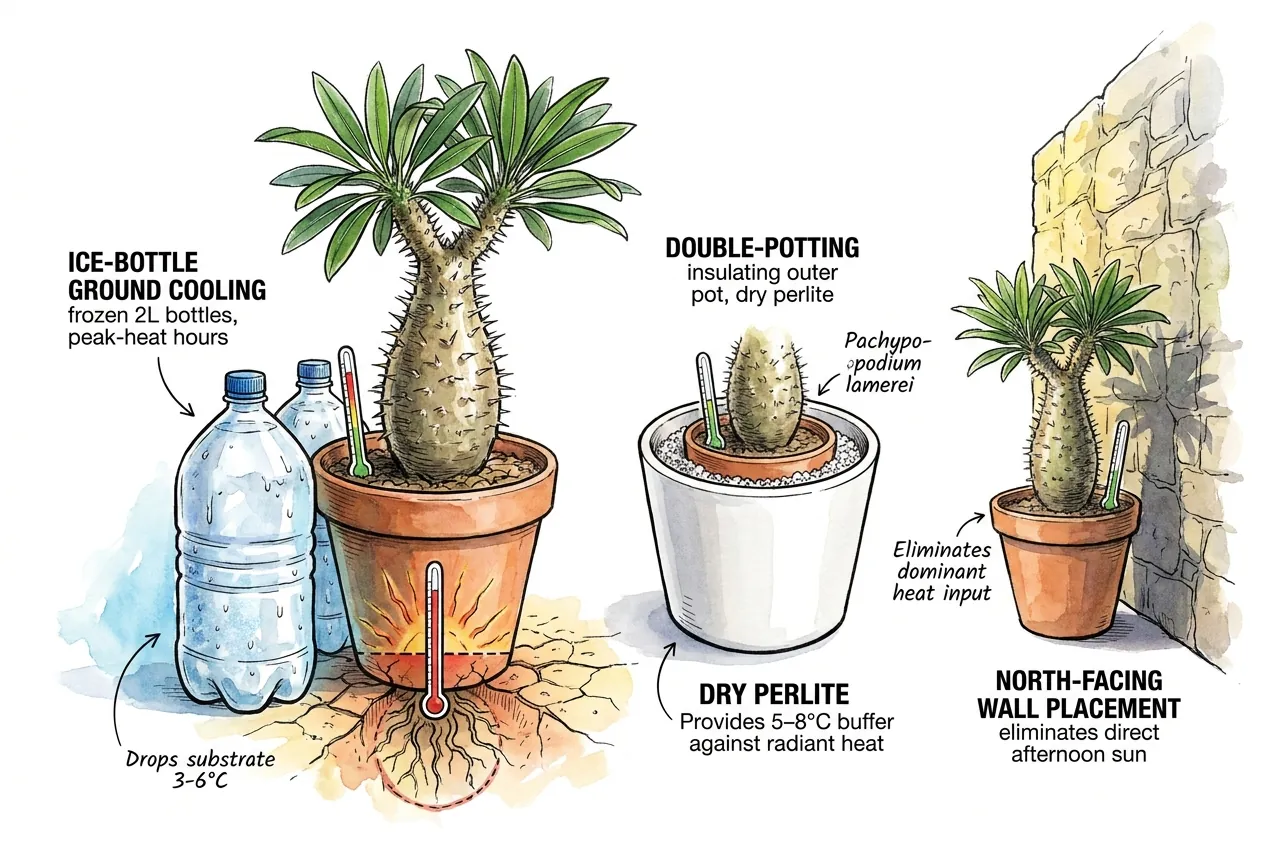
In hot climates, use several low-risk controls together. A light-coloured outer pot, temporary shade, airflow, and a measured move away from radiant surfaces.
Double-potting with a ventilated insulating gap can reduce radiant heating, while a shaded position avoids the strongest afternoon beam.
Each control may provide some margin, but the size depends on the setup. Avoid improvised ice cooling that creates abrupt temperature swings or condensation.
How do I tell hot-soil hypoxia apart from Pythium, bacterial soft rot, and dehydration?
Smell, root appearance, and caudex firmness together give useful clues, but treat them as clues, not a diagnosis.
Roughly. Warm, waterlogged hypoxia and rot often smell sour, fermented, or vinegary and leave soft, water-soaked, dark roots that slough off the core. A faintly earthy or fishy smell with browning roots can point toward Pythium/Phytophthora water molds, which are often favored by cool, wet conditions. A putrid, rotten-cabbage stench with mushy, slimy tissue that spreads fast suggests bacterial soft rot. And simple dehydration has little smell, with a shrunken caudex and dry, brittle roots, and is the one situation that gradual rehydration can reverse.
These presentations overlap, mixed infections are common, and the same symptoms can have different causes, so odor cannot definitively identify the organism.
For a valuable plant, or when it is unclear, confirming the cause may need a proper lab diagnosis.
Whatever the label, the immediate response is similar. Unpot, remove all soft, dead, and discolored tissue back to firm clean tissue with a sterilised blade, and keep the plant dry, warm, and isolated while it recovers.
What does each problem actually smell like?
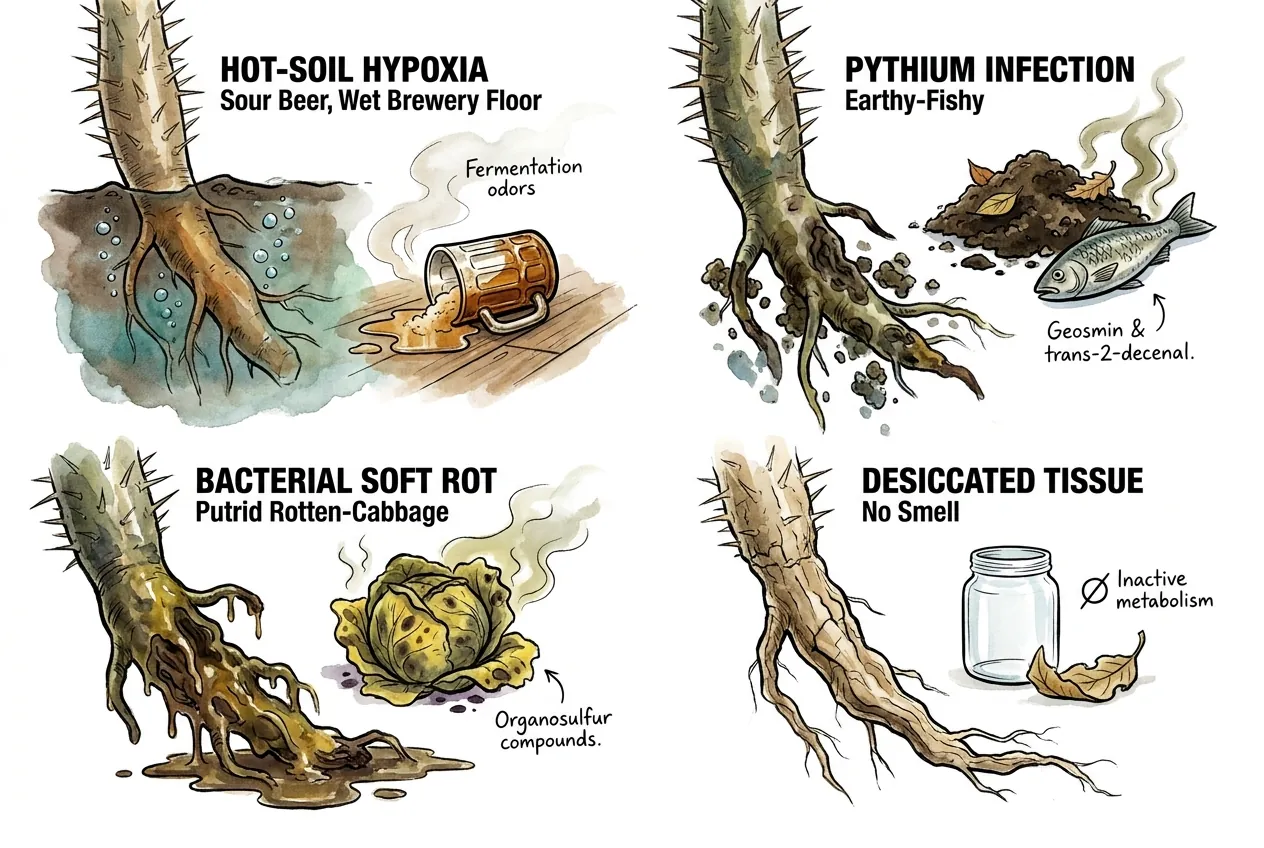
Different decay processes do release different smelly compounds. Fermentation gives ethanol and acetaldehyde (the sour, beery note), some water molds are associated with earthy/geosmin and fishy notes, and bacterial soft rot releases sulfur compounds that read as rotten cabbage.
That is why smell carries some information.
But these associations are general and overlapping, not a reliable key that tells you the exact organism from odor alone.
Use your nose as one input alongside how the roots and caudex look and feel, and smell both the substrate and freshly cut tissue.
A sour, fermented smell means there is active rot (investigate and cut back now, not a precise stopwatch on the plant’s life).
Fishy, earthy, or putrid odours can accompany different forms of decay, but smell is not a reliable organism key or timetable.
No smell with dry tissue is more consistent with dehydration, yet roots and the caudex still need inspection before rehydration.
What do the root systems look like compared side by side?
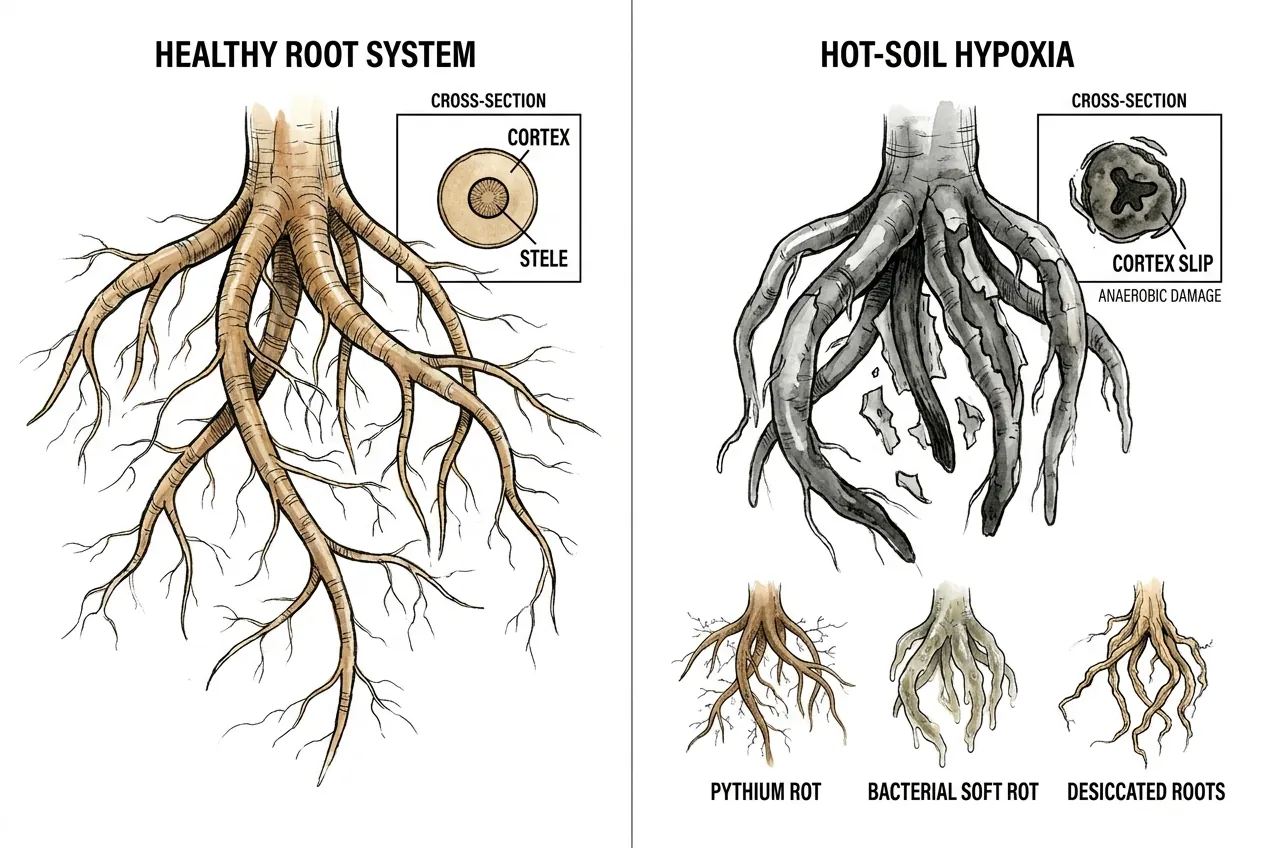
The tissue appearance matches the underlying biochemistry.
Hot-soil hypoxic roots are water-soaked, gray-black, with cortex sliding off the central stele on light touch. Anaerobic damage kills cortex cells from the outside in while the stele resists for longer.
Pythium roots show similar slip but browner, slower, with sometimes-visible oomycete hyphae at the cortex-stele interface under a hand lens.
Bacterial soft rot tissue is mushy, slimy, often translucent, with rapid progression along the entire root and up into the caudex base.
Desiccated roots are dry, brittle, tan to brown, with no softness or smell at all.
| Diagnosis | Smell | Root tissue | Action window | Recovery |
|---|---|---|---|---|
| Hot-soil hypoxia | Sour beer / vinegar | Gray-black, cortex slips on stele | Investigate promptly. No fixed deadline | Depends on caudex and stele condition |
| Pythium | Earthy / fishy | Brown, slower slip | Investigate promptly. Timing varies | Depends on diagnosis and tissue condition |
| Bacterial soft rot | Putrid / rotten cabbage | Mushy slimy, translucent | Can progress quickly. Isolate and investigate | Often guarded. Depends on how far tissue has spread |
| Desiccation | No smell | Dry crackle, brittle | Rehydrate only after roots are confirmed alive | Often more recoverable, but not guaranteed |
What is the recovery protocol when I catch the problem in time?
If inspection confirms active rot, remove only clearly soft tissue with a clean tool, keep the wound ventilated, and use a labelled fungicide only when appropriate for the plant and cut.
Allow the surface to dry before repotting into an airy medium, then resume water cautiously according to root recovery rather than a fixed cure or no-water period.
Why use a labelled fungicide instead of cinnamon?
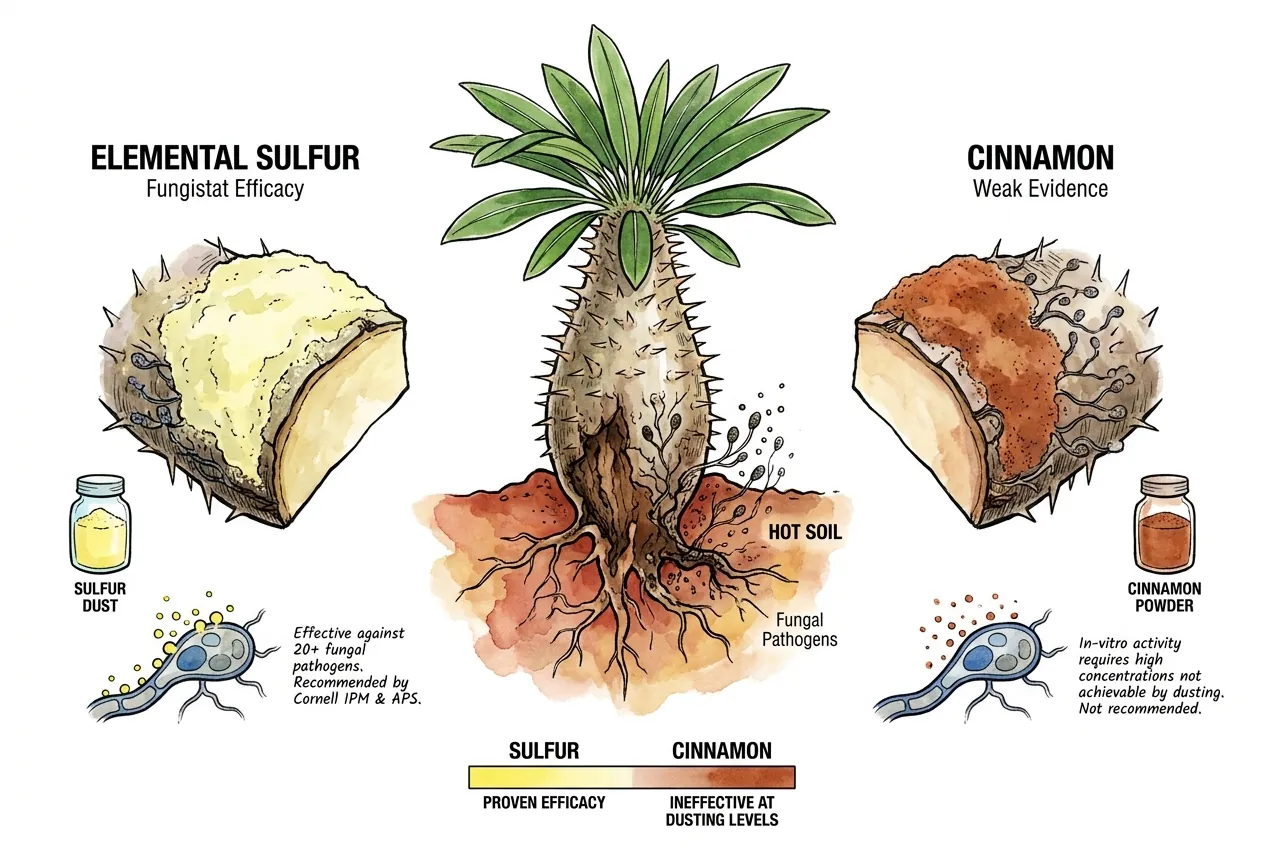
Elemental sulfur has a long history as a broad-spectrum contact fungicide, and a labeled sulfur or copper-based fungicide dust is a more evidence-backed choice than kitchen cinnamon for treating cut surfaces.
Cinnamon has shown some antifungal activity in lab tests, but at doses a light dusting is unlikely to deliver, and it isn’t a reliable substitute.
That said, these are pesticides, not seasonings. Use a product labeled for the purpose, follow its directions, wear gloves and eye protection, and avoid breathing the dust, which irritates eyes, skin, and airways.
Note that sulfur can cause plant injury, or phytotoxicity, in hot conditions. Apply it to a dry wound and keep treated plants out of extreme heat.
A light, even dusting of the cut surface is enough. You don’t need to cake it on.
Why does the dry-cure window need to be 7 to 14 days?
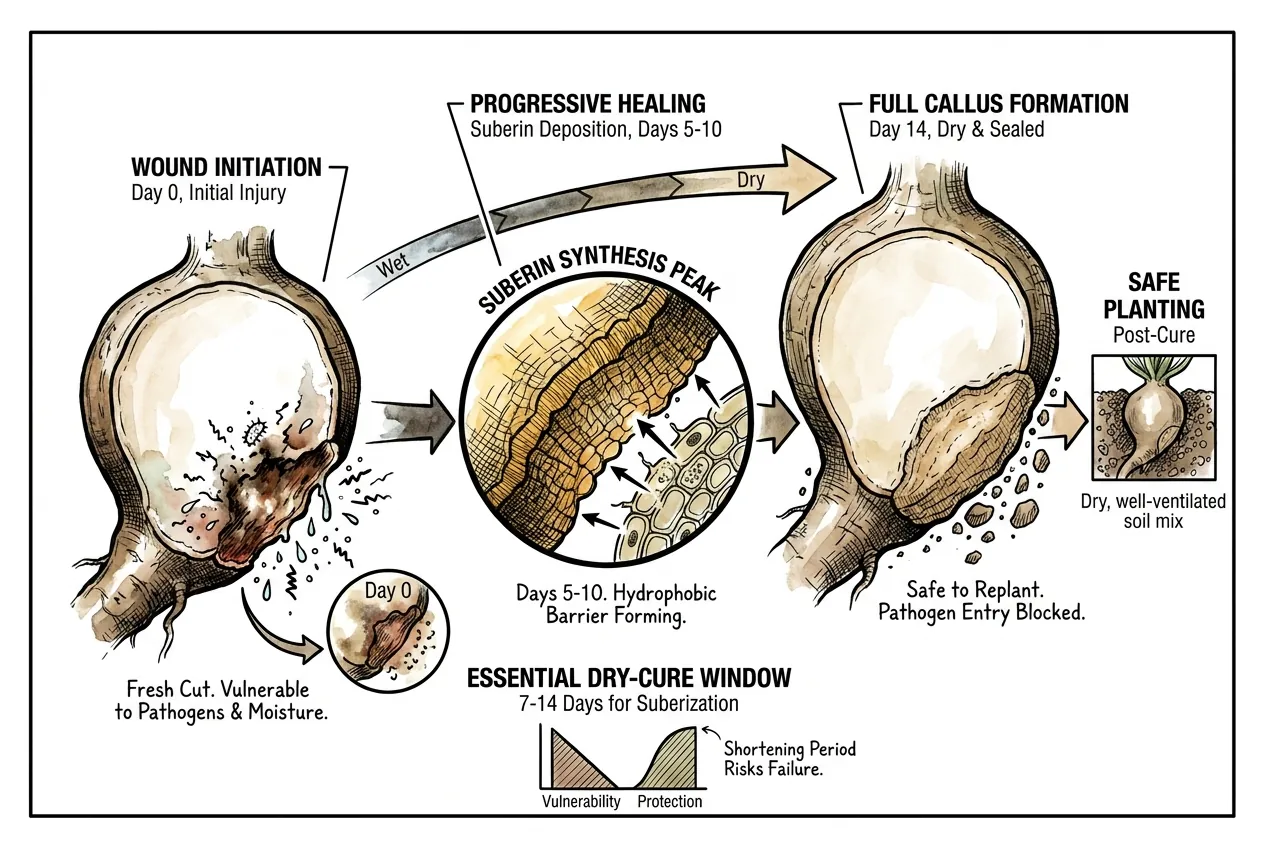
Plant wound-healing involves suberization and callus formation, but the pace varies with wound size, tissue condition, temperature, humidity, and species.
Keep a wound dry and ventilated while it seals, and do not treat a fixed day count as a guarantee.
Propagation guidance often recommends allowing a cut surface to dry before planting, but the useful interval varies with wound size, humidity, temperature, and species.
Use a dry, label-compliant replanting sequence
Cut to clean tissue, use only a label-appropriate treatment, allow the surface to dry, then plant into an airy medium. Same-day planting may be risky when the wound is still wet.
How much root mass can the plant actually lose and recover?
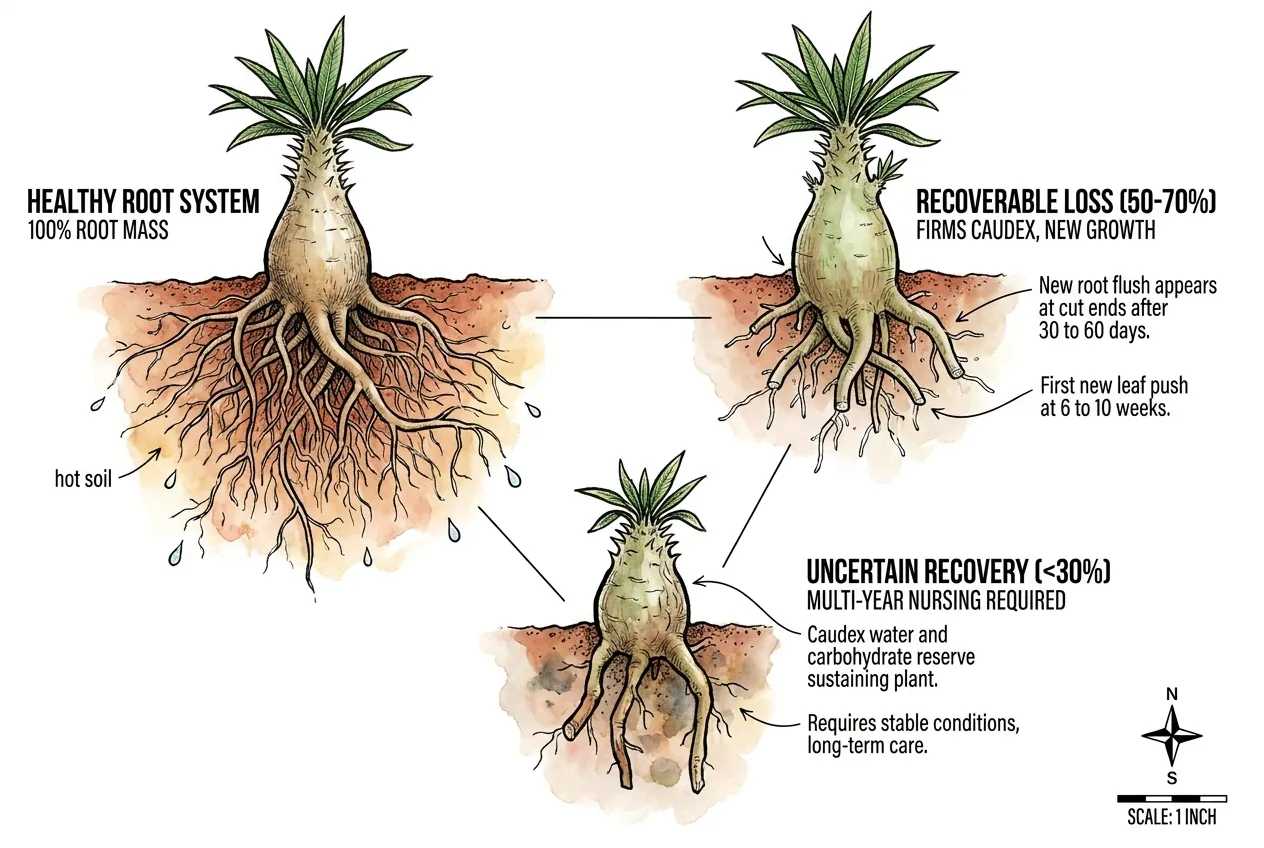
Recovery after root loss depends on the remaining framework roots, caudex firmness, wound condition, temperature, and subsequent watering. Cross-species cultivation reports can provide context, but they do not establish a percentage threshold for P. lamerei.
The caudex stores water and carbohydrates, so a firm plant may tolerate a period without active roots, but the duration is not predictable from caudex diameter alone.
Do not write off a plant that has lost most of its feeder roots.
If the caudex and framework roots remain firm and clean, recovery is possible. Look for new root or leaf growth over the plant’s next growth cycles rather than a fixed number of days.
What gear do I need to actually measure substrate temperature?
A contact probe plus a handheld IR thermometer can cover most temperature decisions in this protocol.
A probe placed near fine-root depth measures the variable that matters. An IR unit is useful for quick surface comparisons but cannot replace a probe in the mix.
A data-logging probe can catch brief peak excursions that occasional spot checks miss when that level of monitoring is justified.
What probe specs actually matter?
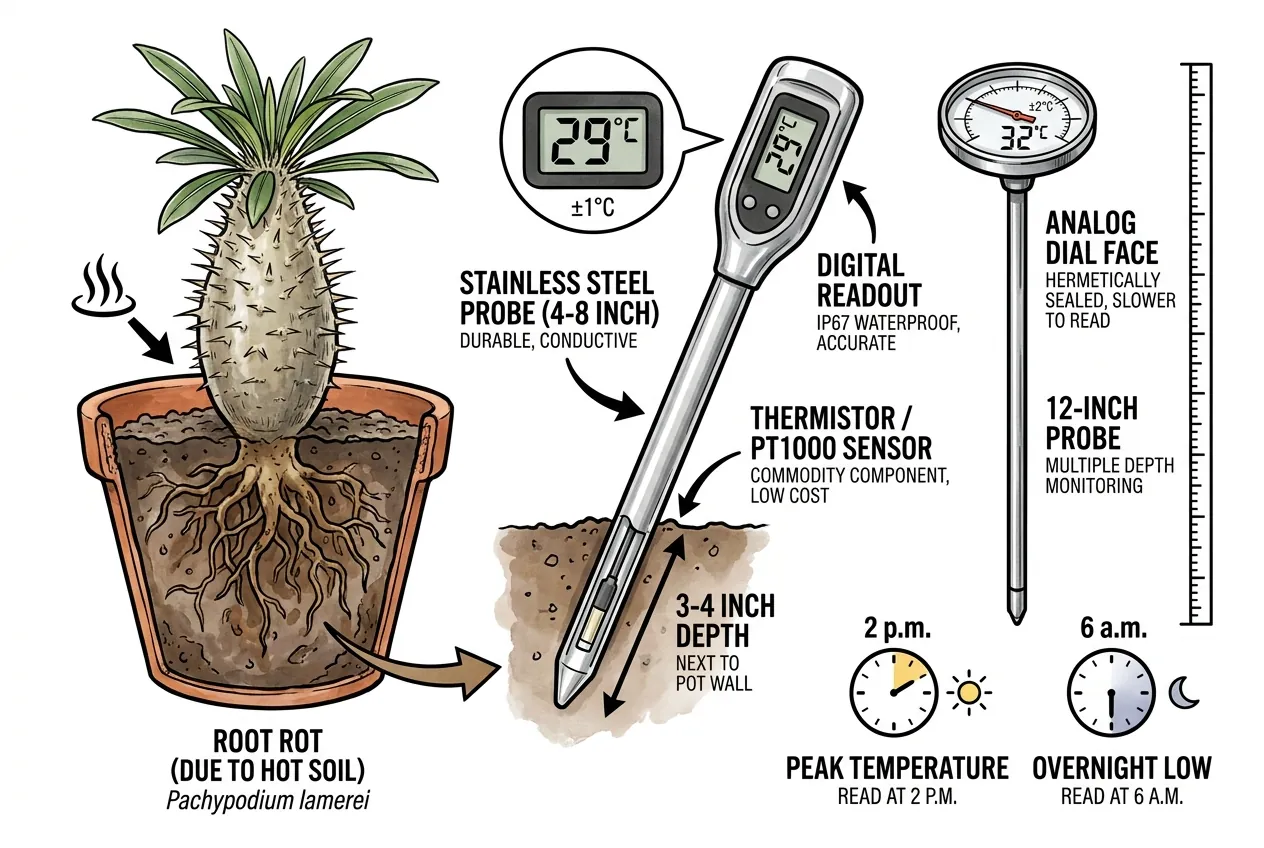
Look for a probe long enough to reach the active root zone, a readable display, and a stated accuracy appropriate to the decision.
Place it consistently in the substrate, noting whether it is near the sunny wall or the pot centre, and compare readings at representative hot and cool periods.
At potting, I mark the sun-facing side and measure the probe tip’s depth below the substrate and distance from the pot wall. The tip sits in the root zone without touching the caudex or plastic. That geometry stays fixed because moving a probe from the cool center to the hot wall can mimic a temperature change.
Every watering starts a new row in my log, beginning with pre-watering pot mass and root-zone temperature. The next entry is pot mass after free drainage.
That row in my log also receives the day’s highest root-zone temperature, the next pre-dawn temperature, and the date the pot returns to its established dry-mass range. Together they show whether retained water overlaps the daily heat peak.
After adding shade or a light outer sleeve, I begin the next test only when pre-watering pot mass is within 1% of the established dry baseline. I apply the same water volume and log root-zone and shielded air temperatures every five minutes, plus pot mass after 30 minutes and 24 hours. I compare the curve of root-zone temperature minus air temperature with 24-hour mass loss because raw pot temperature can fall simply when the day is cooler.
A sealed analog dial contact thermometer is one option for in-substrate use. Dial models of this kind are typically rated around ±1% of full scale, so accuracy in absolute degrees depends on the scale span. Check the stated figure before buying. Many are built with a long compost-style stem, which can be awkward in a small pot and reads a broader region around the tip rather than one precise point, so match the stem length to your pot depth.
Honest tradeoff
An analog dial is slower to read than a digital LCD, and it does not log.
If you want to catch brief peak excursions or want a fine digital readout, choose a digital probe or a data-logging unit instead.
Whatever you use, confirm it reads the substrate near root depth, not just the surface.
Why does IR thermometer emissivity matter?
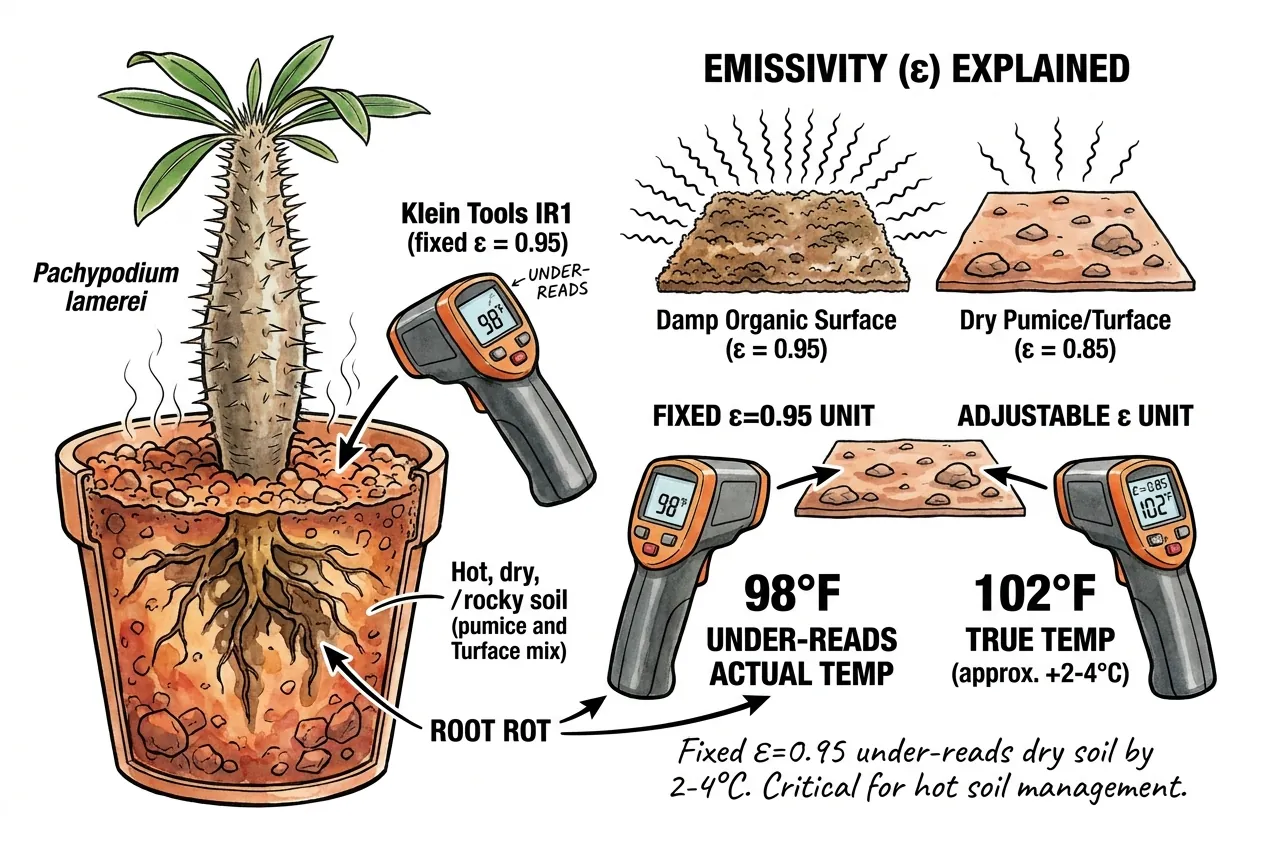
Infrared thermometers measure surface temperature by detecting emitted infrared radiation.
The conversion from photon flux to temperature requires knowing the emissivity (epsilon) of the target surface.
Most consumer IR thermometers use a fixed emissivity around 0.95, which suits damp organic surfaces and leaves.
Dry mineral surfaces like pumice or calcined clay have a somewhat lower emissivity, so a fixed-0.95 unit can read a bit off on them.
The size of that error depends on the exact surface and conditions, so rather than trusting a fixed mental correction, either use an adjustable-emissivity model or cross-check against a contact probe in the same spot.
A basic handheld IR thermometer is handy for quick surface readings. With a distance-to-spot ratio of 10 to 1, a reading taken 10 inches from the target averages an area roughly 1 inch across. The spot grows as you move farther away, while a higher ratio gives a smaller spot at the same distance. Check each model’s ratio, emissivity, and accuracy rather than assuming those specifications are standard across budget units. If the unit has a targeting laser, do not point it at anyone’s eyes.
Two important limits
First, an IR thermometer only reads the surface it is pointed at. It cannot tell you the temperature down at root depth, which is what actually matters, so use it for the pot exterior and soil top, not as a substitute for a probe in the mix.
Second, a fixed-emissivity model can misread dry mineral surfaces somewhat. If that matters to you, an adjustable-emissivity model lets you set the value, and you can sanity-check either against a contact probe.
For continuous logging of substrate temperature at depth, you need a logger with an insertable external probe. Note that basic indoor air thermo-hygrometers (which have no soil probe) will not do this job.
What does a measurement-disciplined hobbyist trial look like?
A small home comparison can move matched, freshly imported P. lamerei plants into different substrate-temperature conditions for a defined observation period. This is a proposed method, not a claim of completed experimental results. The published Q10, soil-oxygen, and nursery-temperature data provide the general rationale. A hobby trial can only describe that setup.
What would the trial actually measure?
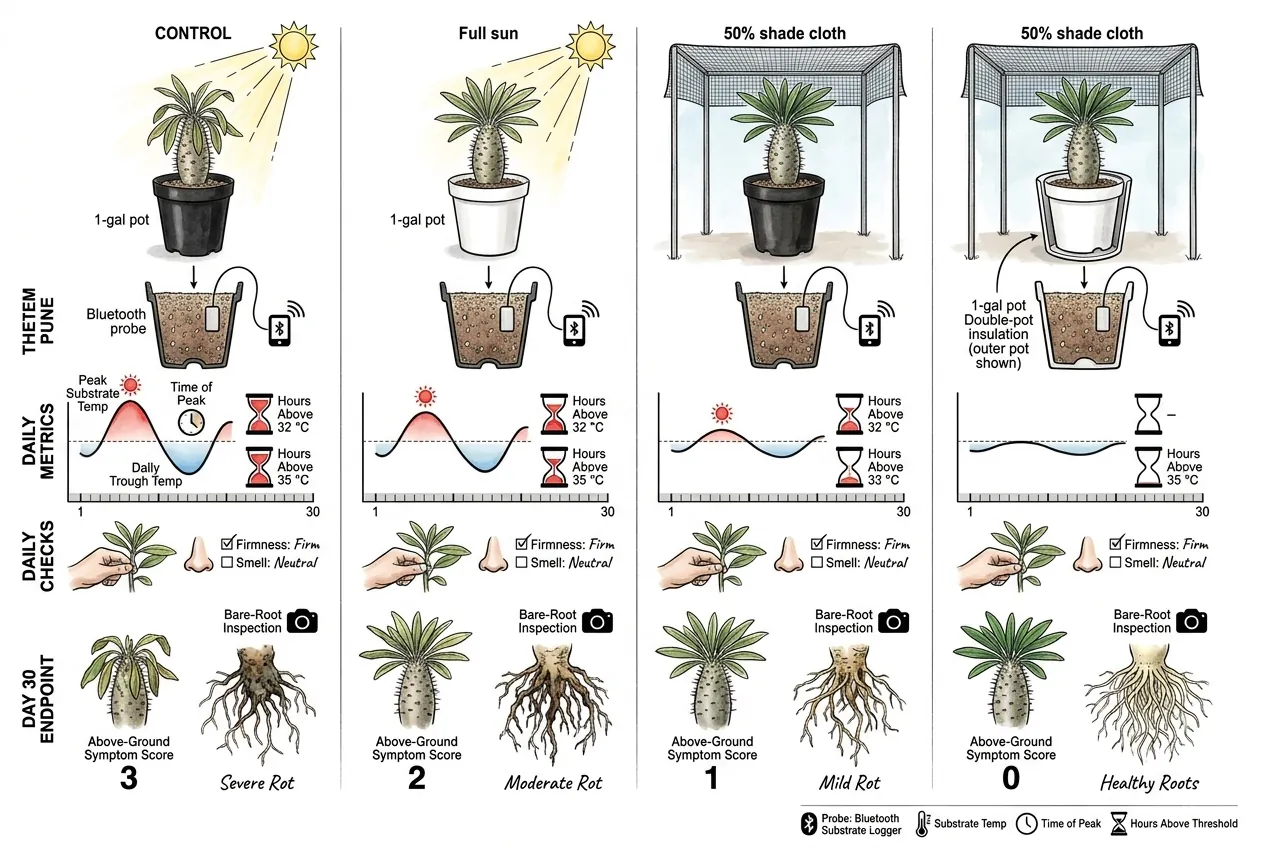
Possible conditions include a dark versus light outer pot and full sun versus measured shade, with root-zone probes logging at a consistent interval.
Record smell, firmness, watering, and plant-level symptoms without treating one plant as a replicated treatment.
At the end of the observation period, compare measured temperature profiles with root and caudex condition if inspection is justified.
Record peak, trough, and time-above-range metrics as descriptive data rather than species thresholds.
What can n = 4 actually conclude?
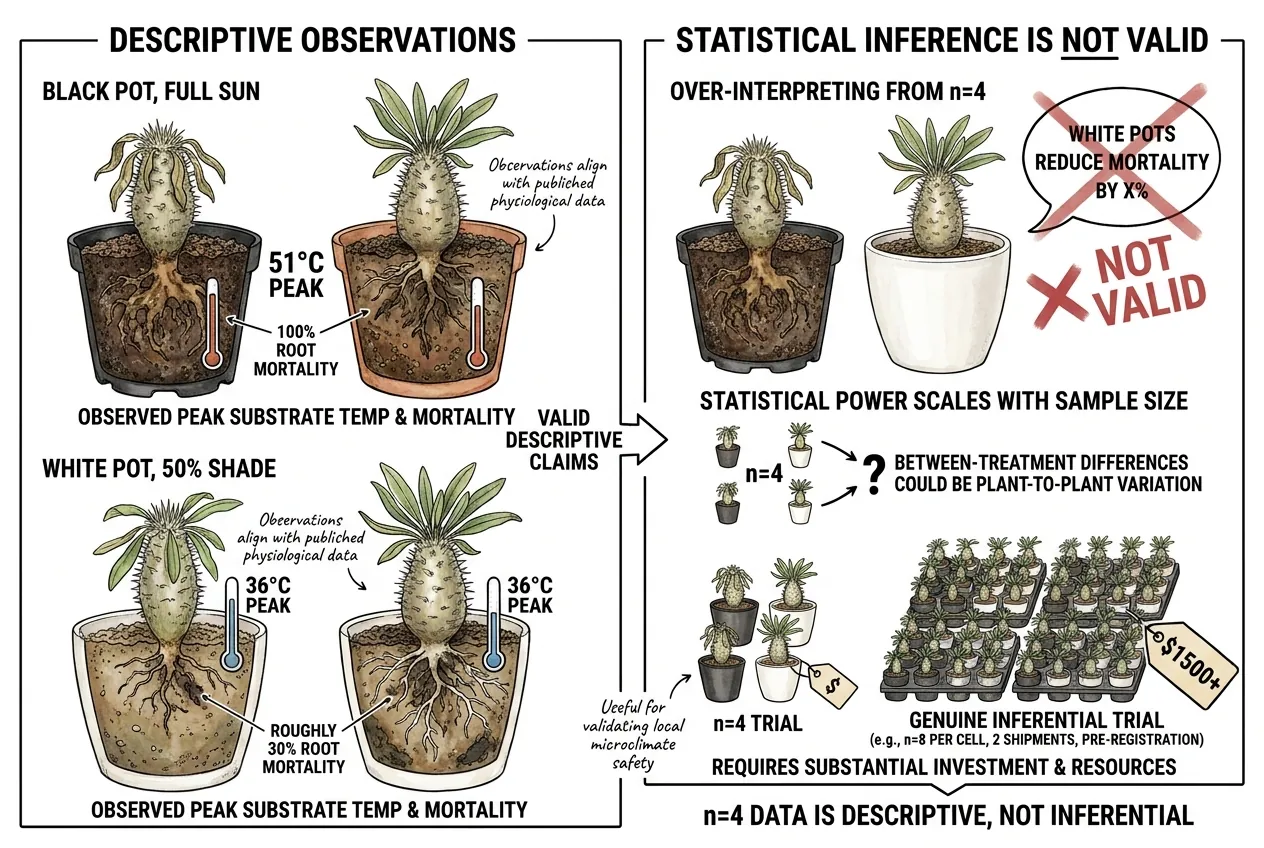
A small home comparison can show whether one microclimate stays in a safe root-zone range, but it cannot prove a general effect. The illustrations show a hypothetical trial design, not measured results.
With one plant per condition you could describe what you personally saw, but you could not conclude that pot color or shade caused a difference, because a single plant per cell could differ for any number of reasons.
A trial that could actually support cause-and-effect claims would need several plants per condition across more than one shipment, with hypotheses set in advance and careful documentation (a substantial undertaking).
The takeaway is simply that a small home comparison is useful for checking whether your microclimate stays in a safe substrate-temperature range, not for proving general percentages.
Troubleshooting and Problem-Solving
Substrate probe reads 33 °C at noon
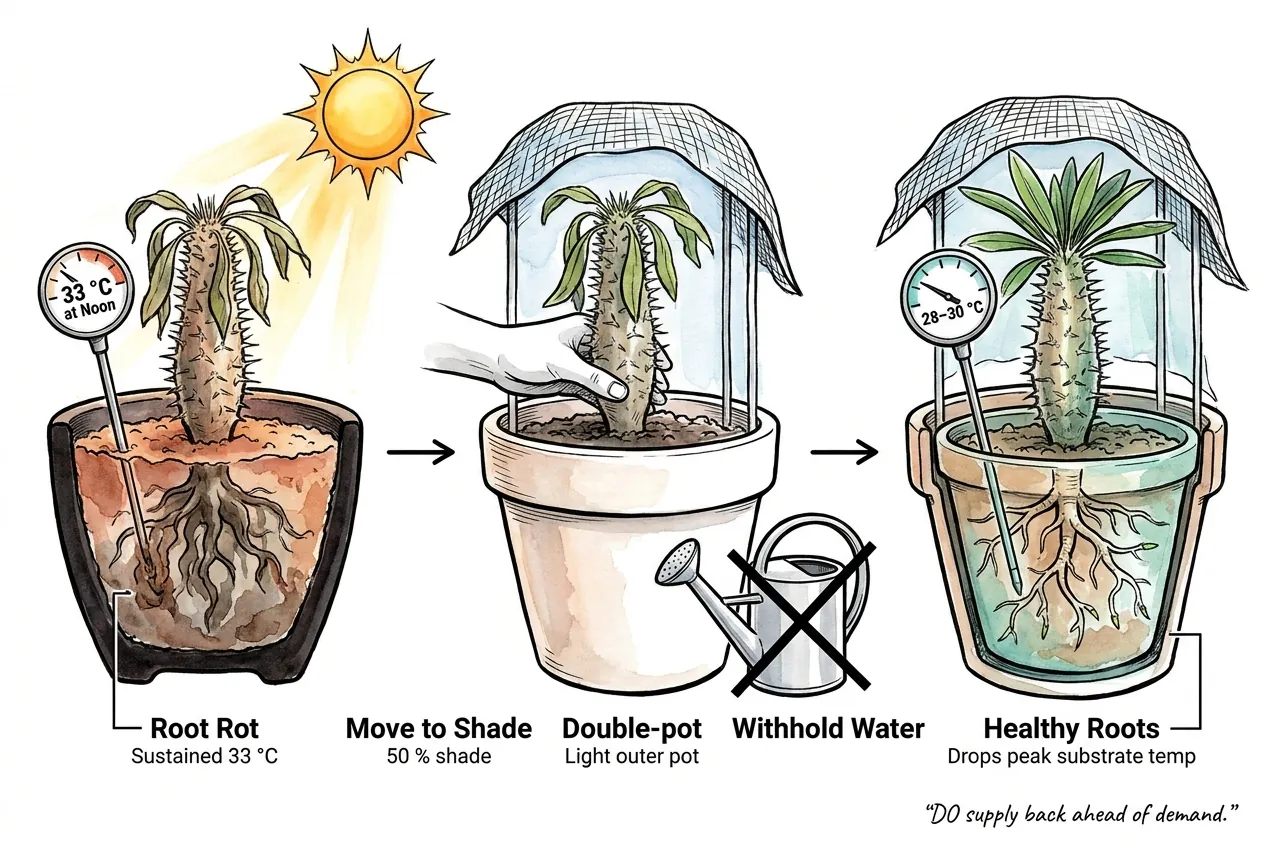
What to look for
A repeated high reading at the substrate edge, especially in a dark pot under strong sun.
How to fix
Reduce heat exposure, use a light-coloured outer pot or temporary shade, and check root-zone moisture before watering.
Why it may help
Lowering the root-zone temperature can improve the balance between oxygen demand and supply, but verify the change with a probe.
Substrate probe reads 40 °C repeatedly over 3+ days
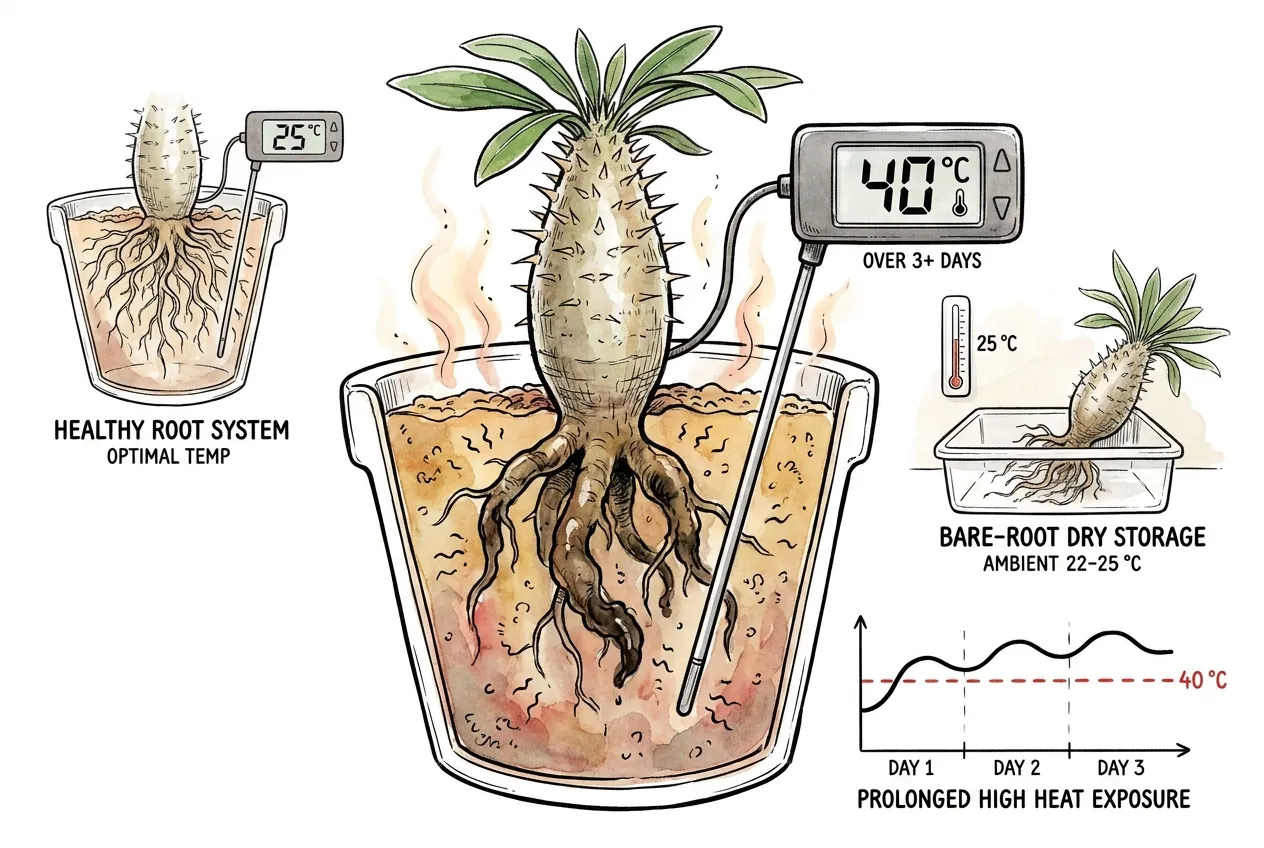
What to look for
Repeated high substrate readings, including warm nights, together with worsening plant symptoms.
How to fix
Move the plant to a cooler, ventilated position, inspect the root zone if symptoms persist, and repot only when you can provide a stable, well-aerated setup.
Why it may help
Prolonged heat can increase root stress. Continuing as-is may worsen damage, so use the measured trend and tissue condition to decide whether to intervene.
Sour-beer smell at Day 3 post-watering
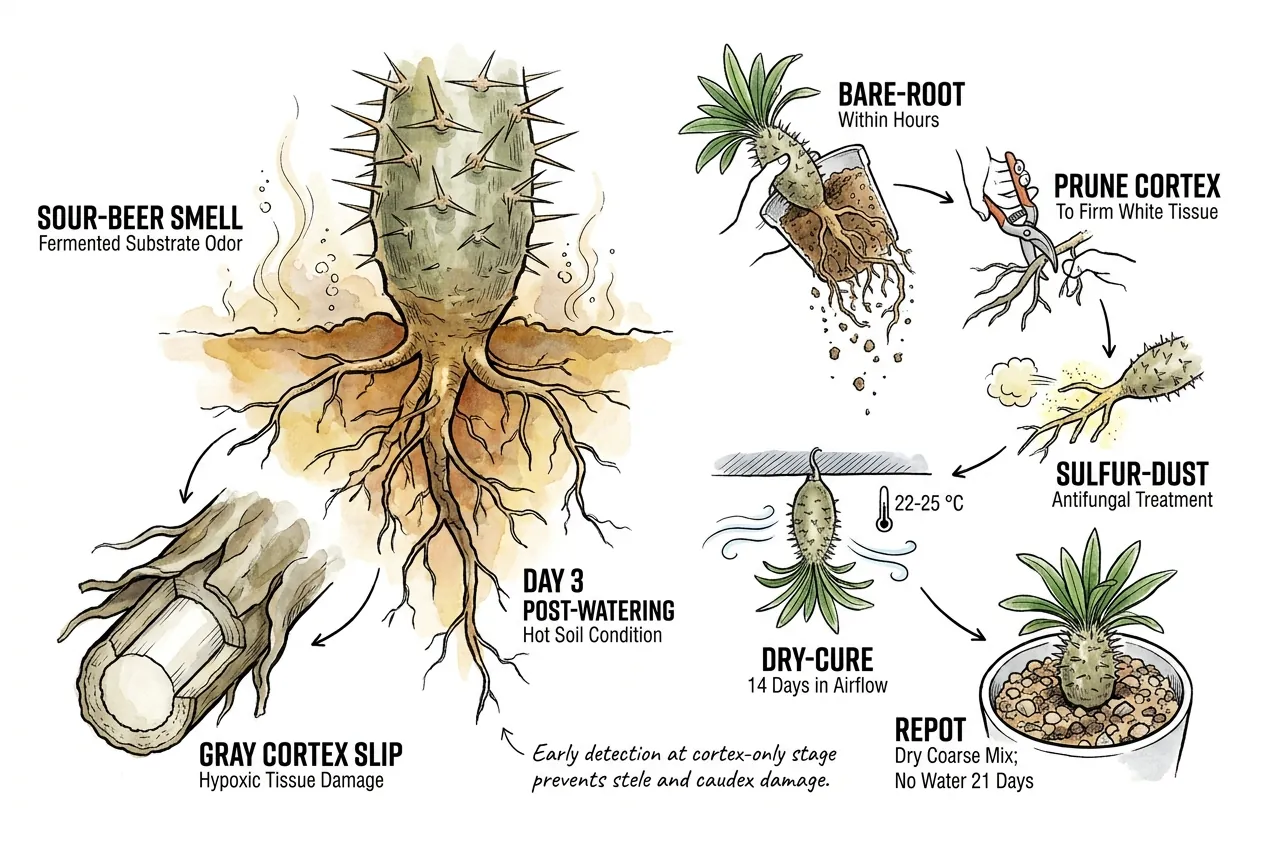
What to look for
Sour, fermented, beer-like smell from substrate. Gray cortex slip on feeder roots. Firm caudex.
How to fix
Investigate promptly, remove clearly rotten tissue, use any labelled treatment as directed, ventilate the wound, and repot only after the surface is dry.
Resume water from the plant’s root condition, not a fixed calendar.
Why it may help
Early investigation can limit further exposure, but smell alone cannot establish how far damage has progressed. See the smooth-versus-knobby caudex guide for the related visual distinction.
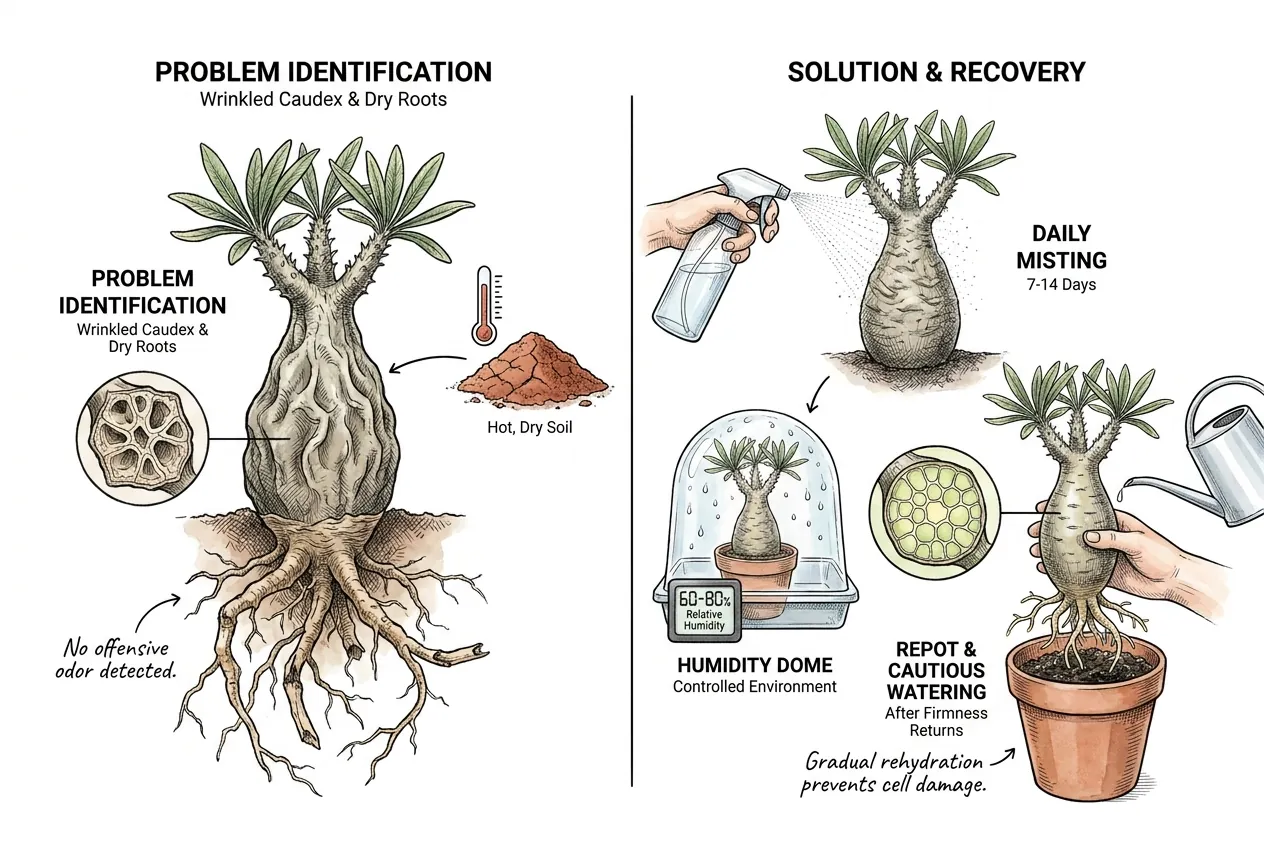
Plant smells fine but caudex is wrinkled and roots are dry
What to look for
No smell, obvious shrinkage with visible wrinkles or skin slack, dry crackly root system.
How to fix
Confirm that the roots are alive, then rehydrate gradually in a ventilated setup. Avoid daily misting or a fixed humidity target when the root condition is unknown.
Why it may help
Gradual rehydration gives you time to observe a living root system without assuming that every wrinkled caudex is ready for frequent watering. See the smooth-versus-knobby caudex guide for the related visual distinction.
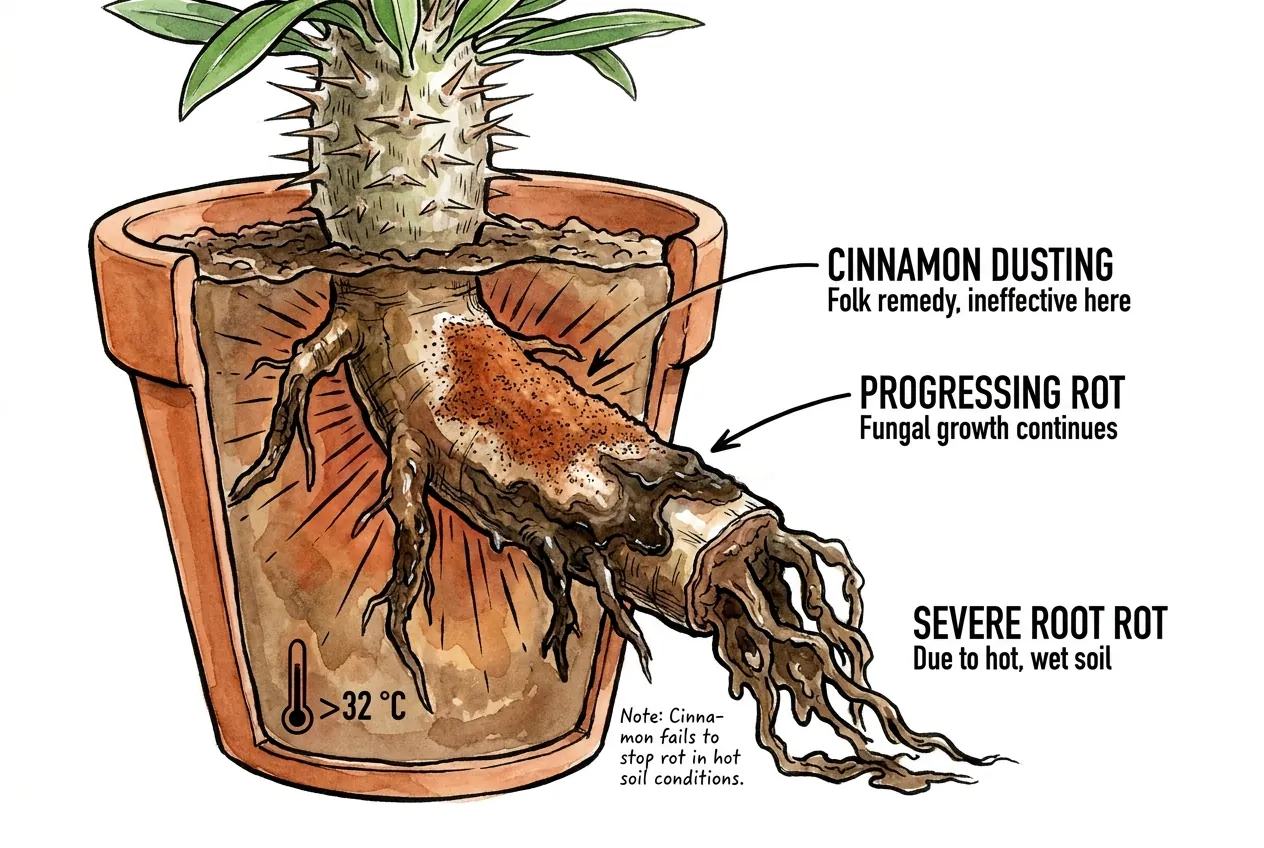
Treated with cinnamon, still rotted
What to look for
Cut surface treated with kitchen cinnamon, rot progresses anyway.
How to fix
Reinspect and remove only active rot, then use a labelled sulfur or copper product if appropriate, allow the cut to dry, and repot into a clean airy medium.
Why this is lower-uncertainty
Sulfur can act as a contact and vapor-phase fungistat when a product label covers the use. Cinnamon is a folk remedy with weak in-vitro evidence at concentrations a light dusting may not deliver.
Practical conclusion
Control the Combined Hot-and-Wet Stress
Hot and wet substrate together can be especially damaging for imported Pachypodium lamerei. Warm roots need more oxygen while warm, saturated soil supplies less.
Use directional evidence, not a magic threshold
No validated exact temperature marks where the curves cross. Keep the root zone cooler and well-aerated, then verify the effect in the actual setup.
Make the import setup measurable
Settle a fresh bare-root import in a dry, ventilated place long enough to inspect the wounds. Use a coarse, free-draining mix in a light-coloured pot and monitor substrate temperature at root depth when possible.
Act promptly when rot is plausible
A sour or fermented smell can indicate active rot. Investigate and cut back to clean tissue promptly, use a labelled fungicidal dust only as directed, and let cut surfaces dry before repotting.