
Adenium Sun Scald: Acclimation, UV, and Leaf Heat
Prevent Adenium sun scald by changing outdoor exposure gradually and watching plant response, leaf heat, moisture, and local conditions. The acclimation framework is illustrative, not a fixed UV threshold.
Maya Ellison · 2026-06-05 · Updated 2026-07-18 · 22 min read
Key Takeaways
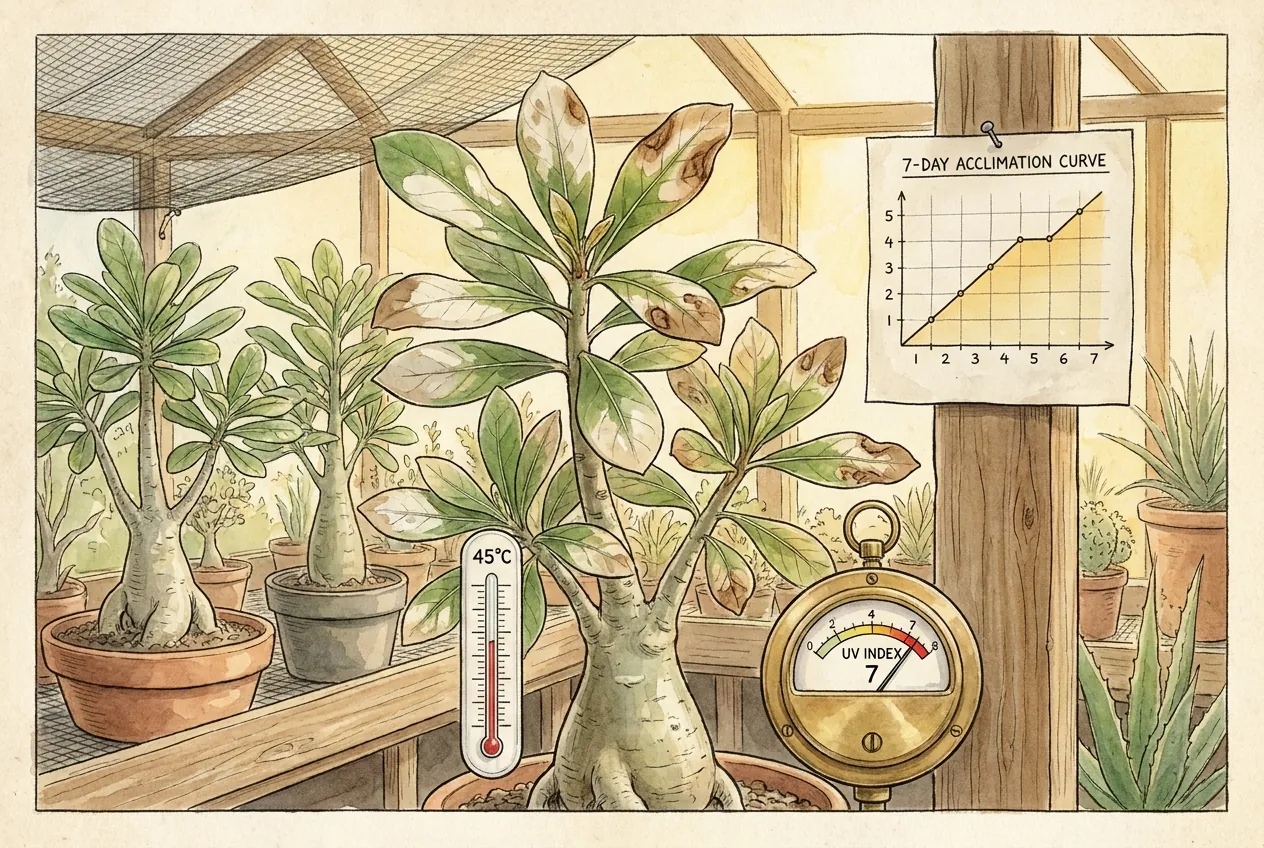
- Strong sun and UV drive scald more than hot air alone, so plan by the UV Index and leaf temperature, not the thermometer on the wall. Use UVI as a rough guide to solar harshness, not an exact Adenium threshold.
- Harden an indoor plant off gradually over one to two weeks, and back off at the first sign of scald. There is no validated day-by-day Adenium schedule, so increase exposure in small steps and pause when leaves show stress.
- Watch leaf surface temperature climbing into the mid-40s °C as a warning zone. A calm, dry, full-sun leaf can run well above air temperature, so an IR thermometer reading matters more than the forecast high.
- Each leaf builds its own flavonoid sunscreen, so acclimation is per leaf, not per plant. An already-hardened plant does not protect a fresh flush, which is why new leaves can scald under the same sun.
- Do not strip scalded leaves that still have green margins. They keep feeding the plant, and removing them forces it to lean harder on caudex reserves.
Why is UV exposure a better guide than air temperature for Adenium sun scald?
How light and heat combine
Sun scald is driven by intense light and UV reaching an unprepared leaf, not by hot air alone. High UV and visible light can overwhelm the leaf’s defenses and photosynthetic machinery, while direct sun can also overheat the leaf, so the injury is usually a combined light-and-heat problem.
The UV Index is designed to predict sunburn risk to human skin, not plant damage. It is still a useful guide to how strong the sun’s UV may be, but no validated conversion links one UVI value to an exact Adenium damage threshold. Use the forecast to plan a cautious transition, then watch the plant and leaf temperature.
Many plants build epidermal flavonoids that act like a natural sunscreen in response to UV. Greenhouse- or window-grown plants may have less protection when glazing blocks the wavelengths that trigger it, which is one plausible reason an indoor-grown Adenium can scald when moved directly into full sun.
When does UV Index actually peak in the continental US?
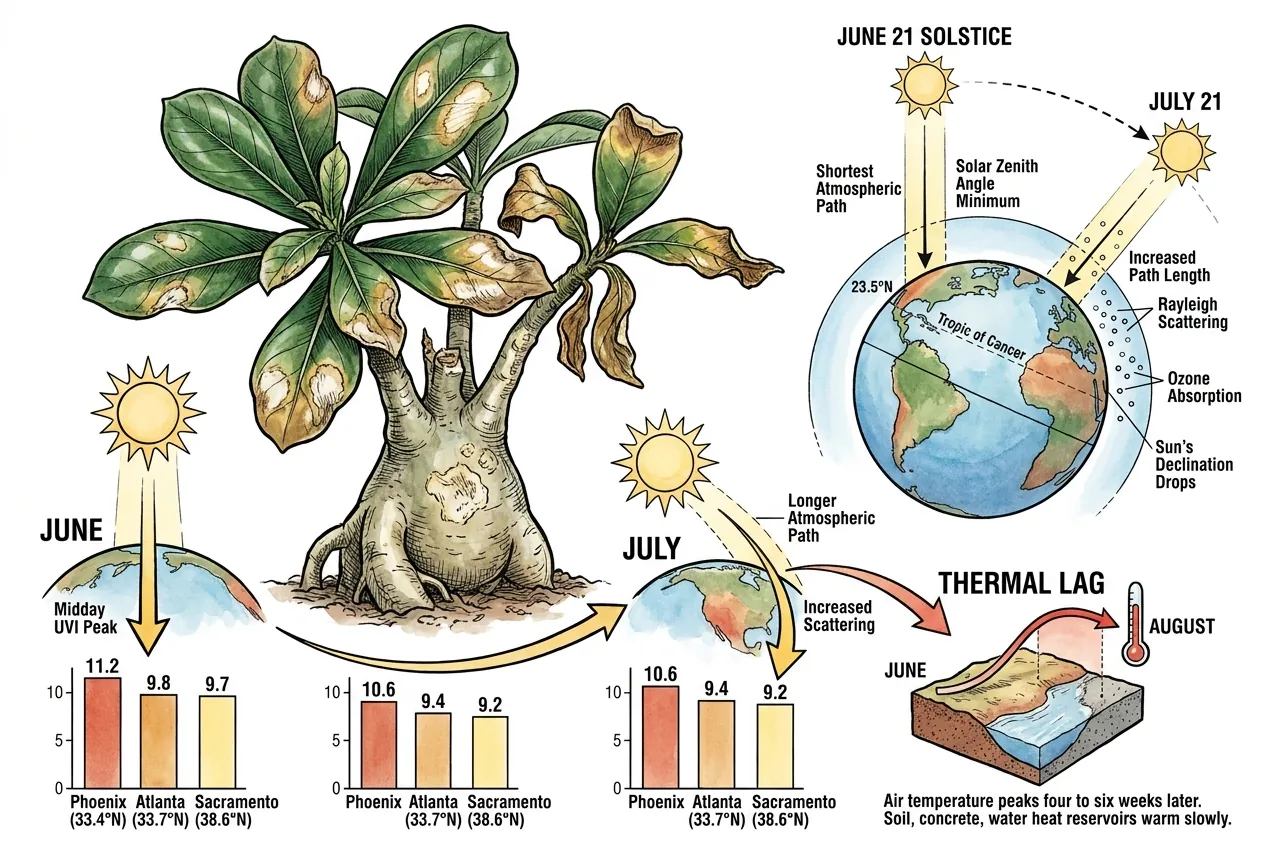
Across much of the continental US, clear-sky UV tends to be near its yearly peak around the June solstice (often a little higher than mid-to-late summer, even though the hottest weather comes later).
This is not universal. Local cloud patterns, ozone, and elevation can shift the actual peak, and some northern areas can read as high or higher in July.
Treat a June UV peak as a useful general tendency, not an exact rule for your location. Check the local UV forecast.
Why UV peaks before air heat
The main reason is the sun’s angle. Near the June solstice the midday sun is highest for the Northern Hemisphere, so UV travels the shortest path through the atmosphere and arrives strongest. By late July the sun’s declination is lower, which lengthens the air-mass path even when the air feels hotter.
Air temperature peaks later because land, concrete, and water act as heat reservoirs that warm slowly through July and August. UV-B has no comparable reservoir, so it follows solar geometry much more directly.
Schedule around the mismatch
A hobbyist who waits for the first 90 °F day to move Adeniums outdoors in late May or early June may also be moving them near a seasonal UV peak.
A mid-July move can have different UV-B exposure even though the air feels hotter. Check the local forecast instead of assuming either month is safe.
Pro tip
Check the NOAA UV Index forecast, not the air temperature alone, when scheduling outdoor Adenium moves.
A clear early-June day can carry a high UVI and therefore deserves a cautious transition, but no band is a validated Adenium injury threshold.
What does the EPA UV Index scale actually mean for plants?
Read the scale as a planning aid
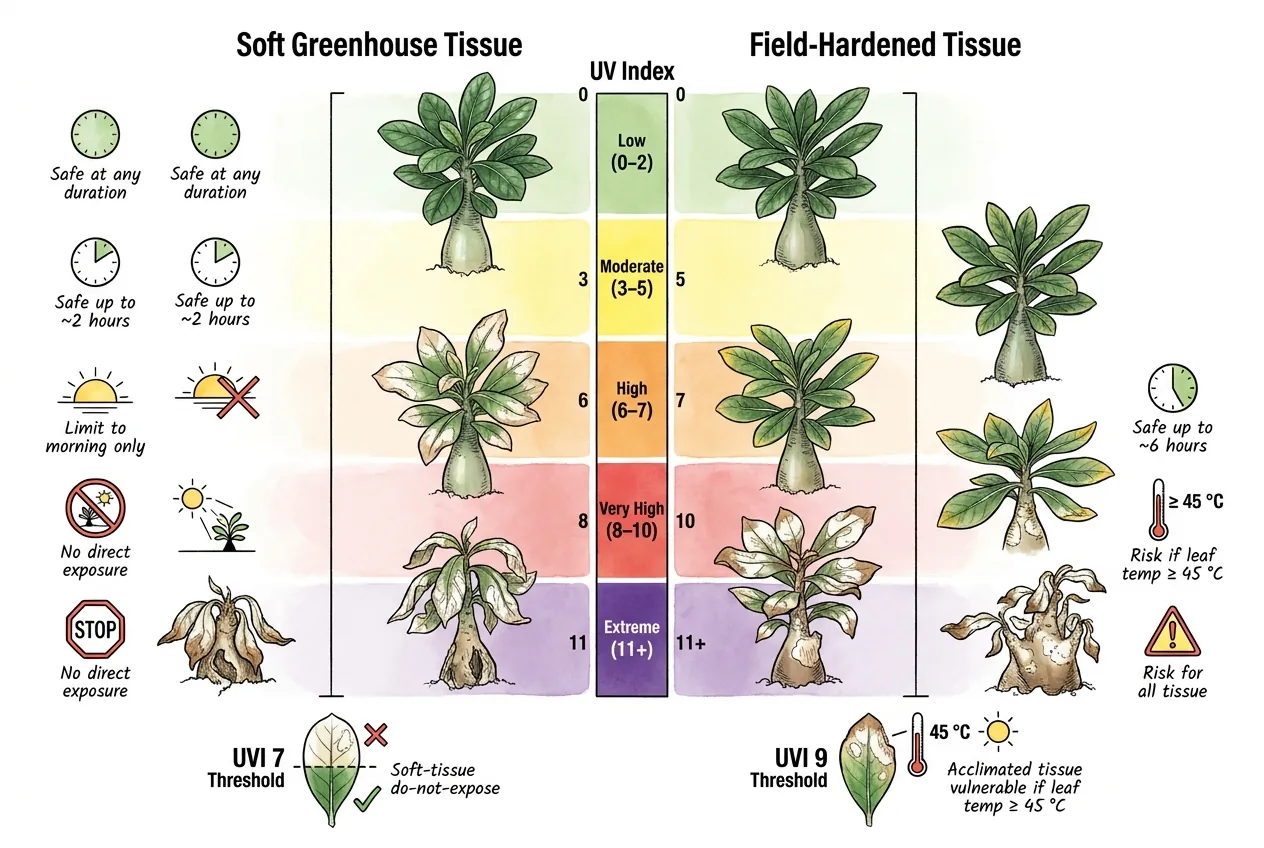
The EPA UV Index runs from 0 through 11+ across five categories. Low is 0–2, Moderate is 3–5, High is 6–7, Very High is 8–10, and Extreme is 11+. The scale is roughly linear in UV intensity, with UVI 10 about twice as intense as UVI 5, but the category boundaries are communication bands rather than biological steps. Cumulative dose also depends on exposure time. The table maps bands to rough Adenium risk for scheduling, not validated damage thresholds, because exact values have not been established for Adenium.
| UVI band | Category | Adenium risk on soft greenhouse tissue | Adenium risk on field-hardened tissue |
|---|---|---|---|
| 0–2 | Low | No validated duration. Monitor response | Lower relative risk, not guaranteed safe |
| 3–5 | Moderate | Short exposure may be appropriate. Adjust to response | Monitor exposure and leaf condition |
| 6–7 | High | Use shade or shorter exposure while acclimating | Risk depends on duration and microclimate |
| 8–10 | Very High | Strong shade or postpone. Plant-specific | Higher risk when heat and exposure combine |
| 11+ | Extreme | Postpone or use substantial shade | Do not treat the band as a universal injury threshold |
As a practical guide, unhardened greenhouse-grown tissue is more vulnerable in the higher bands, while hardened tissue can still be injured when strong sun combines with a hot leaf surface. Use these entries to schedule exposure, not as exact cutoffs.
What does UV-B actually do to a soft Adenium leaf?
What UV-B can damage
In plant studies, UV-B can damage a leaf's DNA and impair its photosynthesis machinery (photosystem II). How much depends on dose and species.
Bleached, sunken patches can result from combined light and heat injury. Do not infer a single UV-B mechanism from appearance alone, because water stress, temperature, and pathogens can overlap.
Why do greenhouse-overwintered plants scald at lower UVI?
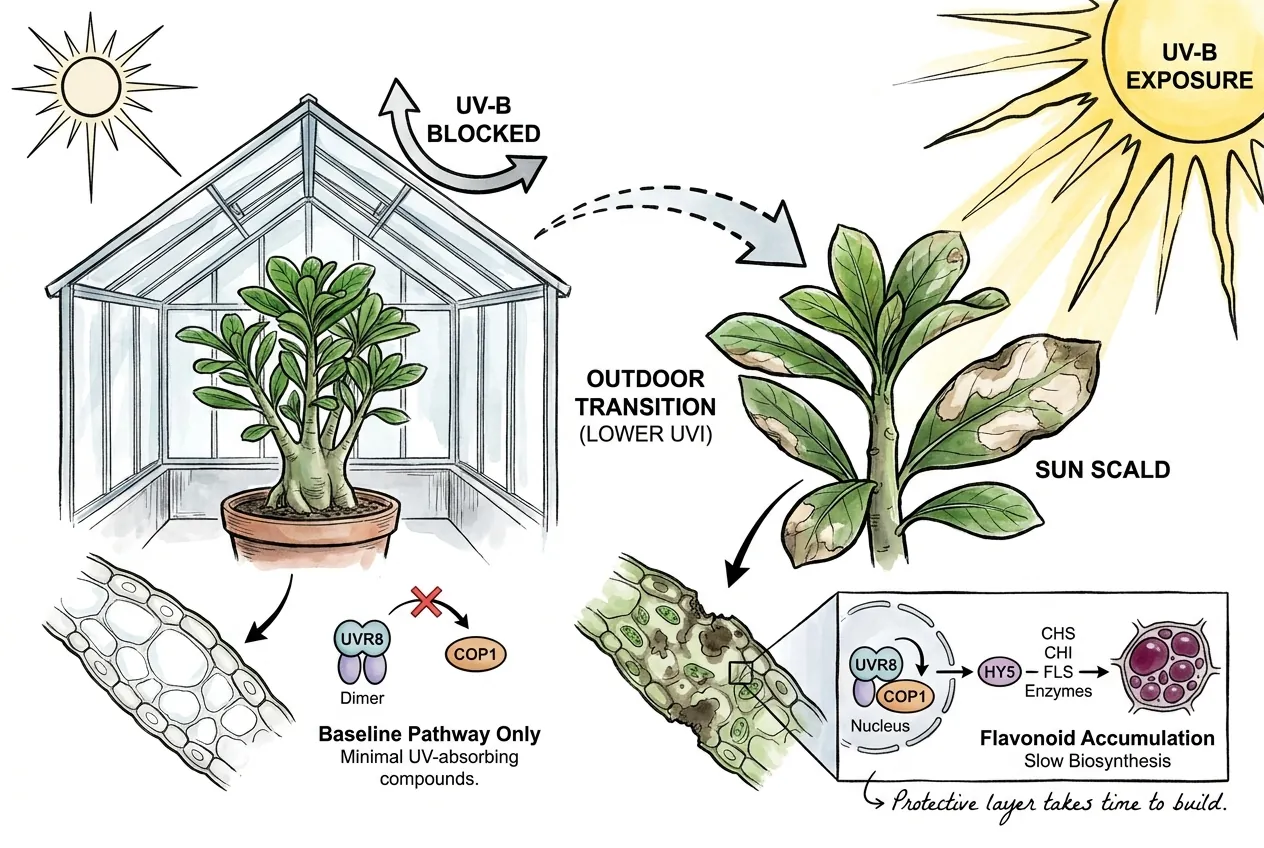
Greenhouse-overwintered plants can scald at lower UVI when their epidermal tissues have had less opportunity to acclimate.
UV-B can act as one signal for flavonoid biosynthesis, but the response and compounds vary by species and environment.
Do not treat a named flavonoid pathway from another plant as a validated Adenium threshold.
How leaves build protection
The signal pathway is well understood. A UV-B sensor in the leaf, called UVR8, switches on the genes that build flavonoid pigments in the outer cell layer.
Those flavonoids can absorb later UV-B before it reaches deeper tissue. Many greenhouse coverings reduce incident UV-B substantially, although transmission varies by material and age, so a plant can look healthy under cover while remaining less acclimated than a field-grown sibling.
How long does the leaf actually need to build that sunscreen?
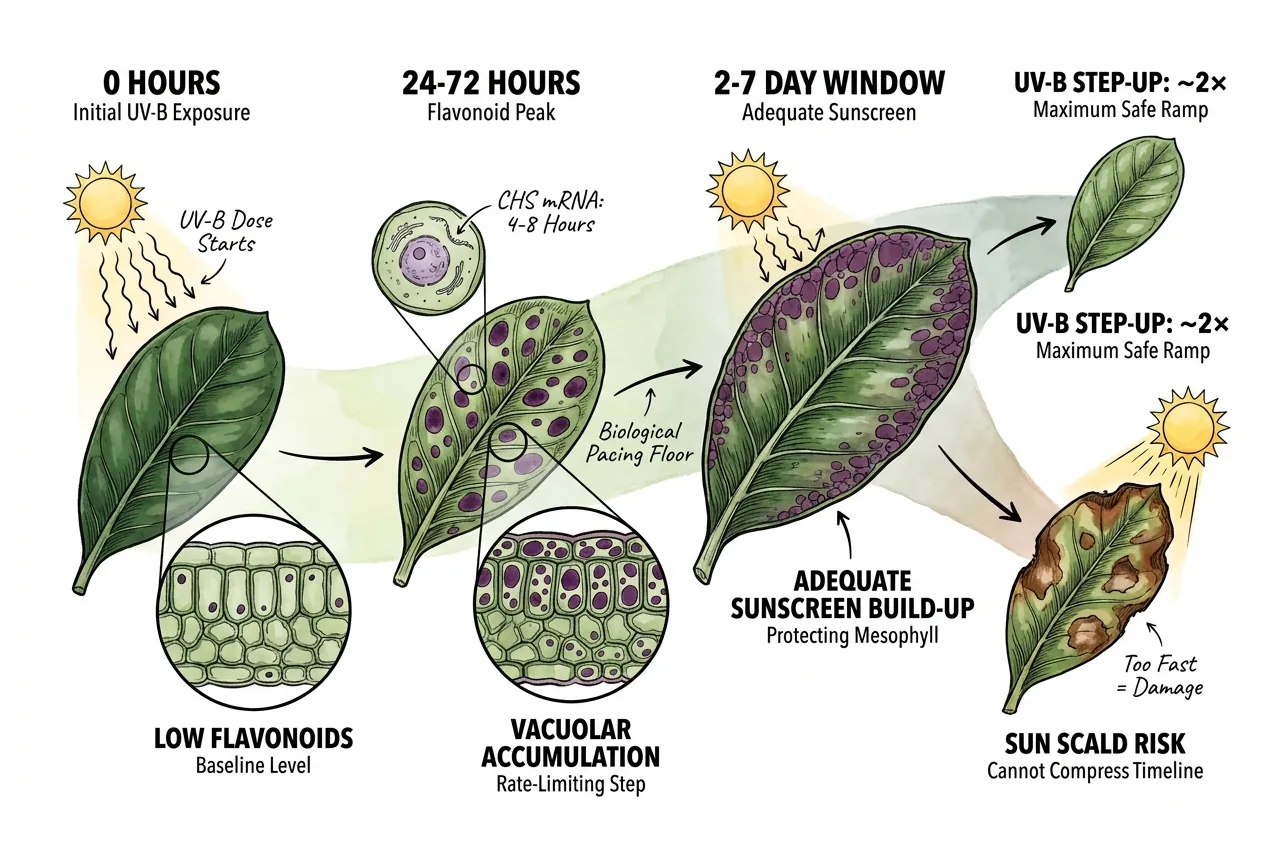
Studies in several non-Adenium species report flavonoid responses over roughly 1–3 days after a changed UV-B dose, but timing and dose are species- and protocol-dependent. Research in Brassica, Populus, and lettuce provides context for gradual exposure rather than a direct UVI-to-safe-dose conversion. Because forecast UVI, cloud, leaf angle, and temperature change the dose at the leaf, increase exposure in small steps and pause when the plant shows stress instead of compressing a laboratory timeline.
What two numbers should I measure before exposing the plant?
The two measurements
Measure UV Index and leaf surface temperature. UVI describes photochemical load, while leaf temperature describes thermal stress. These independent damage modes can stack on a hot, clear-sky day.
What UV Index is safe for Adenium?
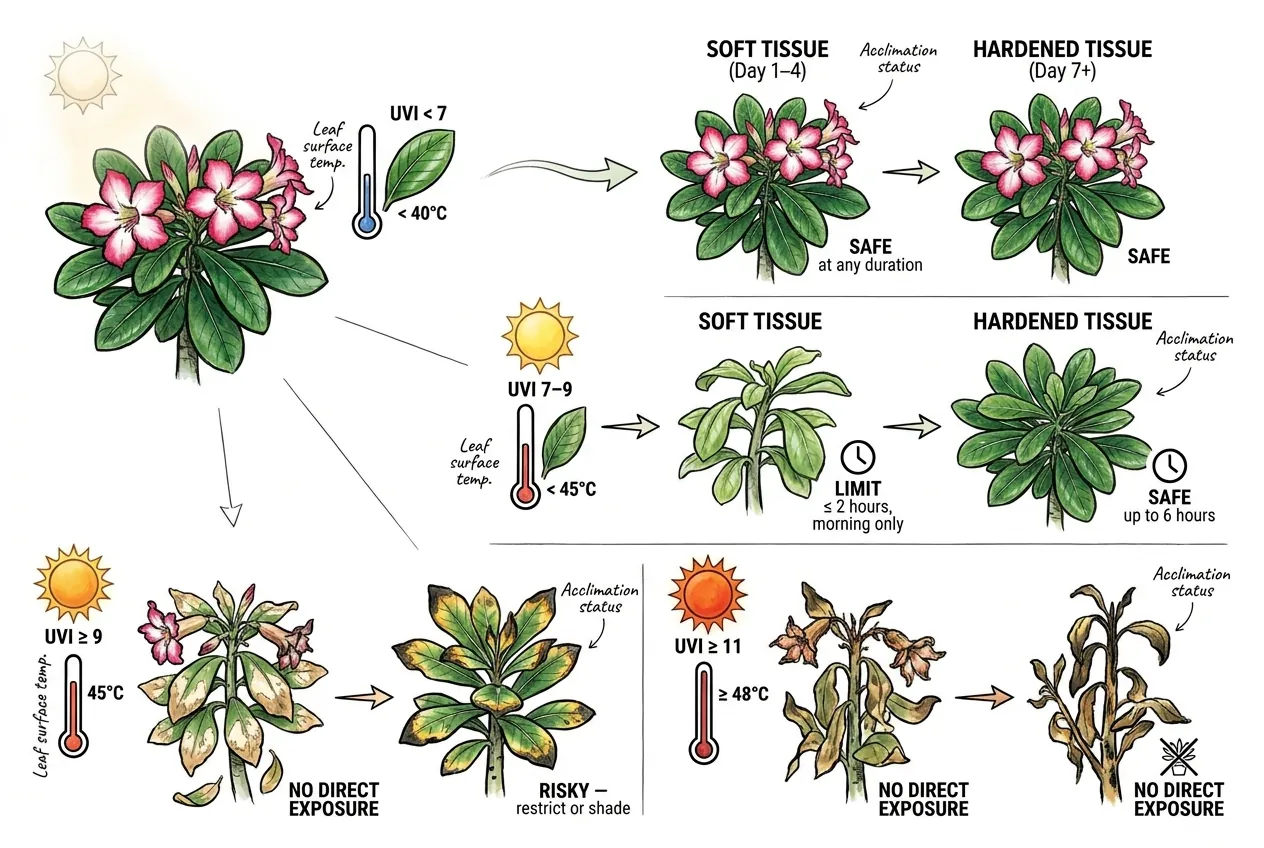
Use UVI as a rough description of solar intensity, not an Adenium safety switch.
Unhardened tissue generally deserves more shade and shorter exposure as sunlight and leaf temperature rise. Hardened tissue can still be injured by a hot, prolonged exposure.
Leaf temperature, wind, humidity, water status, leaf angle, and exposure duration all change the outcome.
No validated Adenium dataset converts a UVI band and one leaf-temperature reading into a universal go/no-go rule.
Two-variable decision rule
| Condition | Soft tissue (Day 1–4 of acclimation) | Hardened tissue (Day 7+ or outdoor all season) |
|---|---|---|
| Lower solar load and moderate leaf temperature | Start with brief exposure. Monitor response | Lower relative risk. Still monitor |
| Stronger sun or rising leaf temperature | Use shade or shorten exposure | Check duration, wind, and leaf condition |
| Very strong sun or hot leaf | Postpone or provide substantial shade | Restrict exposure and cool the plant |
| Extreme forecast or severe heat | Do not expose unacclimated tissue directly | Postpone or use active cooling and close monitoring |
Read both numbers before direct-sun exposure when practical and use the more restrictive signal as a reason to slow or shade the transition.
Warning
Air temperature is a weak predictor of leaf surface temperature. A windless, low-humidity morning can leave a full-sun leaf much hotter than the air, but the difference depends on wind, water status, angle, and surface properties. Measure with an IR thermometer when possible before exposing very soft tissue.
What leaf surface temperature is the danger zone?
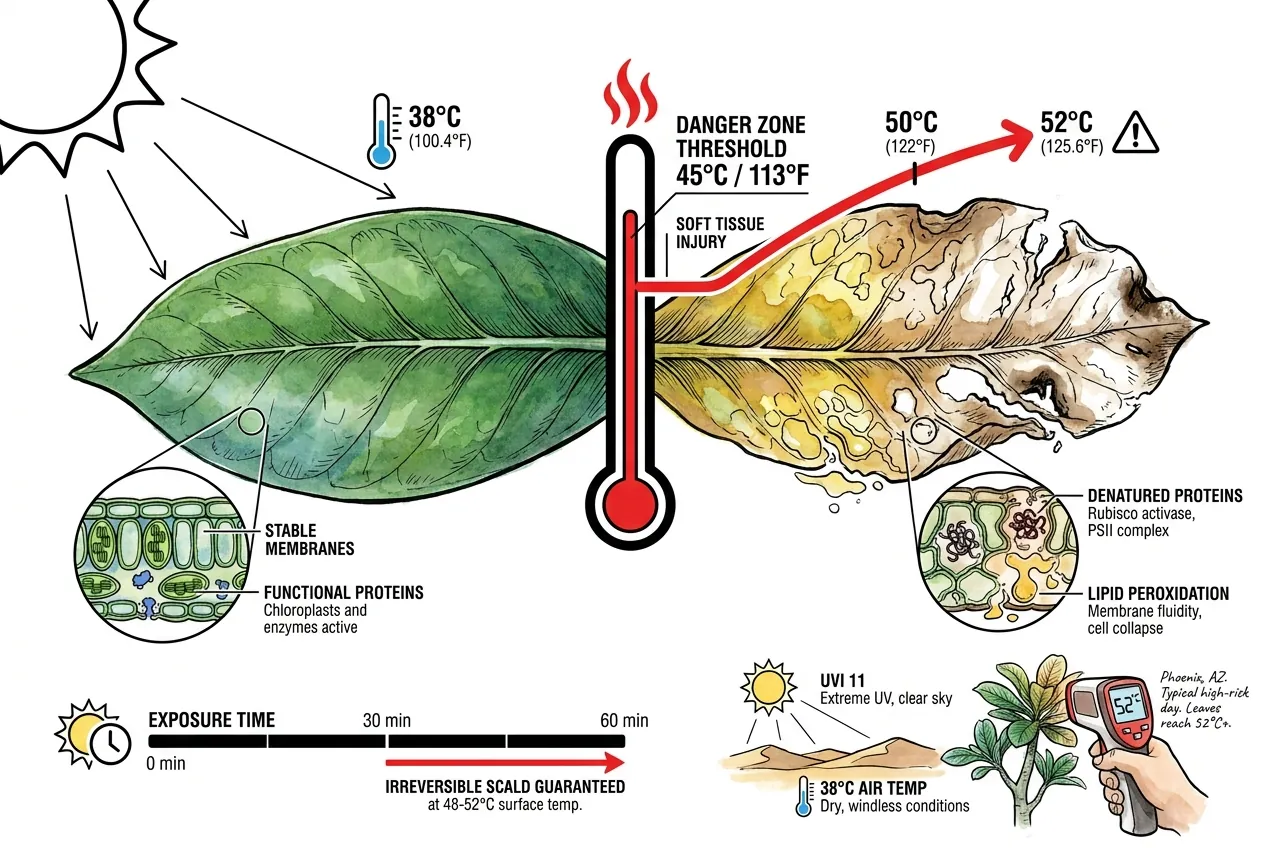
Many soft, broad-leaved plants show heat injury somewhere in the roughly 40–45 °C leaf-temperature range after sustained exposure, and Adenium's thin leaves likely sit closer to this group than to the extreme heat tolerance of cacti and agaves, which have thick waxy skins and CAM physiology.
Adenium's exact leaf-injury temperature has not been pinned down in the literature. Treat leaf surfaces climbing into the mid-40s °C as a warning zone to avoid, not a precise switch.
What heat does to leaf function
At high leaf temperatures, cell membranes destabilize and heat-sensitive proteins begin to break down. Key photosynthesis enzymes fail early, and parts of the machinery break down around 45 to 50 °C, so photosynthesis can collapse before any visible bleaching appears.
On a hot, dry, windless day a flat Adenium leaf can run well above air temperature. An unhardened plant can develop injury quickly, but the timing is site- and plant-dependent rather than an hour-based rule.
How does wind and humidity change the leaf-temperature threshold?
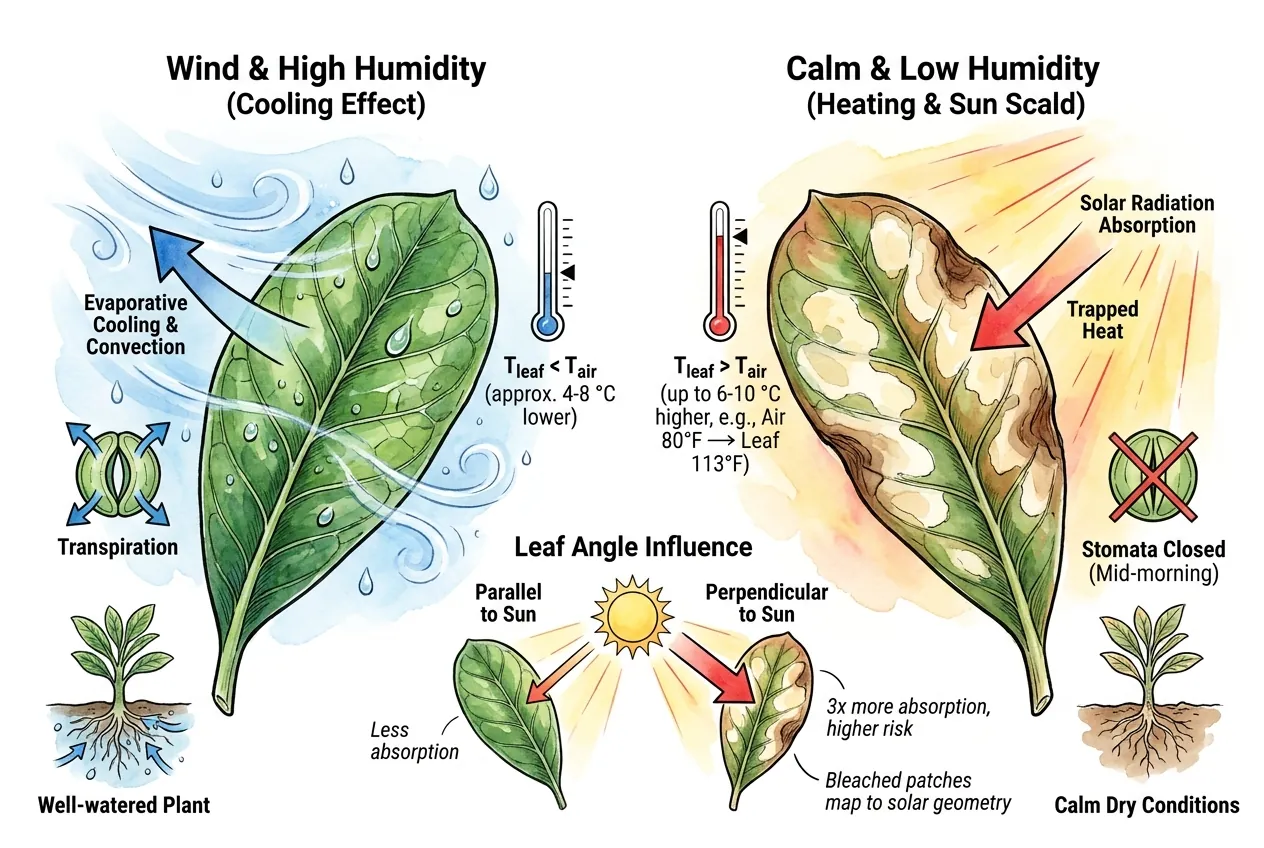
Wind can cool a well-watered leaf relative to still air, while calm, dry conditions can push leaf temperature above air temperature. The size of the shift depends on the radiation hitting the leaf, how much it is transpiring, and the wind at its surface.
Compare leaf readings with the whole microclimate
One air reading is incomplete, so compare leaf readings with wind, humidity, water status, and shade. Adenium can close its leaf pores and lose the evaporative cooling that would otherwise shed heat, which pushes leaf temperature up on calm midday.
A leaf facing the sun head-on absorbs about three times more radiation than one angled edge-on, so bleached patches that follow leaf orientation are consistent with simple sun geometry.
What is the actual 7-day acclimation curve?
Use gradual exposure
A week or so of gradually increasing sun is a sensible way to harden off an indoor-grown Adenium. Start with a short, gentle exposure and build up in steps. The minute counts and idea of doubling exposure are practical frameworks rather than precise biological formulas, so adjust to plant response and back off at the first sign of trouble while leaves build protective pigments.
What does the day-by-day schedule look like for the US Sun Belt?
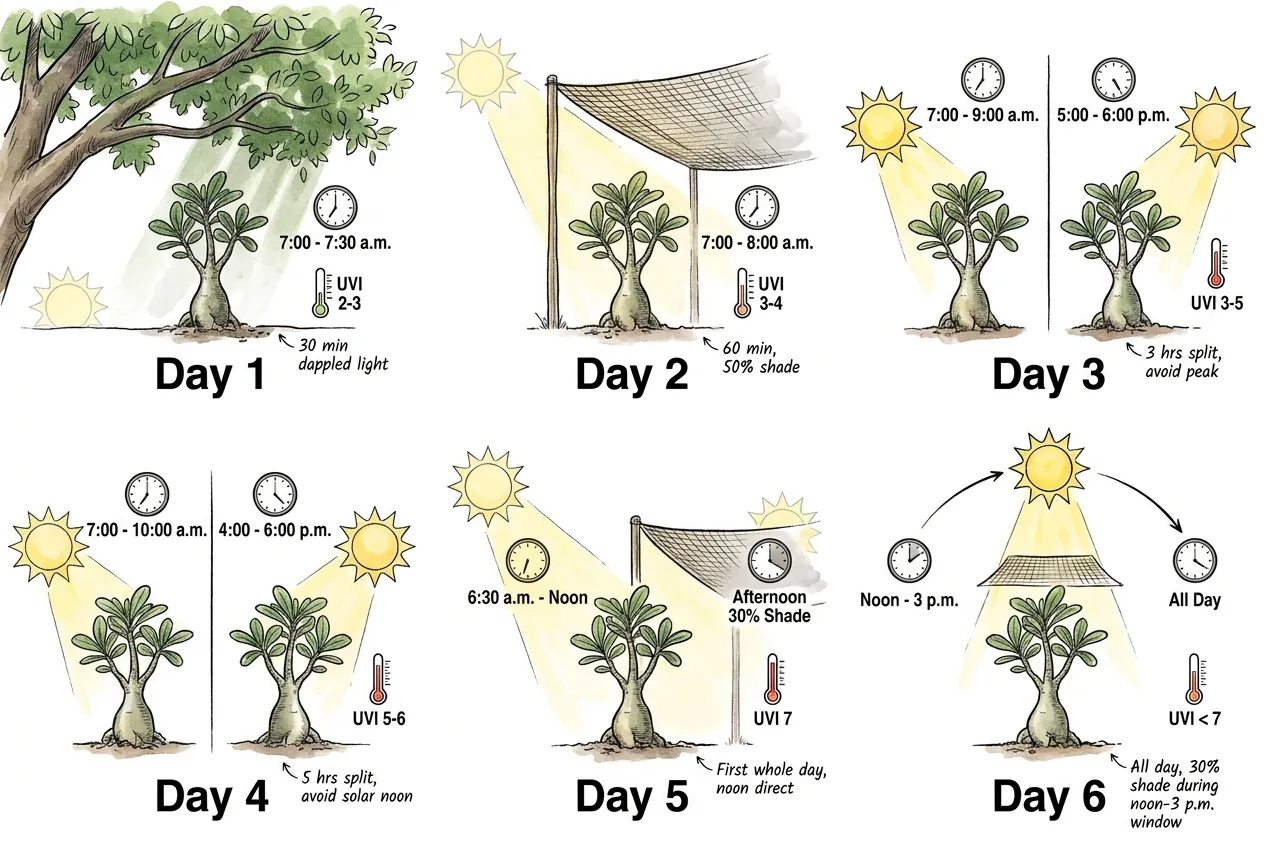
There is no validated day-by-day Adenium schedule. Start with indirect or filtered light for a short period, then add exposure in small steps only when leaves remain firm and unmarked.
Extend the same step, add shade, or move the plant back when bleaching, heat stress, wilt, or tissue collapse appears.
Adjust the pace to the site
Choose the pace from the starting environment, season, cloud cover, wind, pot temperature, and plant water status.
A greenhouse plant moved to a hot, clear patio may need a much slower transition than a plant already receiving outdoor light.
Remember
Each leaf builds its own flavonoid sunscreen independently. An already-acclimated plant does not automatically protect new leaves, so acclimation is per leaf rather than per plant.
Before acclimation starts, I photograph the canopy from the same pot-rim orientation and label every fully expanded leaf on a duplicate image. I give each leaf that unfolds after the move a separate number. This keeps the original greenhouse or indoor leaves from being treated as evidence for the more vulnerable new flush.
For each exposure step, I record the time window, local UVI forecast, weather, and whether a sun-facing or sheltered leaf felt hotter. I score marks by leaf rather than giving the whole plant one damage score. An old leaf can retain a stable scar while a new leaf is responding differently, so the ledger tells me which cohort needs shade or a longer pause.
What if UVI spikes mid-schedule?
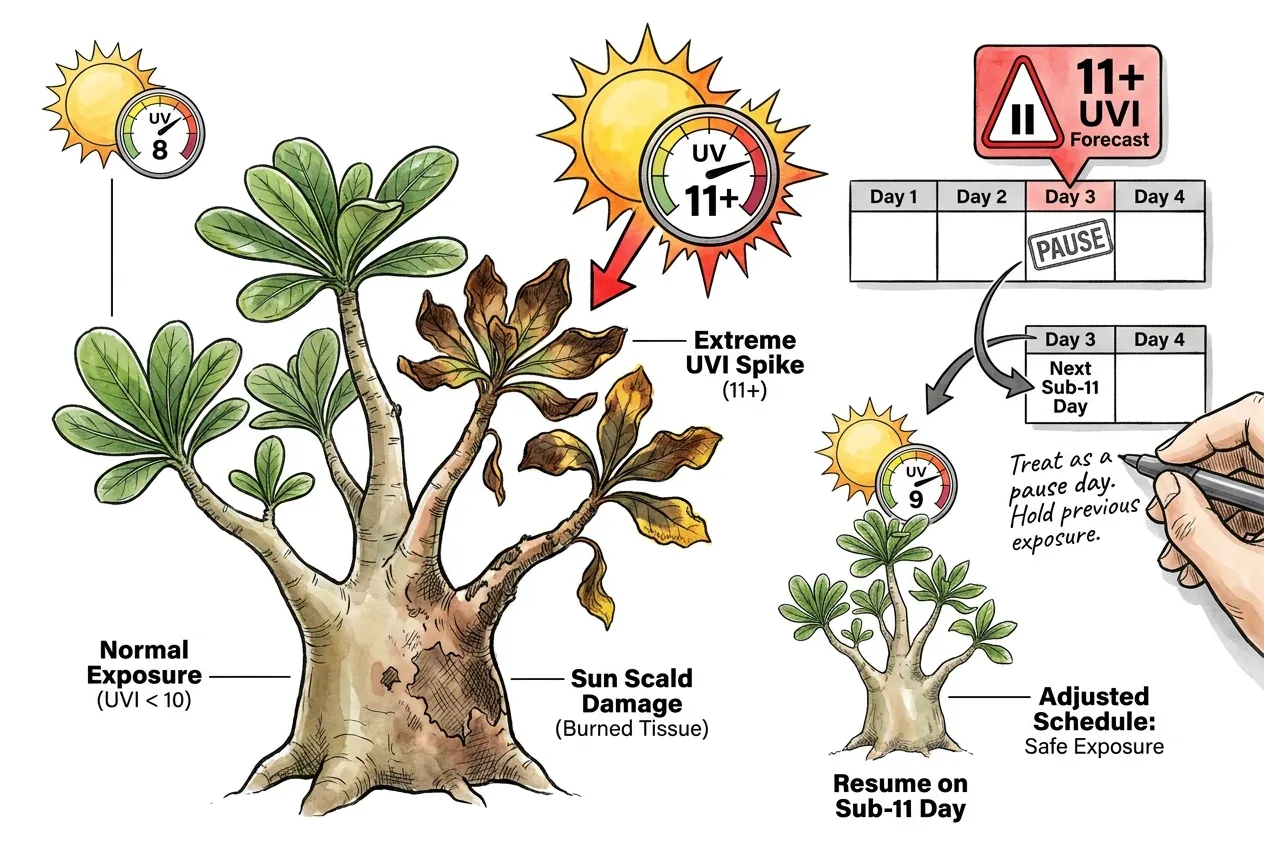
If the forecast becomes markedly brighter or hotter, hold the current exposure or add shade rather than advancing the acclimation.
Forecast UVI is a planning clue, not a measured dose at the leaf.
What shade cloth percentage is the workhorse?
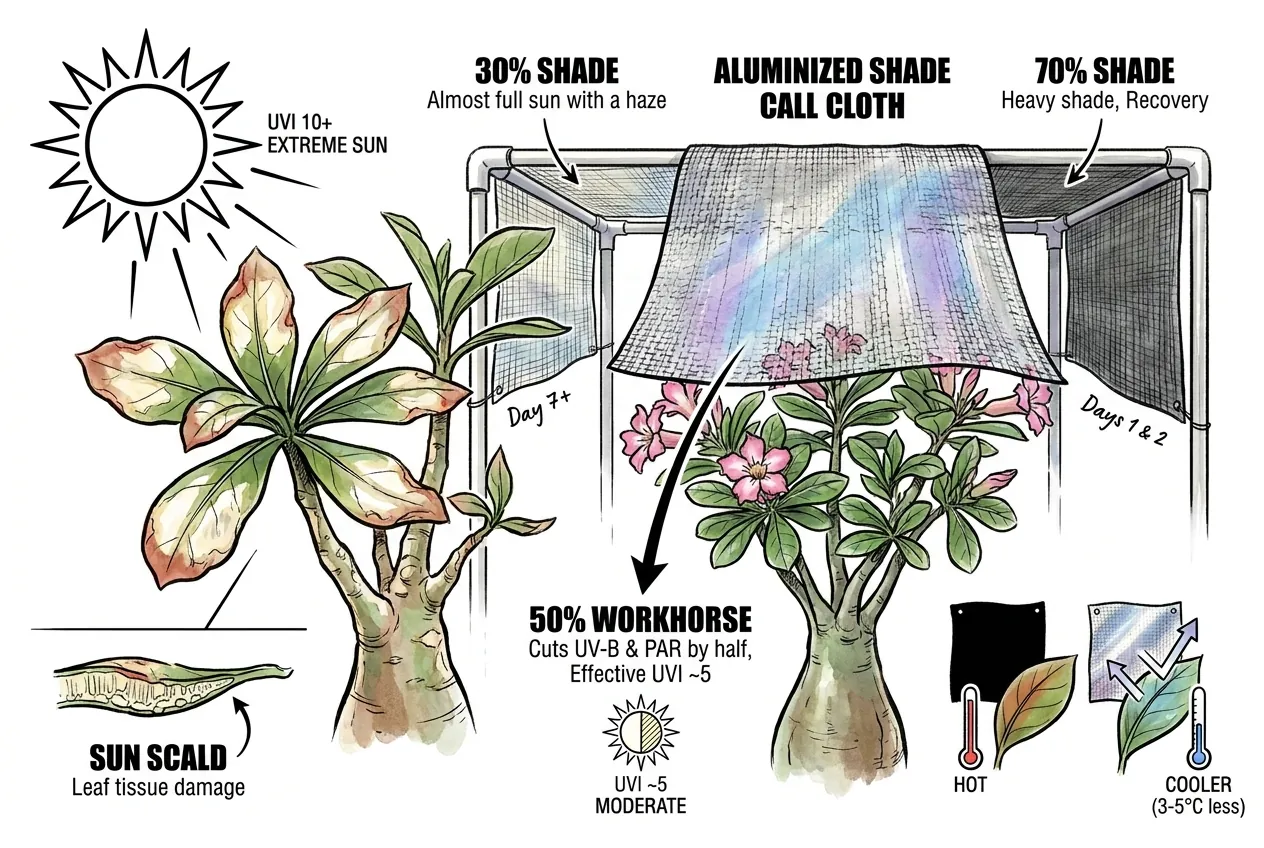
A shade cloth around 50 percent is one practical option for reducing overall light, but the reduction in UV versus visible light varies with material, color, weave, and installation.
Use the rating as a starting point and watch the plant rather than assuming it guarantees protection.
Growers commonly choose 30, 50, or 70 percent cloth, but the useful tier depends on site, season, and starting acclimation.
Lighter cloth may suit a later transition. Heavier shade may be useful for early exposure or recovery from scald. Neither percentage is a universal day-by-day rule.
Reflective cloth can change radiant load, but the temperature difference depends on color, weave, air gap, orientation, wind, and the surface below.
Use it as a temporary cooling option, not as a guaranteed reduction.
Choose a panel large enough to shade the plant and leave an air gap. Secure it so it cannot contact leaves or trap heat.
Reflective shade cloth is one possible heat-management material. Check the current listing, install it above the canopy with an air gap, and use it only as long as the plant needs protection.
Price, shade rating, and cooling performance vary by material and installation.
A plain mesh may be adequate at one site. A reflective panel may help at another.
How do I measure UV Index and leaf temperature without an expensive lab setup?
A handheld UV meter and an IR thermometer can help compare one setup over time, but neither turns acclimation into a validated protocol. Check current specifications and use them as supplementary observations.
What handheld UV Index meter actually works?
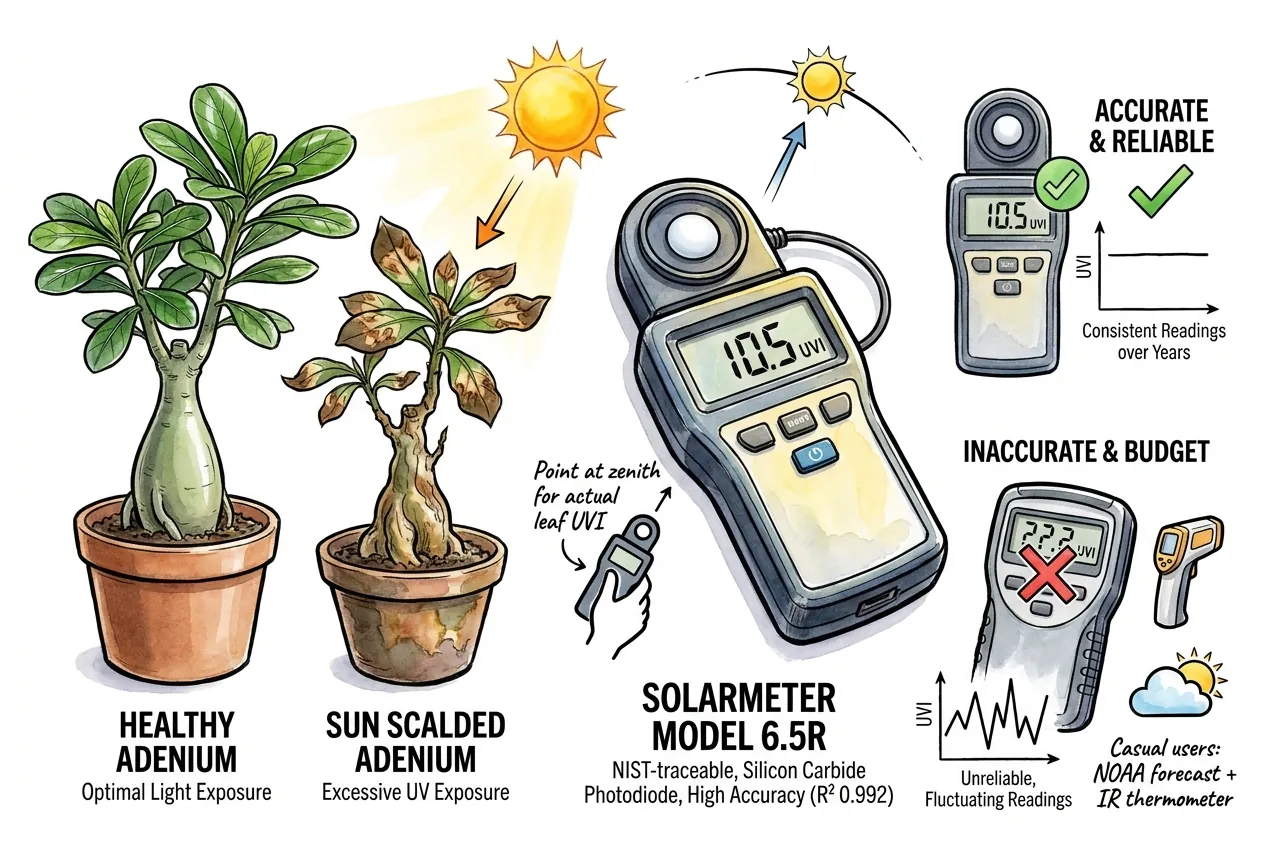
The Solarmeter Model 6.5R is designed for a particular UV measurement use.
Confirm its current calibration, range, and intended spectrum before applying it to plant exposure.
Solarmeter 6.5R is sold to the reptile husbandry community for measuring UV-B lamp output.
It can also provide a repeatable comparison for plant acclimation. Point it at the zenith from the plant’s location at the planned exposure time. Treat the reading as an approximation of the load at a horizontal leaf surface, not as the exact dose every leaf receives.
The manufacturer describes NIST-traceable calibration and multi-year stability testing.
Weigh meter cost against collection size
The meter costs more than a budget UVI meter. Casual hobbyists with one or two plants can skip it and rely on the NOAA forecast plus an IR thermometer, while larger collections may benefit from the repeatable comparison. It does not prevent scald by itself.
If a dedicated meter is too steep, a lower-cost approach is the NOAA forecast UVI plus an IR thermometer reading.
Forecast error and broken-cloud effects vary, so use those values for planning and then adjust from the plant and local measurements rather than treating them as a go/no-go guarantee.
How do I set up an IR thermometer for leaf surface temperature?
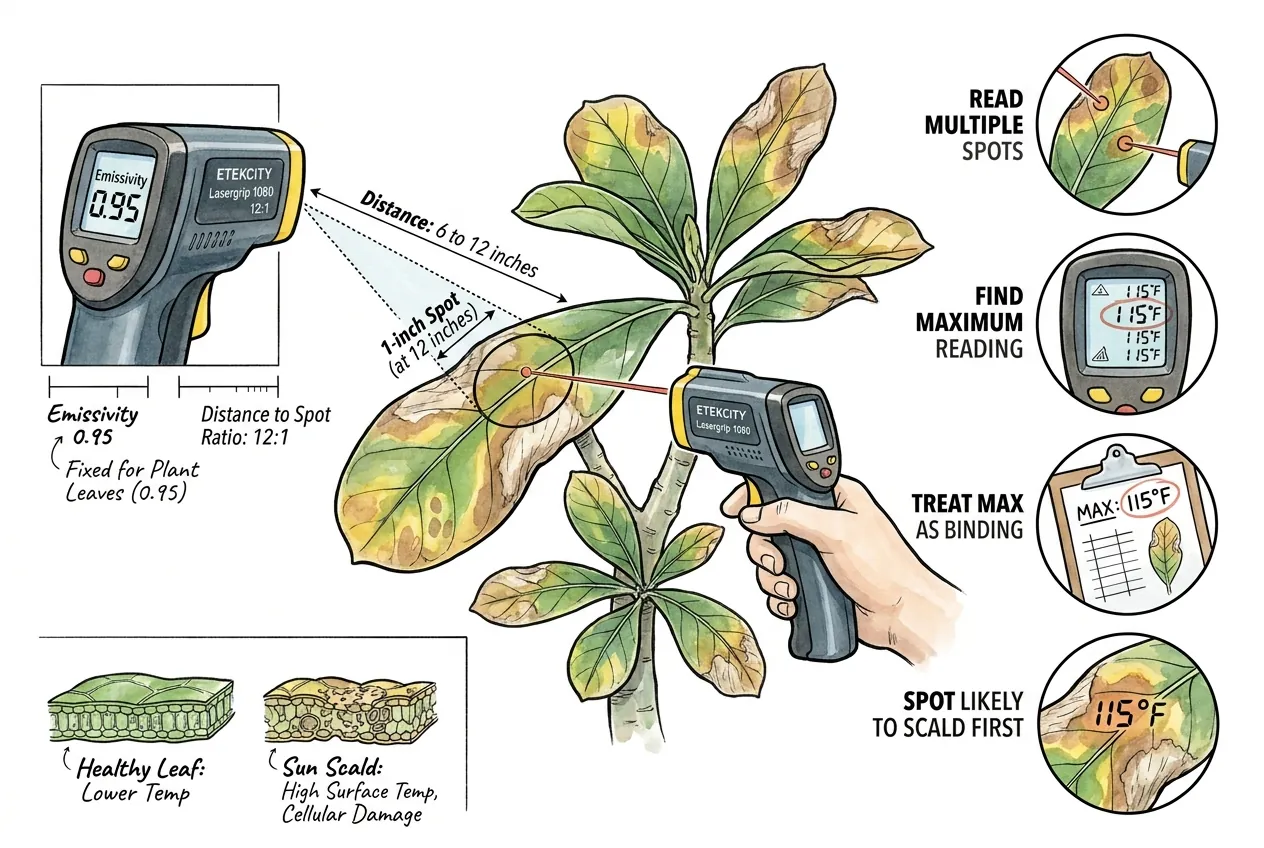
Use the IR thermometer according to its manual, keep the target spot smaller than the leaf, and compare several readings from the same setup.
Emissivity, distance, reflectivity, wind, and leaf angle can change the value, so treat it as a relative observation rather than a universal injury alarm.
Etekcity Lasergrip 1080 is one low-cost IR thermometer option.
Confirm its emissivity, distance-to-spot ratio, and range from the current manual. Hold it at a consistent distance, read multiple spots, and compare the pattern rather than treating the maximum as a universal injury threshold. A fixed emissivity may suit matte leaves but is not appropriate for every surface.
Battery life and price can change.
The value is the repeatable leaf-surface comparison, not a guarantee of accurate diagnosis from one reading.
Leaf temperature is heterogeneous.
Read multiple spots and record the conditions so you can compare changes. Do not let one maximum reading substitute for plant observation.
Important
An IR thermometer is optional but useful when you need to compare leaf and air conditions.
Use it alongside plant observations and shade decisions, not as a standalone diagnosis.
How do I tell sun scald apart from look-alike disorders?
Start with pattern and history
Sun scald often presents as bleached, sunken patches on the upper leaf surface with edges that may follow leaf orientation toward the sun.
Look-alikes follow different patterns, so use the whole plant and recent exposure history before changing treatment.
What does sun scald actually look like?
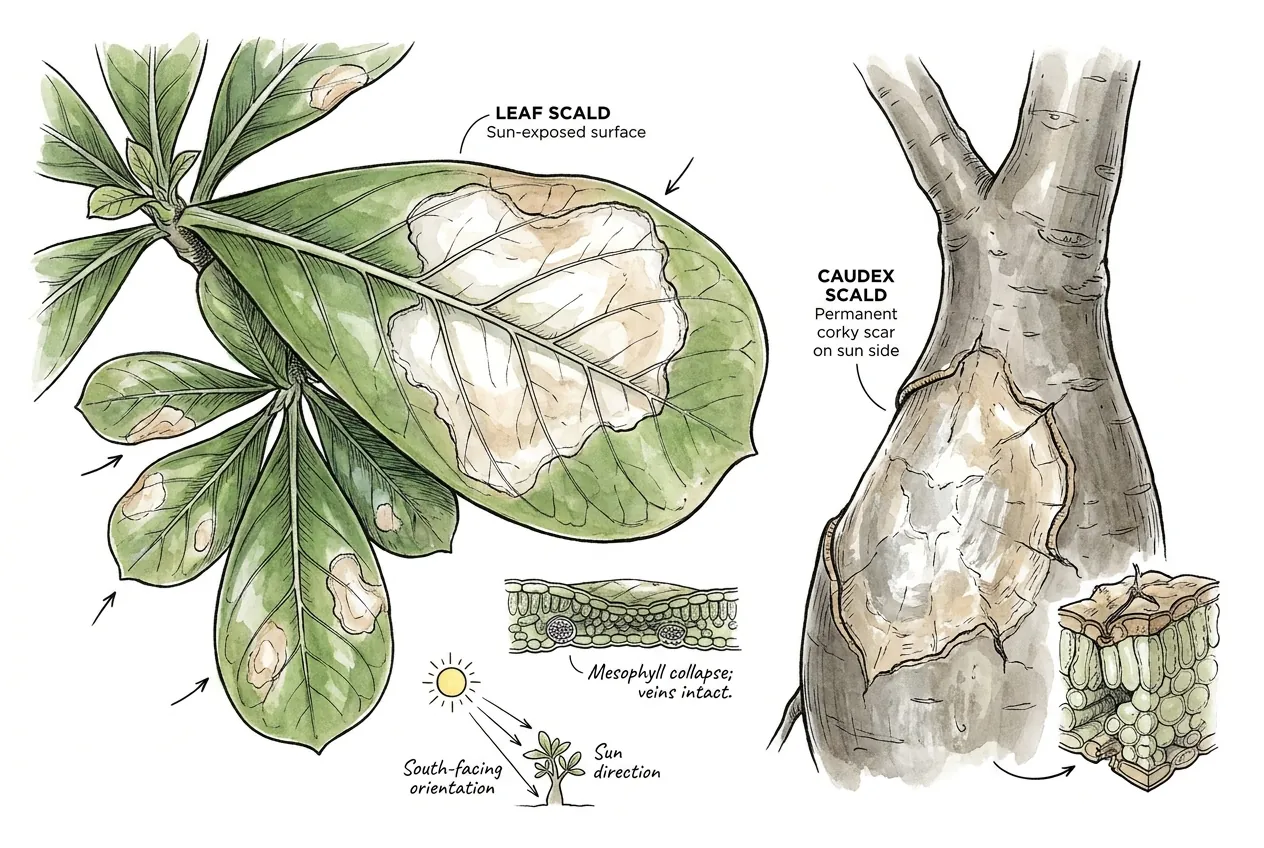
Sun scald patches can be sharply demarcated, irregularly shaped, white-to-cream-to-pale-tan, and sunken when underlying tissue is damaged. Leaf veins may remain intact, and sun-facing orientation is a useful clue rather than a stand-alone diagnosis. Caudex scald is related but distinct, with silvery-tan papery patches on the sun-exposed side and a persistent corky scar as new tissue grows around the affected area.
How do I tell scald from sulfur deficiency?
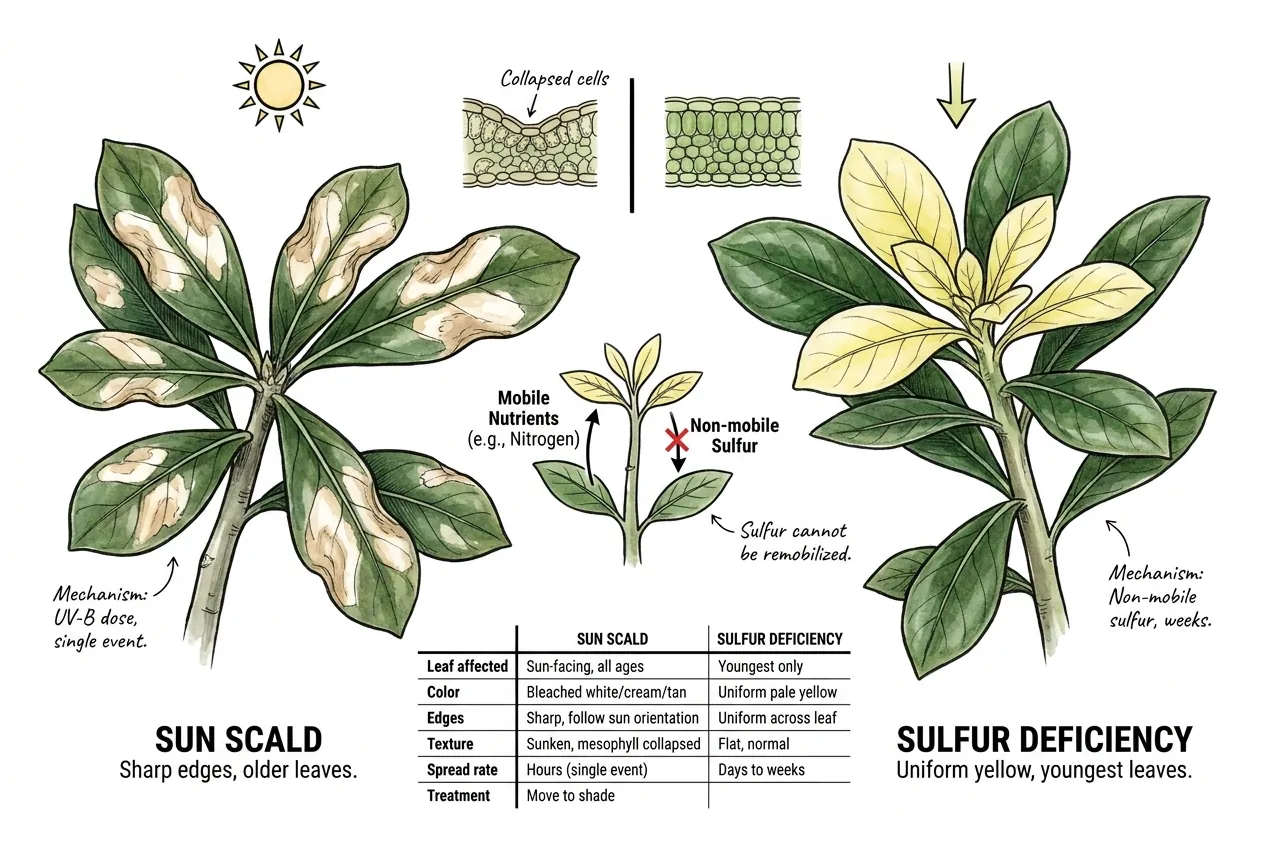
Sulfur deficiency often presents as uniform pale-yellow chlorosis in younger leaves, without the sharp edges typical of a light patch. Scald presents as sharply edged bleached patches on upper, sun-facing leaves. The pattern helps triage but is not definitive. Sulfur is relatively immobile, so deficiency can make new leaves pale while older leaves stay dark green. Scald instead affects whichever leaves received the UV-B dose, usually the upper, sun-facing canopy.
| Feature | Sun scald | Sulfur deficiency |
|---|---|---|
| Leaf affected | Sun-facing, all ages | Often younger leaves |
| Color | Bleached white/cream/tan | Uniform pale yellow |
| Edges | Sharp, follow sun orientation | Uniform across leaf |
| Texture | Sunken, mesophyll collapsed | Flat, normal |
| Spread rate | Can appear quickly after exposure | Often develops over days to weeks |
| Treatment | Move to shade | Confirm deficiency, then follow a suitable label |
How do I tell scald from cold shock?
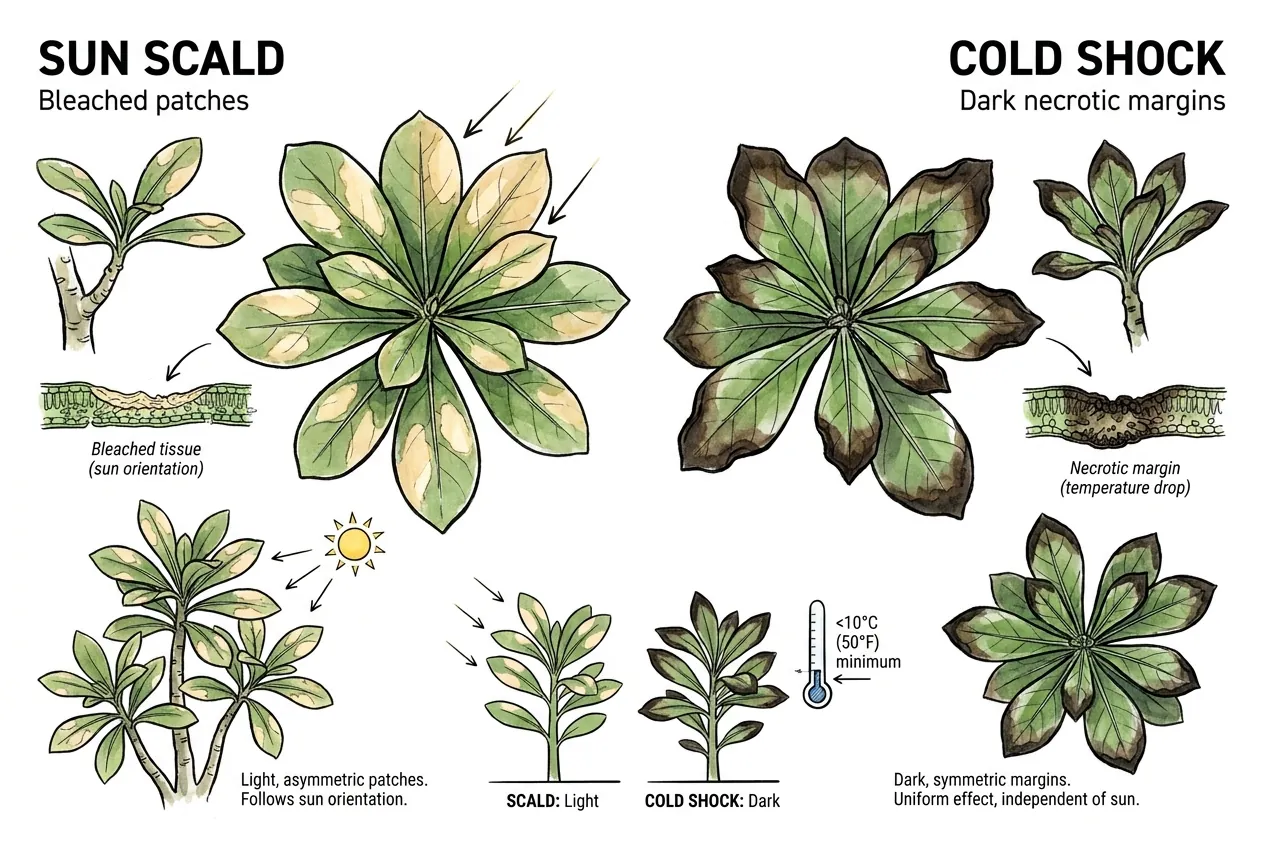
Cold shock can produce dark leaf margins after a cool night, while scald more often produces pale patches that follow sun exposure. These patterns are clues rather than definitive colors because Adenium cold response varies with tissue, hardening, moisture, and exposure duration. Do not use one nighttime temperature as a universal injury threshold. If dark margins follow a cool exposure, move the plant to a stable temperature and compare the whole pattern before deciding between cold injury, scald, disease, or water stress.
What about caudex sunburn specifically?
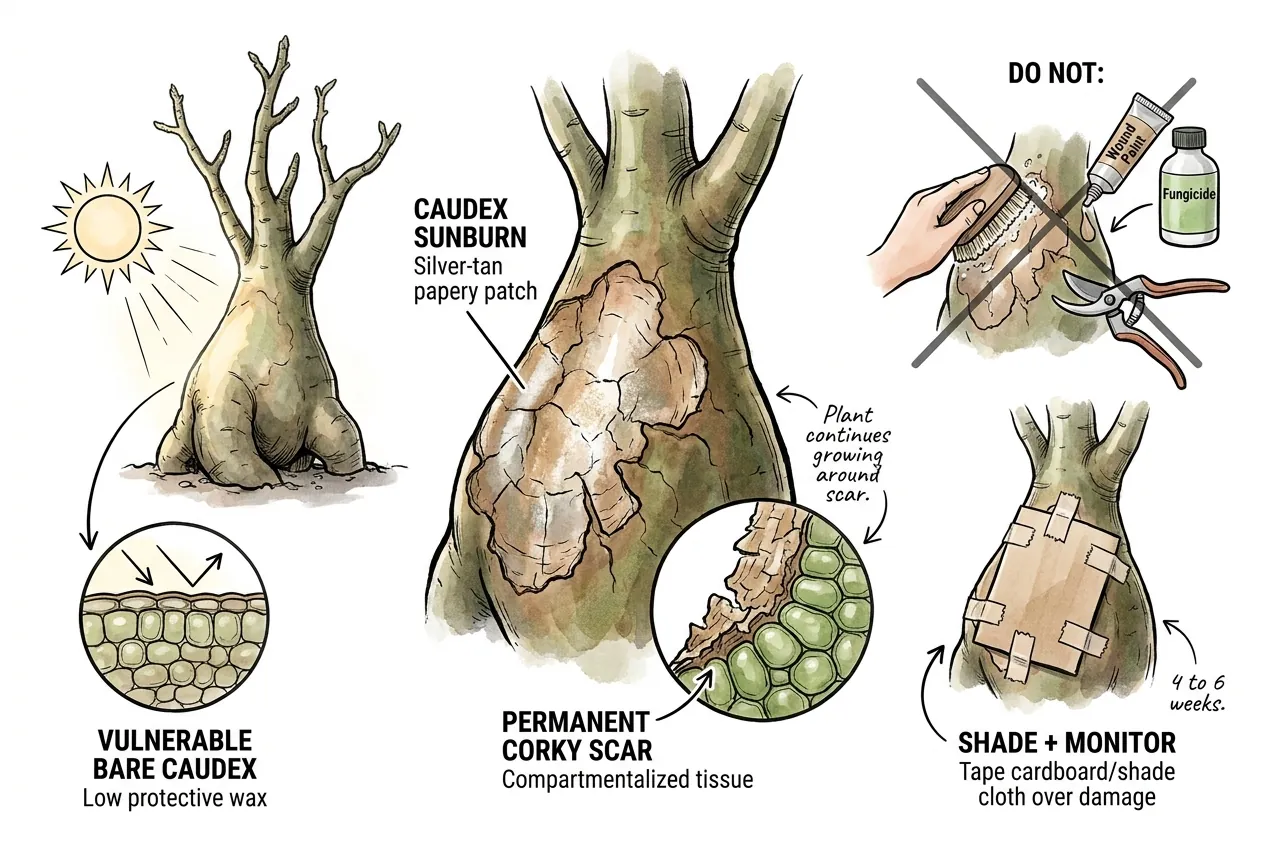
Treat caudex scald conservatively
Caudex sunburn can appear as silver-tan to bronze papery patches on the sun-exposed side, often south-facing in the Northern Hemisphere. Unlike leaf scald, it may leave a persistent corky scar while surrounding tissue grows around the damaged zone.
Bare-caudex plants are particularly vulnerable because the skin initially has less protective wax and pigment. Use shade and monitoring rather than scrubbing, wound paint, preemptive fungicide, or pruning into the damaged tissue.
A breathable barrier can help for several weeks if it does not contact the tissue or trap heat. Progression or softness warrants closer diagnosis.
My plant already scalded (what now?)
Protect the remaining green tissue
Move the plant to gentler light, protect it from additional heat, and match watering and feeding to the root zone and current growth. Leave damaged leaves in place while they retain healthy tissue unless disease or safety requires removal because their remaining function varies by severity.
Why shouldn’t I strip the scalded leaves?
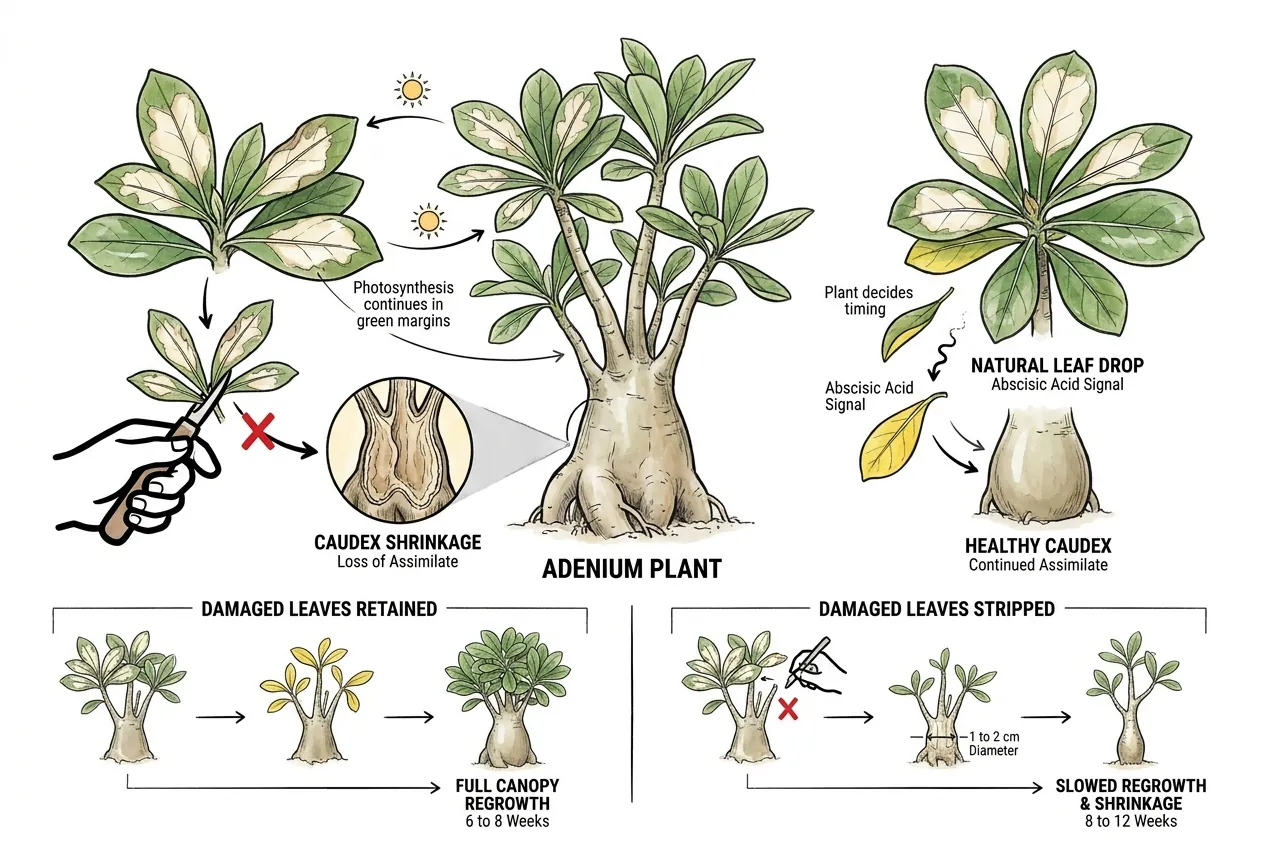
Scalded leaves may still photosynthesize at their margins even when the center bleach patch is dead. Removing them can increase reliance on caudex reserves, especially when much of the canopy is damaged. Leave partially green leaves in place while stable, then remove tissue that is fully dead or diseased with clean tools. Recovery speed depends on roots, light, temperature, and functional leaf area, and no universal week or caudex-size change is established.
What’s the correct shade and fertilizer regime during recovery?
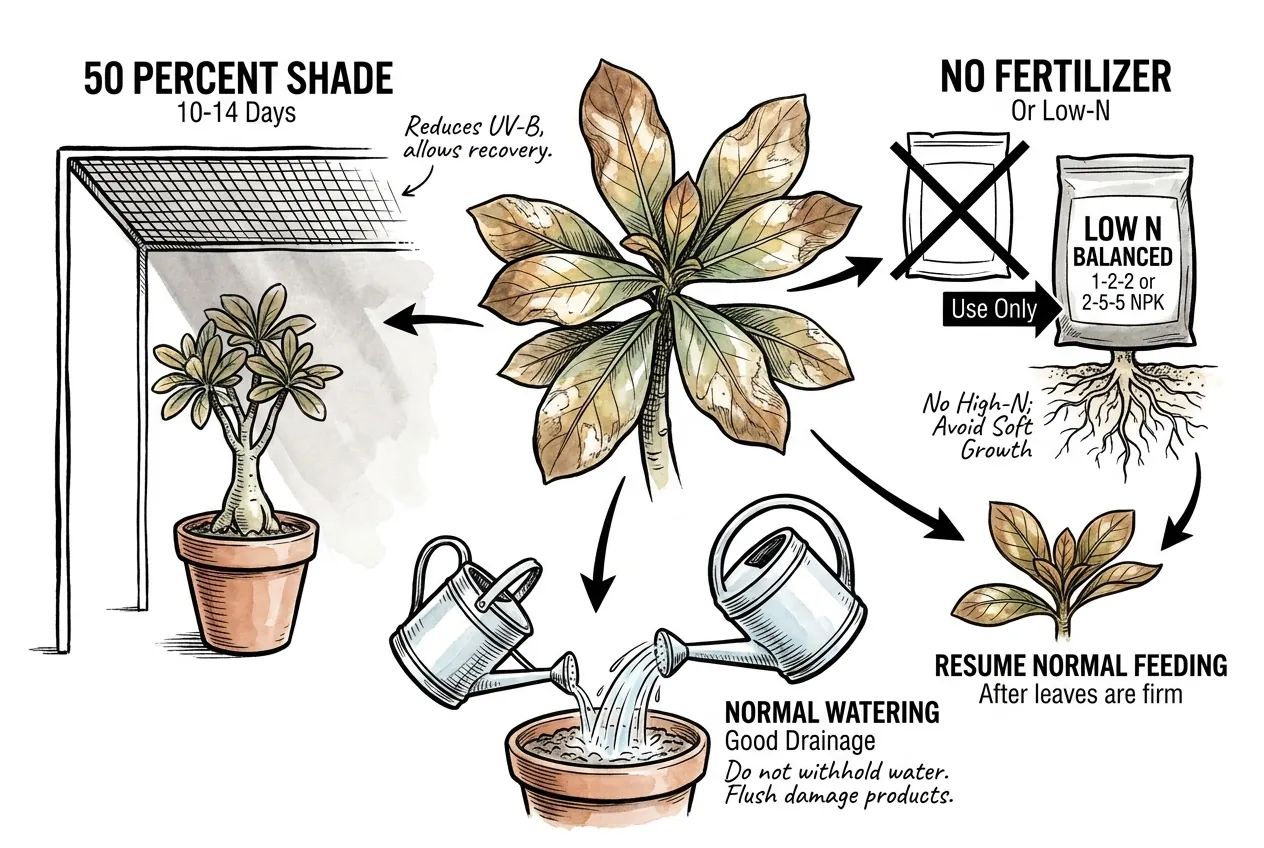
Use temporary shade appropriate to the site rather than a fixed percentage or duration. Keep the medium draining and water when the plant and root zone indicate uptake is needed. Avoid forcing fertilizer while the plant is heat-stressed or roots are compromised. Resume a label-compliant feed only when new growth and root function are stable because no NPK ratio has been validated as a scald treatment.
How long until new flavonoid-hardened leaves replace the damaged ones?
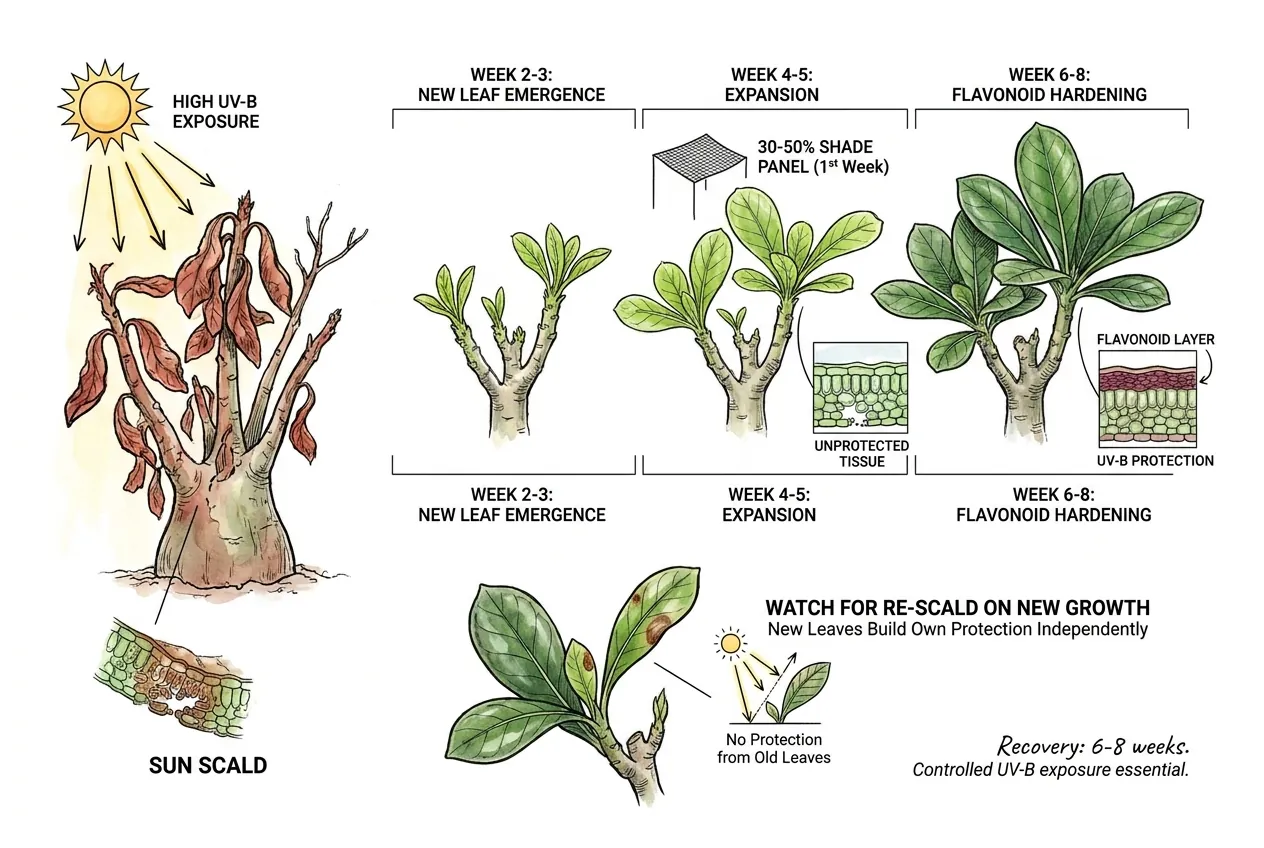
New growth may replace damaged leaves over weeks to months, depending on roots, season, and conditions. Do not use a fixed recovery calendar or assume existing caudex health removes the need for gradual light exposure. Each leaf builds its own flavonoid layer, so old leaves do not protect new ones. Use temporary shade over a new flush when local sunlight is markedly stronger than recent exposure, and increase light only after new leaves remain stable.
Illustrative acclimation case log
The following small case log is observational and cannot establish a dose, schedule, or success rate. It shows why site, weather, and plant history should be recorded when comparing acclimation choices.
What was the trial setup?
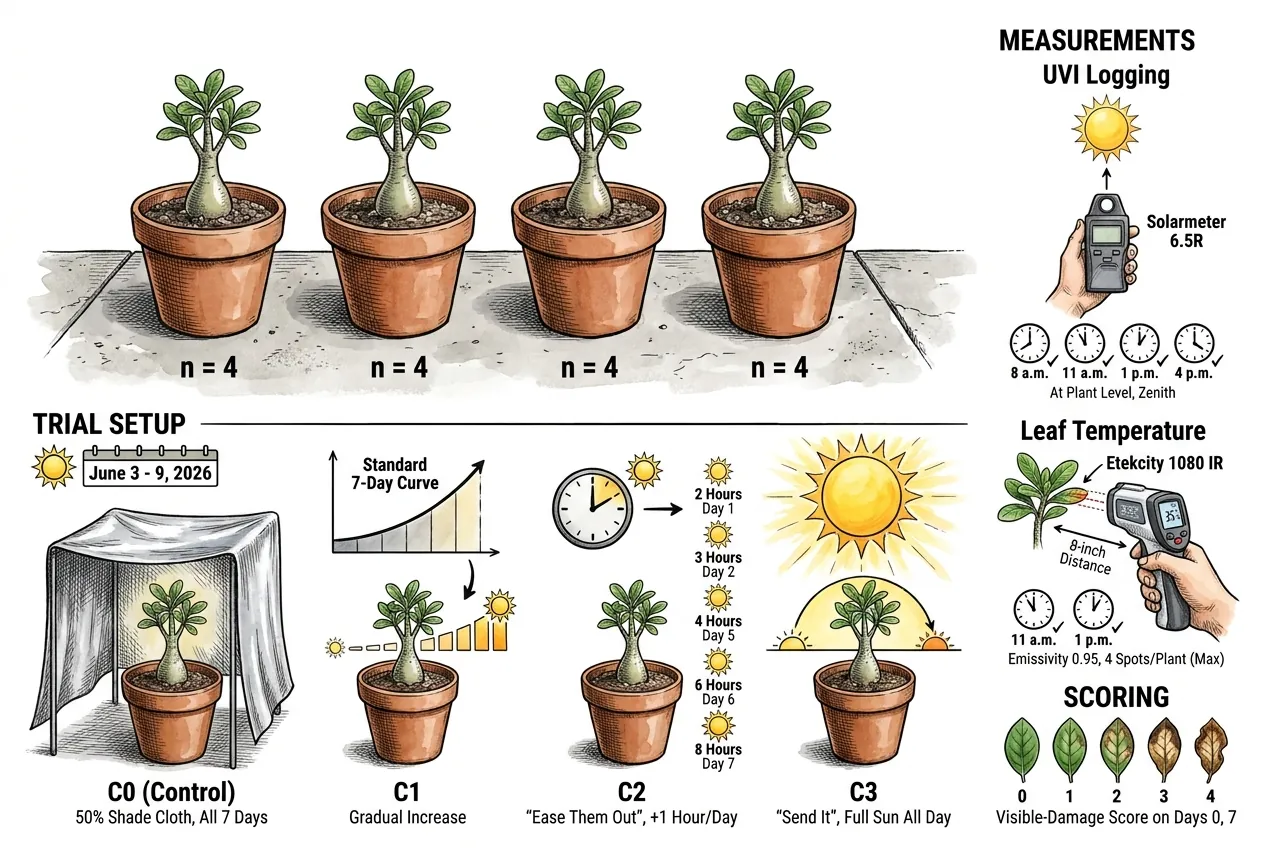
The log covered four indoor-overwintered Adenium obesum seedlings about 12 months old with caudexes around 6 cm across. They were kept near a south-facing low-E window from October 2025 through May 2026, then observed for seven days on a south-facing concrete patio in central Texas at about 30.27 degrees N with no overhead obstruction.
Treatments
- C0 control with 50 percent aluminized shade cloth for all 7 days
- C1 followed the standard 7-day acclimation curve
- C2 used a gradual start with 2 hours of full sun on Day 1, increasing by 1 hour per day.
- C3 received full sun all day from Day 1.
Measurements
UVI was logged at 8 a.m., 11 a.m., 1 p.m., and 4 p.m. with a Solarmeter 6.5R pointed at zenith at plant level. Leaf surface temperature was logged at 11 a.m. and 1 p.m. with an Etekcity 1080 IR thermometer at emissivity 0.95 and an eight-inch distance, using four spots per plant and recording the maximum.
Scoring
Visible damage was scored from 0 to 4 using photographs on Days 0, 3, and 7. The investigator was not blinded to treatment.
Limitations
Four plants are too few for statistical inference, with no replication, one site, one week, and no blinding. The trial is illustrative case logging for qualitative pattern observation only.
What did the trial show?
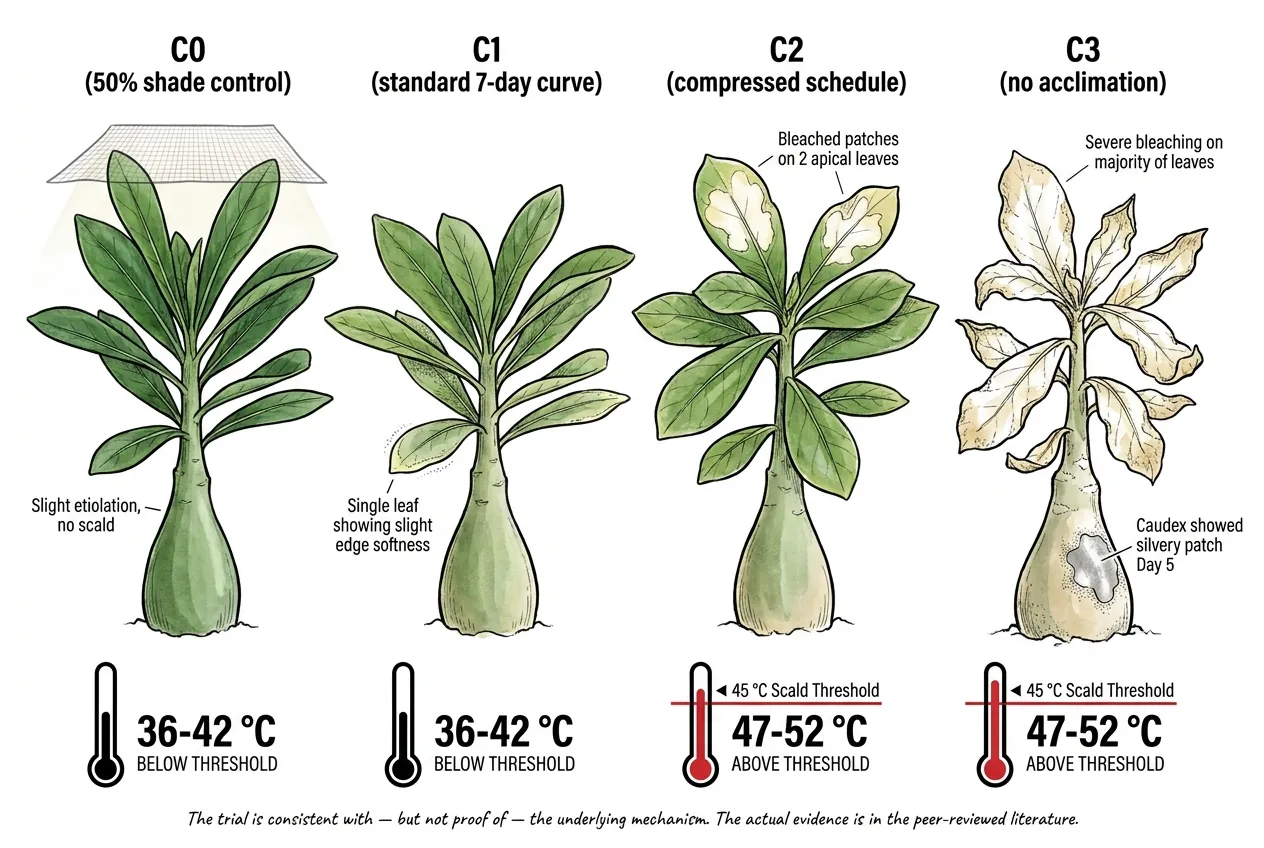
The observations from this one site should be read only as a local comparison, not as a validation of the preceding framework.
| Treatment | Damage score (0–4) | Notes |
|---|---|---|
| C0 (50% shade control) | 0 | Slight etiolation, no scald |
| C1 (standard 7-day curve) | 1 | Single leaf showing slight edge softness |
| C2 (compressed schedule) | 2 | Bleached patches on 2 apical leaves |
| C3 (no acclimation) | 4 | Severe bleaching on majority of leaves. Caudex showed silvery patch Day 5 |
Record local UVI forecasts and leaf-temperature readings with the instrument and conditions used. These values cannot establish an Adenium injury threshold or prove that one schedule caused the observed differences. The case is consistent with the general value of gradual exposure and shade, but replication across sites, cultivars, and seasons would be required to estimate any effect.
Troubleshooting common acclimation problems
Day 2 already showing bleached patches
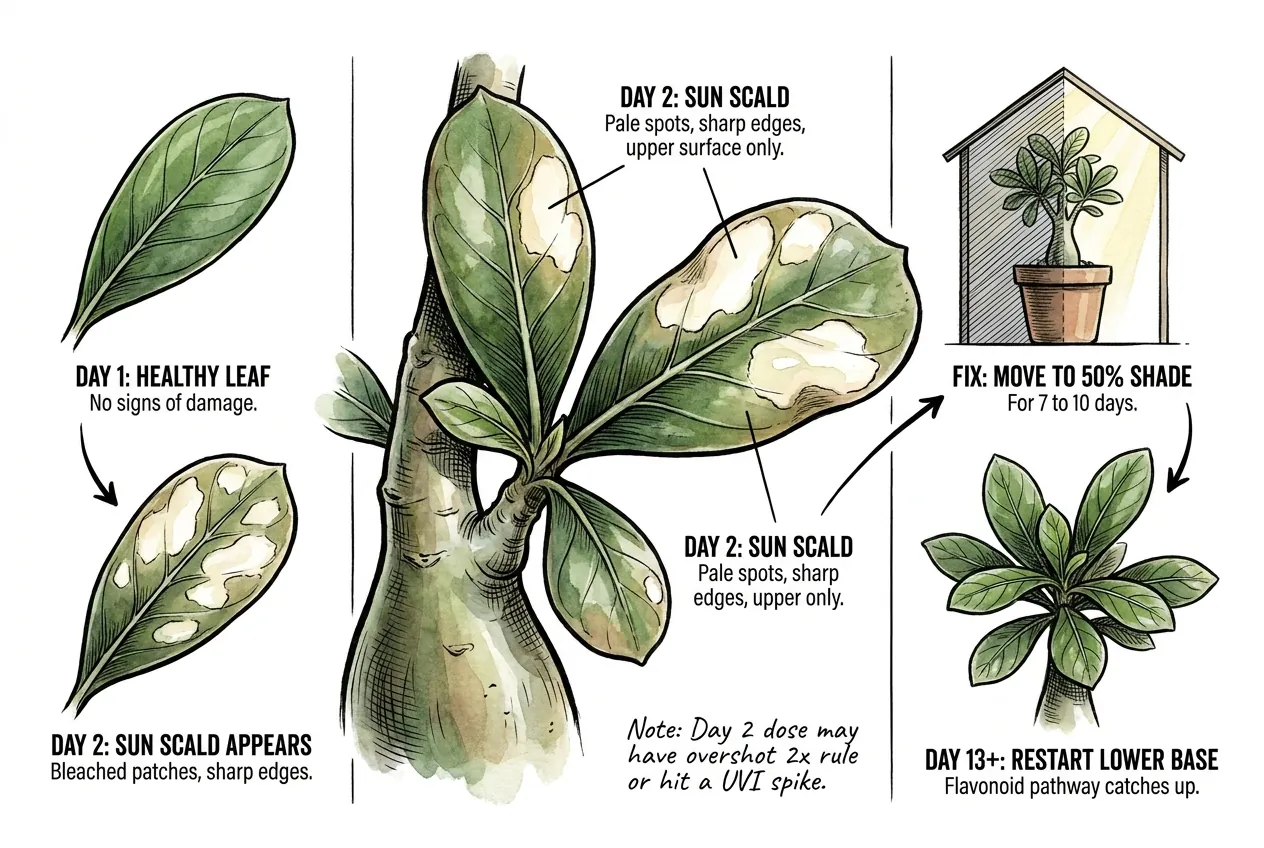
Faint pale spots on Day 2 morning with sharp, upper-surface edges justify moving to gentler light, holding the current exposure, and restarting more conservatively after stabilization. The cause may be excess light, heat, water stress, or another problem, so do not infer a failed flavonoid schedule from pale spots alone.
Days 1–4 went fine, Day 5 scald appeared
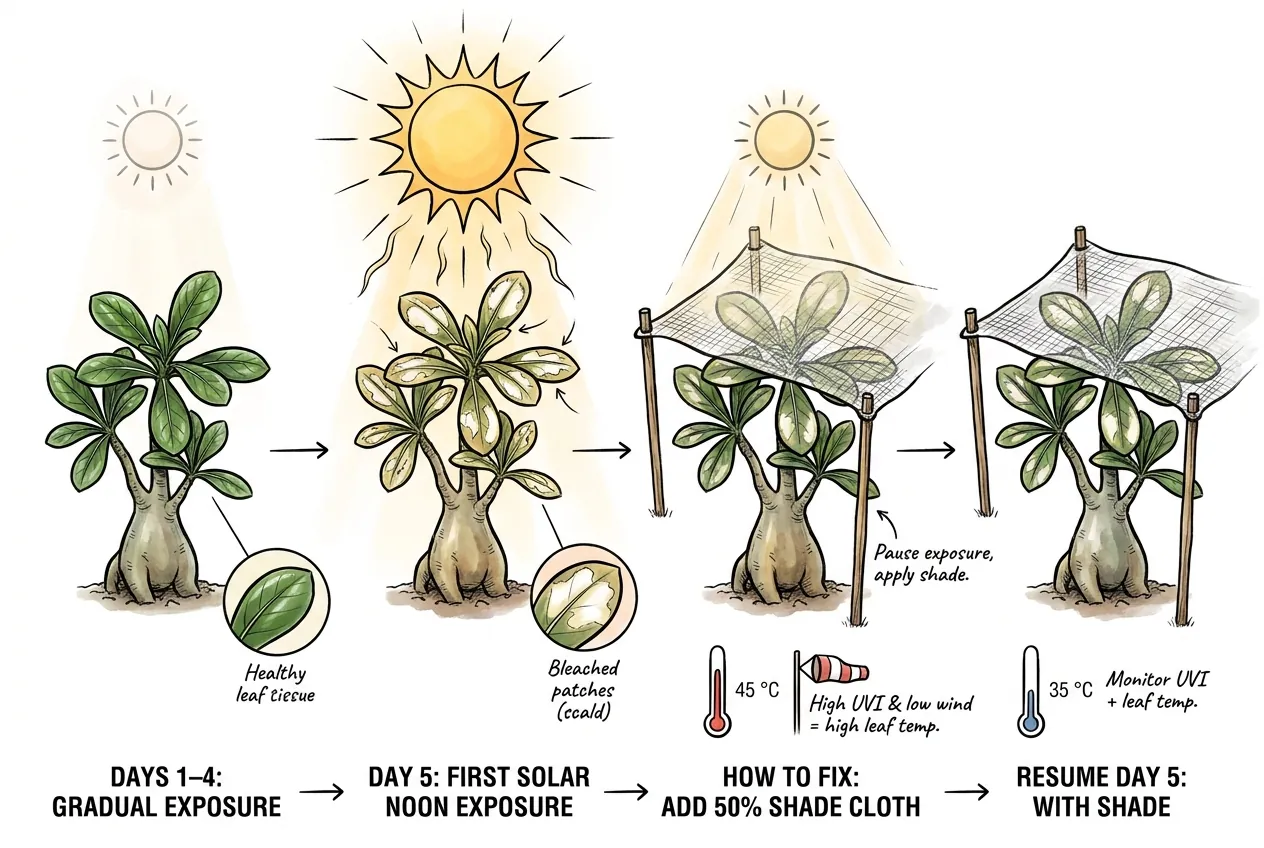
Bleached patches after the first whole-day exposure justify pausing the increase, adding shade during the hottest period, and resuming only after the plant remains stable. Compare UVI and leaf-temperature readings with wind, water status, and pot conditions.
Old leaves fine, new leaves scald
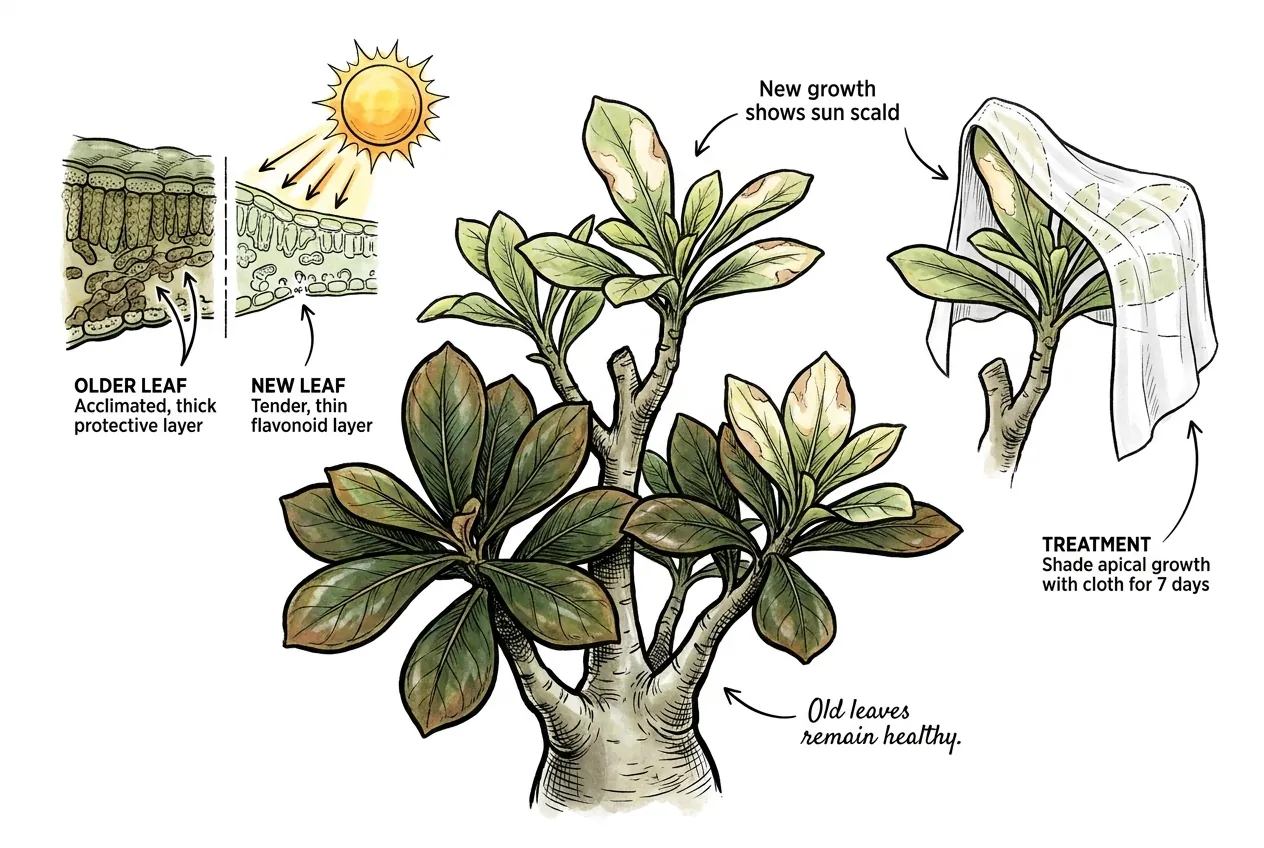
When older lower leaves remain bronzed and healthy but the new flush shows bleached patches, shade the apical growth temporarily and extend the transition until new leaves remain stable. Each leaf builds its own flavonoid layer, so an acclimated plant does not automatically protect new leaves.
Cracked caudex along scar line during recovery
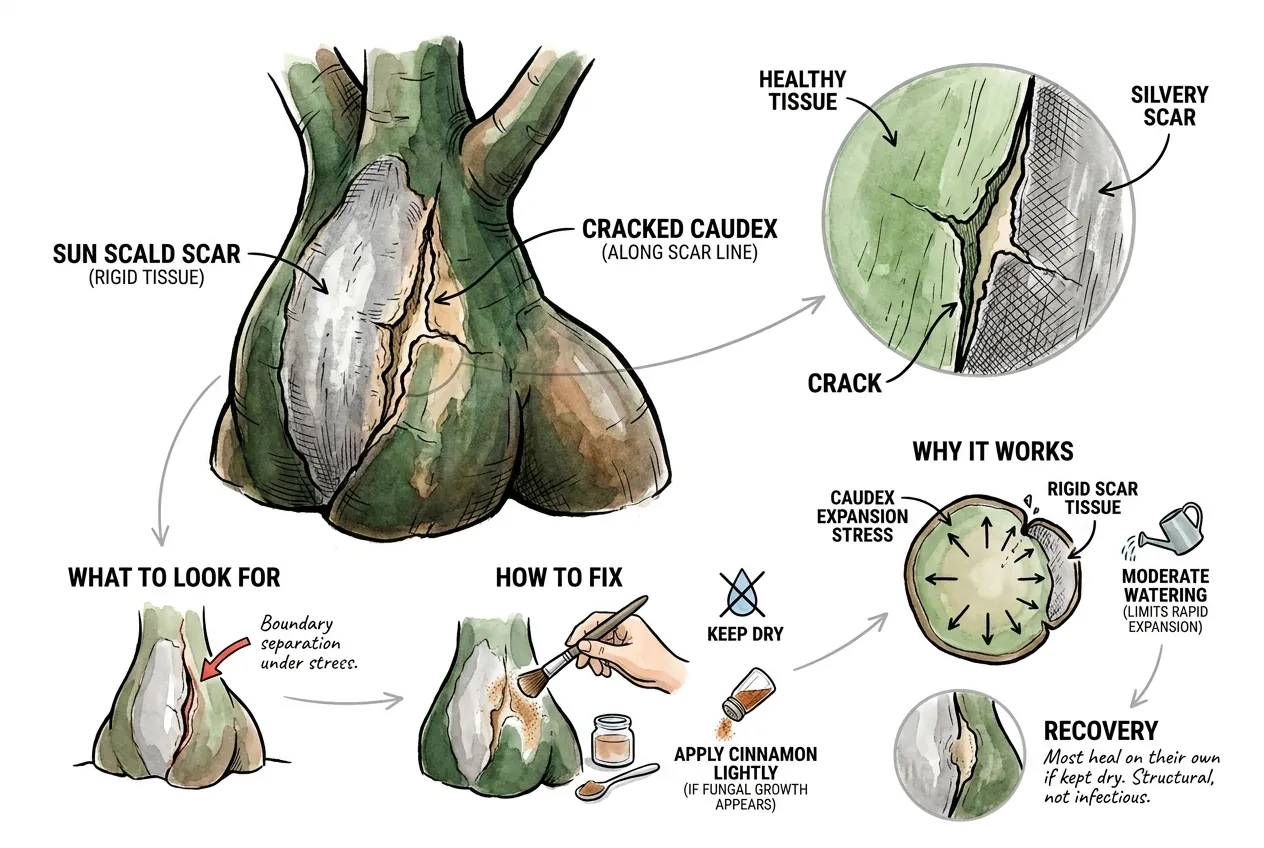
A crack along the boundary between healthy caudex and a silvery sunburn scar should remain clean and dry. Seek plant-health advice if it spreads, softens, or develops exudate, and do not apply kitchen powders to a fresh wound. Scarring, growth stress, dehydration, and infection can look similar, so adjust watering only after checking the root zone and the plant’s overall condition.
Symmetric black margins after a cool night during acclimation
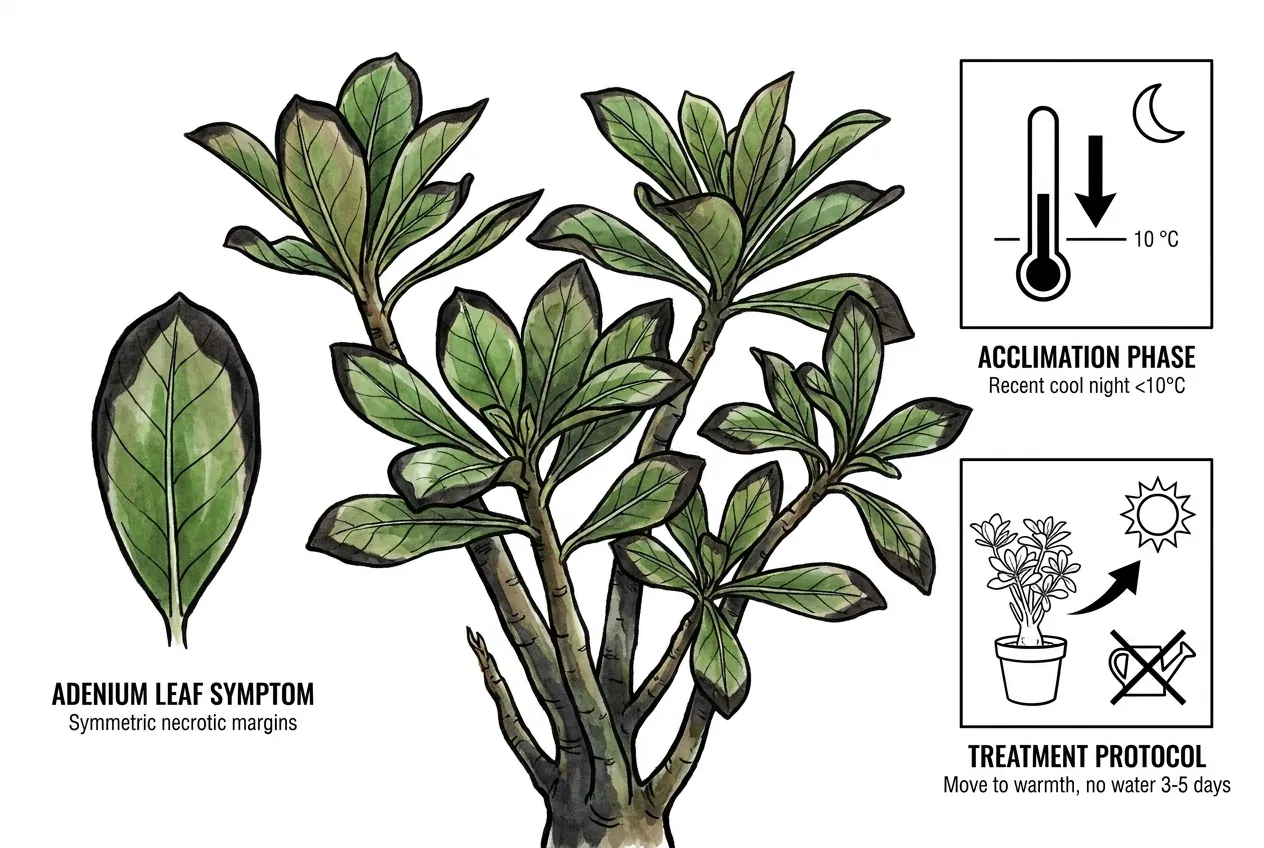
Symmetric dark leaf margins after a recent cool night make cold injury one possibility, but sun, disease, and water stress can overlap. Move the plant to a stable temperature and check the mix before watering. Species, acclimation, duration, and moisture change the cold response, so no single temperature or no-water interval diagnoses the cause.
Practical conclusion
Read solar intensity and leaf heat together
Strong sun and UV can drive scald more than hot air alone. Use the UV Index as a rough guide to solar harshness, not as an exact plant threshold.
Use gradual hardening
Gradual hardening is safer than a fixed exposure calendar. Increase exposure in steps over roughly one to two weeks and back off at the first sign of scald.
Choose shade by the site
A moderate shade cloth can be practical when its transmission fits the site. A UV meter and IR thermometer can add context, but careful observation of the plant remains essential.
Keep useful green tissue
Do not strip scalded leaves while they retain healthy green margins. Removing them can increase the plant’s reliance on caudex reserves.
Affiliate Disclosure
This article contains Amazon affiliate links. As an Amazon Associate I earn from qualifying purchases. If you use these links, the site may earn a commission at no extra cost to you. Product availability, price, and specifications can change. Check the current listing before buying.