
Adenium White Spots on Leaves: Causes, Mites, Safe Fixes
Adenium white spots on leaves can come from residue, sun scald, spider mites, or powdery mildew. Diagnose first with a wipe test and underside check, then treat safely.
Maya Ellison · 2026-07-12 · Updated 2026-08-01 · 17 min read

Key Takeaways
- Choose a treatment only after the pattern is clear. Adenium white spots have several different causes, so identify before you spray.
- Powder that returns on new leaves needs a mildew check. A mark that wipes away once may only be residue.
- Fixed patches after stronger sun are more consistent with scald than active disease. Review the recent light change before spraying.
- Tiny stipples with webbing or movement on the undersides point to spider mites. Flip the leaves and tap them over white paper to confirm.
- Chalky marks that wipe off and match a pot-rim crust are hard-water residue, not disease. But a soft caudex or sour wet mix means inspect the roots before spraying anything.
Common causes of adenium white spots on leaves include residue, sun scald, spider mites, powdery mildew, and active leaf spot disease. A lower-risk move is diagnosis first, treatment second.
Start with texture, pattern, location, and change over the next couple of days. Those four clues prevent the usual mistake of spraying a stressed desert rose before you know what changed.
Why does my adenium have white spots on leaves?
Use texture and behavior together
White spots can reflect a specific stress signal recorded by the leaf. Surface chalk, fixed papery tissue, tiny stipples, and spreading lesions point to different causes.
Adenium leaves sit on a water-storing caudex, but the leaves are still thin working tissue. They show light shock, mite feeding, salt residue, and disease before the trunk shows stress.
Use the pattern split before treating
Start with this split before choosing a treatment.
| Check | What it points to | What to do next |
|---|---|---|
| Wipes off as chalk | Mineral residue or powdery mildew | Check whether it returns or follows dried water drops |
| Stays fixed and papery | Sun scald or old physical damage | Review the last light or heat change |
| Looks like many tiny dots | Spider mites or other sap-feeding pests | Inspect undersides and tap leaves over white paper |
| Expands, halos, or browns | Fungal or bacterial leaf spot pressure | Improve airflow, keep leaves dry, and monitor new lesions |
Separate active from fixed marks
A useful first split is active versus fixed. Active problems tend to spread, reproduce, or appear on new growth, while fixed injuries stay where the damage happened.
Treat this as a helpful starting sort, not a firm diagnosis. An infection can look stable for a while, and fresh sun injury can show up a day or two after exposure, so keep watching rather than deciding from one look.
Beyond the common causes above, white or pale marks can also come from scale, thrips, spray or fertilizer residue, chemical burn, edema, nutrient or root problems, or mechanical scuffing, so keep an open mind.
What does a quick adenium white spot test look like?
Use a three-step check
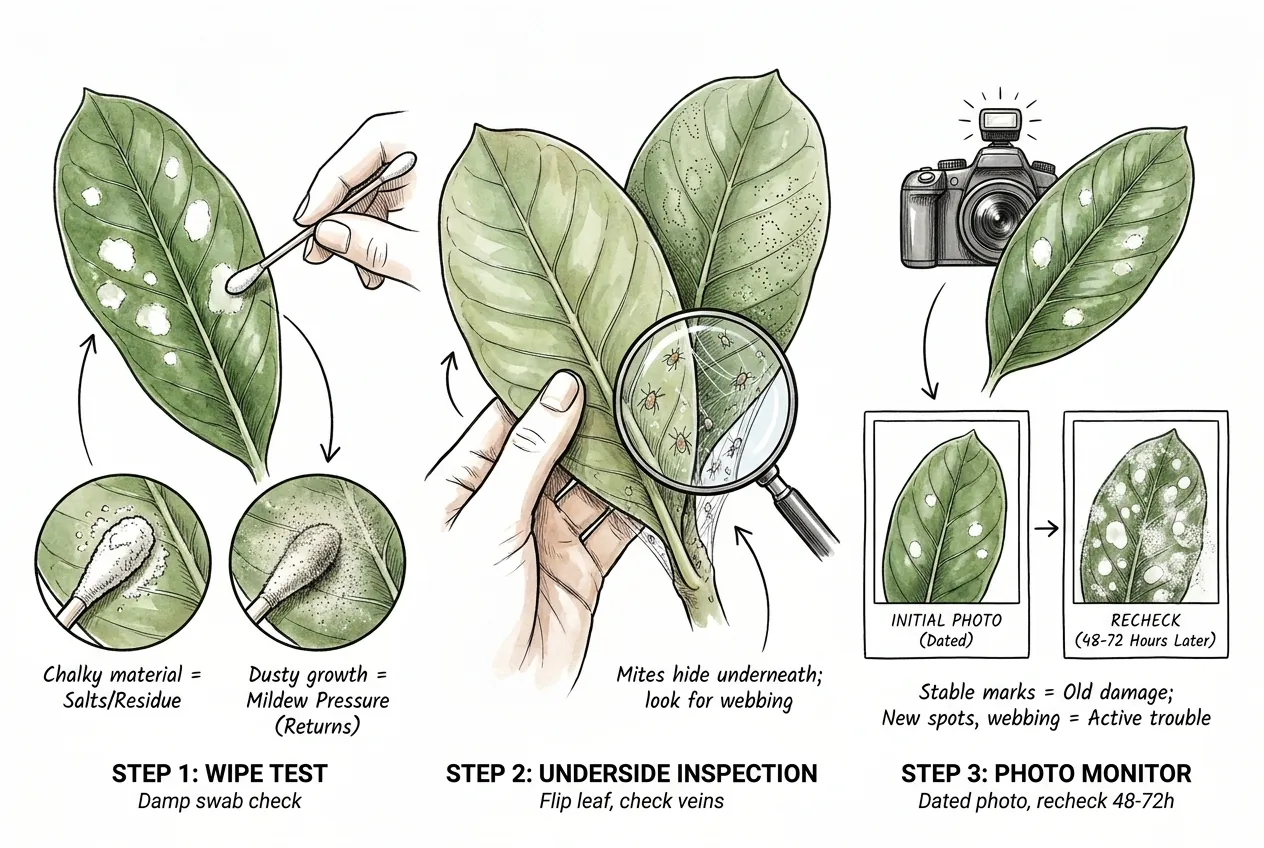
A quick test uses a damp swab, underside inspection, and a dated photo. That sequence separates residue, mites, sun scald, and disease without stressing the plant.
Wipe one mark
First, wipe one mark gently with a damp cotton swab. Chalky material suggests salts or residue. Dusty white growth that returns suggests mildew pressure.
Inspect the underside
Second, flip the leaf. Spider mites usually hide underneath while the top surface shows the damage. Look along the midrib, petiole, and leaf base.
Track the change
Third, photograph the worst leaves and recheck over the next couple of days. Stable marks are usually old damage. New spots, webbing, or fresh powder mean active trouble.
For a simple residue check, I choose one leaf with two similar nearby marks and label them A and B on a duplicate photograph. Mark A gets one fresh swab dampened with distilled water while B remains untouched. I then photograph the used swab against a dark card so transferred chalk, loose wax, or powder is visible against the cotton.
After the leaf dries, I photograph both marks with the lamp returned to its recorded position beside the leaf. If A clears and the tissue beneath matches the surrounding leaf while B remains chalky, surface residue becomes more plausible. If A still looks papery, stippled, translucent, or necrotic, wiping removed only part of the evidence.
That single wipe ends the first check. On the next inspection date, I recheck A, B, the underside, and the youngest expanding leaf. Repeated scrubbing can erase the original surface pattern and create pale damage, while recurrence on clean new tissue carries more weight than residue on an old test leaf.
How do I tell fungus from mineral residue on desert rose leaves?
Separate surface growth from residue
Fungus behaves like a living problem, while mineral residue behaves like dried material left by water, fertilizer, or splash.
Recognize powdery mildew
Powdery mildew is the main white-powder suspect. It forms white to gray surface growth and can distort young leaves under high pressure.
Read embedded lesions
True adenium leaf fungus white spots often begin pale, then turn tan, brown, or necrotic. A halo around dead tissue is a stronger disease clue than a clean chalk ring.
Look for water-dried residue
Mineral residue usually sits on the leaf surface. It often appears after overhead watering, misting, or hard-water droplets.
| Clue | Powdery mildew | Fungal leaf spot | Mineral residue |
|---|---|---|---|
| Texture | Dusty or felt-like | Embedded lesion | Chalky or crystalline |
| Behavior | Returns or spreads | Enlarges, darkens, or halos | Stays tied to water marks |
| Location | Living leaves and tender growth | Edges, tips, or scattered tissue | Droplet paths, leaf surface, pot rim |
| First move | Isolate, add airflow, remove worst leaves | Stop wetting leaves and monitor spread | Wipe leaves and change water practice |
Treat active disease
Treat only when the disease pattern is active. Fungicides protect clean tissue better than they erase old damage. Recovery means new, clean leaves.
When are adenium white spots likely powdery mildew?
Recognize recurring powder
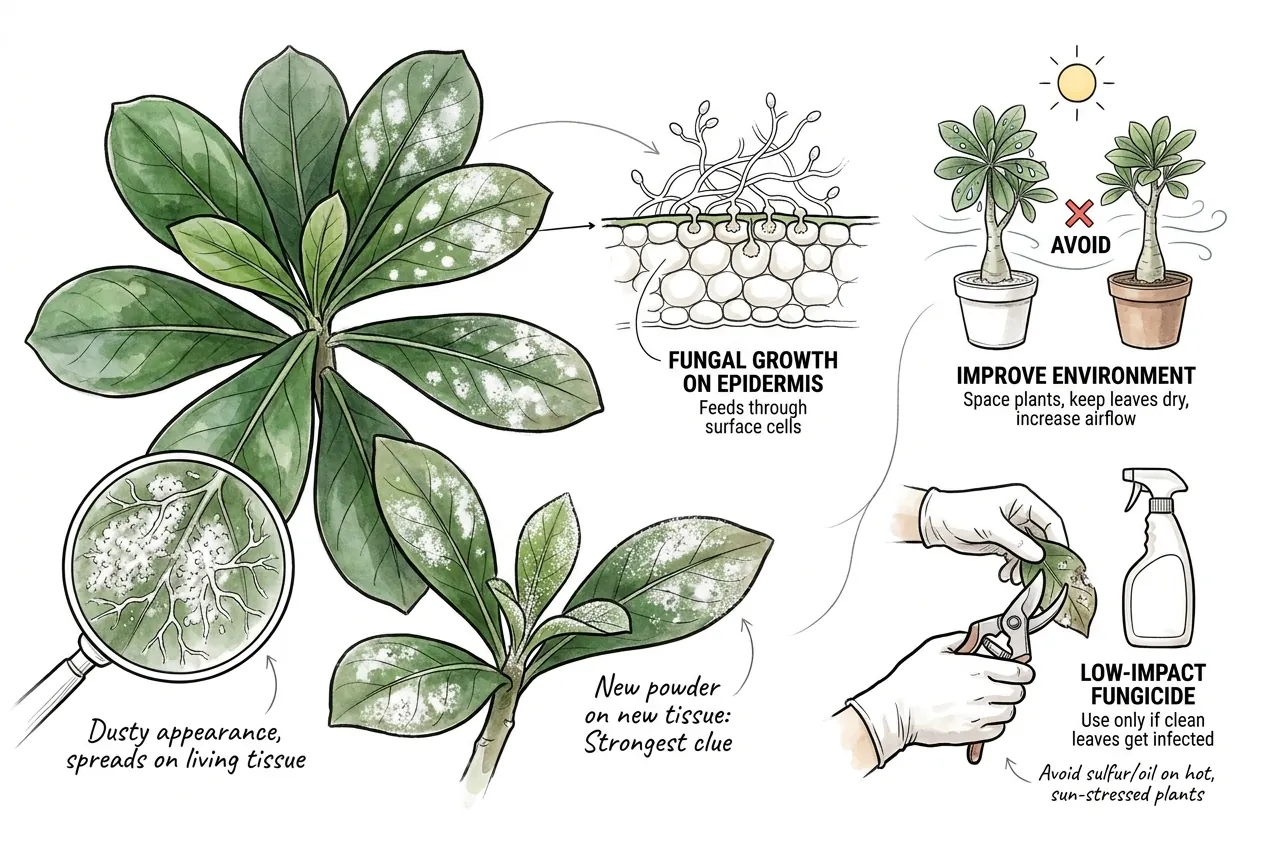
White spots are likely powdery mildew when they look dusty, return after cleaning, and spread across living leaves. New powder on new tissue is the strongest clue.
Treat recurring powder as active growth
Powdery mildew is superficial-looking, but it is not harmless dust. Many powdery mildew fungi grow on the leaf surface and feed through epidermal cells.
Improve airflow before spraying
Improve the environment first by spacing plants, removing the worst infected leaves, and increasing gentle airflow. Unlike many leaf-spot fungi, powdery mildew does not require wet leaves to infect, and prolonged leaf wetness can even suppress it.
Keeping foliage dry is good general hygiene against other diseases, but it is not a direct cure for mildew. Airflow and spacing matter more here.
Protect yourself during removal
Adenium sap can irritate skin, and no part of the plant should be ingested. Wear gloves when removing leaves, wash hands and tools afterward, and keep the plant and cut material away from children and pets.
Use a labeled treatment
Use a labeled low-impact fungicide only when clean leaves keep getting infected. Follow label PPE, ventilation, and re-entry directions, and avoid sulfur or oil sprays on hot, sun-stressed adeniums.
How do I tell sun scald from fungus on adenium?
Read recent light history
Sun scald shows up as fixed, dry, bleached tissue on the sun-facing side, usually after a light change. Fungus is more likely when spots spread, powder returns, or lesions darken. A fixed pale patch points toward scald, but it doesn't by itself rule out chemical burn, cold injury, or physical damage. Use the plant's recent history (a move into stronger sun, a spray, a cold night) to decide.
Confirm whether the patch is fixed
Sun-scalded adenium leaves often show white, tan, or bleached patches on the exposed side. The mark does not wipe off.
Harden off future growth
This often follows a move from indoors, shipping, shade, or nursery benches into stronger sun. The plant may thrive in strong light, while old shade-built leaves struggle with the jump.
Use bright light without a shock
Adenium still needs bright light. The mistake is an instant move to full sun on leaves built for weaker light, not full sun as a goal.
University of Arizona notes that adeniums can sunburn after a fast move from dark shade to bright light. That single transition explains many sunburned adenium leaves and supports a gradual acclimation plan.
Can sun-scalded adenium leaves recover?
Judge recovery by clean new leaves
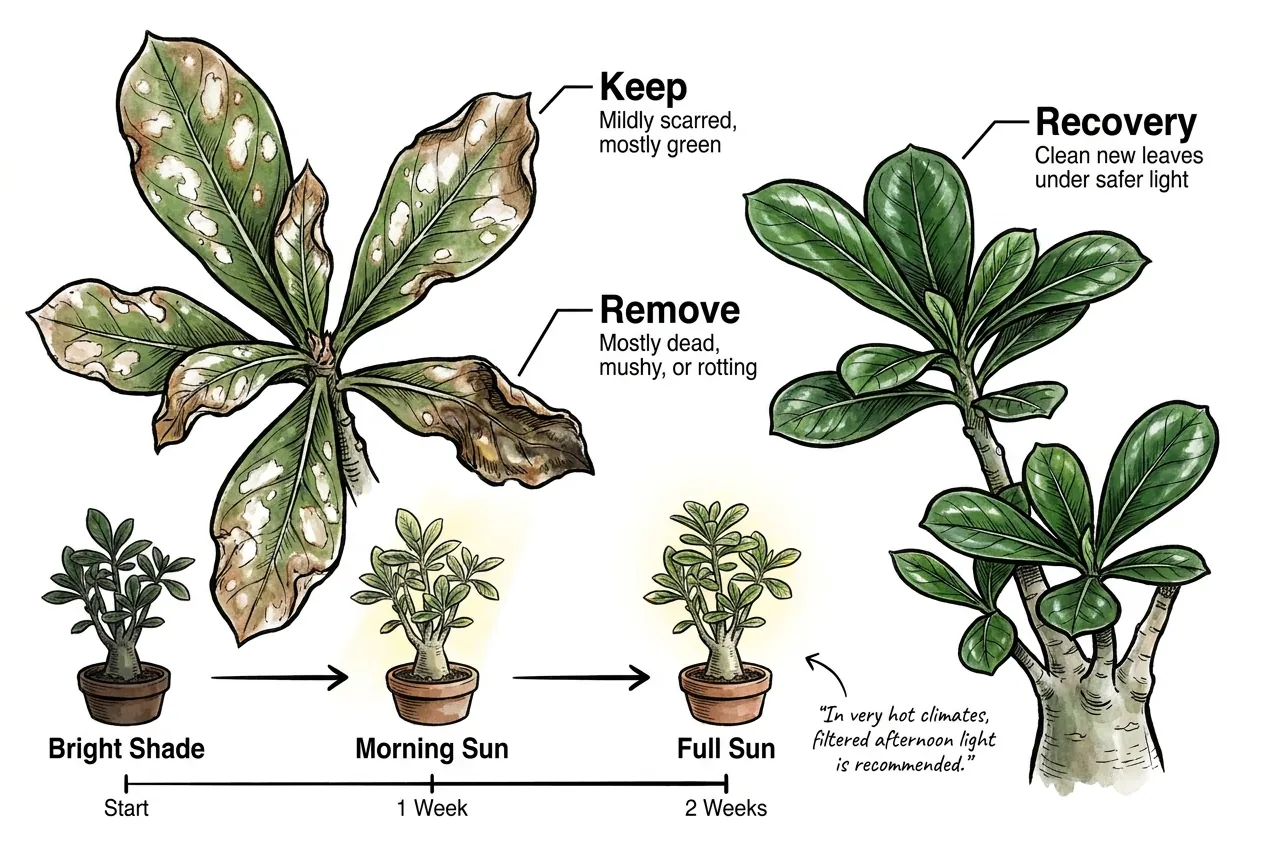
Sun-scalded leaf tissue does not turn green again. The plant recovers by producing clean new leaves under safer light.
Keep useful green leaves
Keep mildly scarred leaves if they are mostly green. They still help feed the caudex. Remove leaves that are mostly dead, mushy, or rotting.
Increase exposure gradually
A gradual transition prevents repeat damage. Start in bright shade, then morning sun, then longer direct exposure as the plant adjusts.
In very hot climates, filtered afternoon light often works better than testing the plant against patio heat. Clean new growth is the progress report.
How do I confirm spider mites on adenium leaves?
Match stippling with underside evidence
Confirm spider mites by matching tiny white or yellow stipples with underside evidence such as moving dots, eggs, or cast skins. Fine webbing is a strong sign, but it usually shows only once populations are high, so its absence does not rule mites out.
Moving specks aren't always pest mites. They can be harmless predatory mites or other tiny insects, so look at their shape under magnification before treating.
Treat stippling as feeding damage
Adenium spider mites white spots are feeding scars, not powder. The dots are collapsed leaf cells where mites fed from underneath.
Run a white-paper tap test
Use the white-paper tap test. Hold white paper under the leaf, tap the foliage, and watch fallen specks for a few seconds. Moving specks matter.
Use magnification to confirm movement
For inspection, magnification matters most. A hand lens works for scouting, but stronger magnification helps separate eggs from dust.
Use a pocket microscope as a secondary check
Carson MicroBrite is a pocket microscope option for checking whether suspected mites are moving, leaving cast skins, or sitting beside eggs. Its stated 60x to 120x range gives more detail than a basic hand lens, but the narrow field of view makes it slower for scanning a whole plant.
Balance magnification with field of view
Inspect the underside near the midrib and leaf base, and compare moving organisms against stationary dust. High magnification is slower than a hand lens when you need to scan a whole plant.
How do I treat spider mites on desert rose without burning the leaves?
Start with physical removal
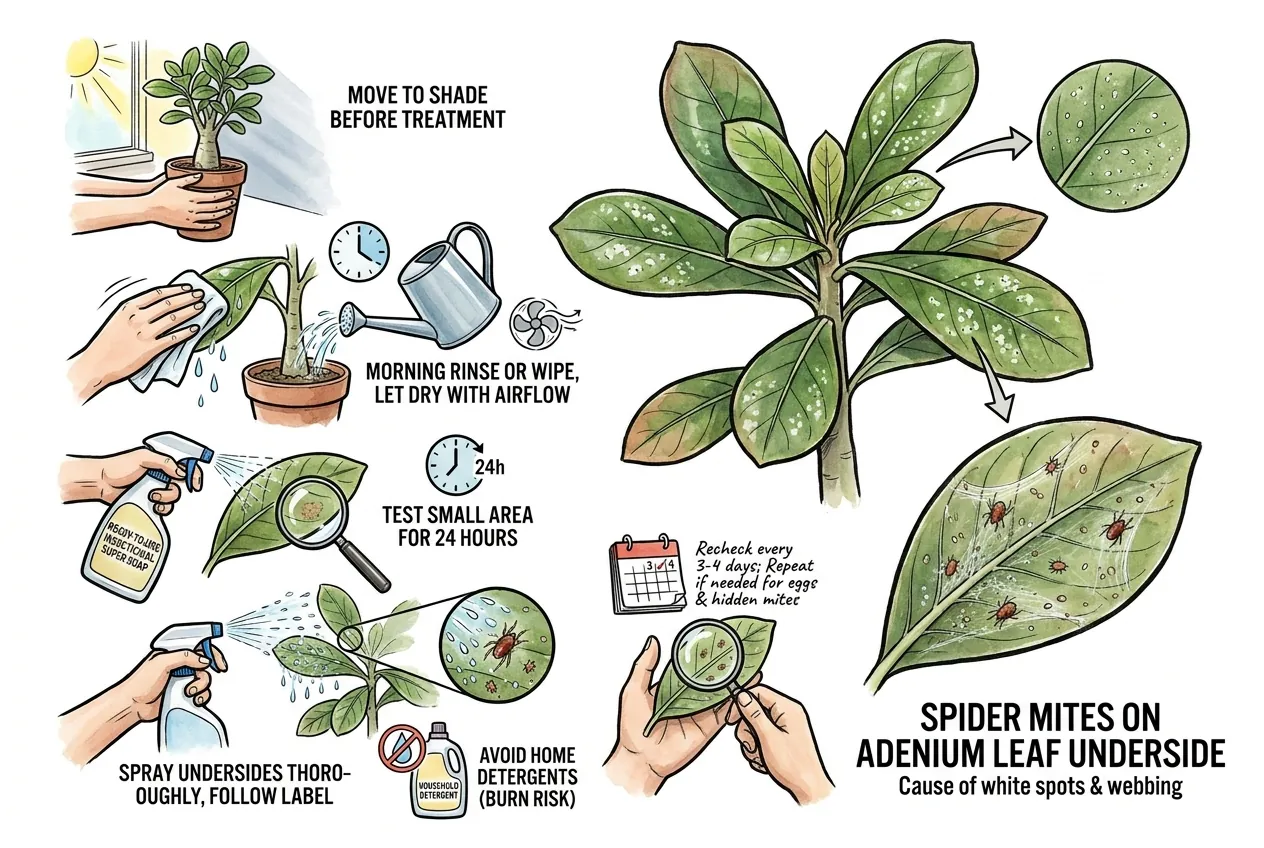
Treat confirmed mites with isolation, physical removal, repeat inspection, and careful contact treatment. Do not spray hot, thirsty, sun-exposed adeniums.
Rinse before chemical treatment
Start by rinsing or wiping leaf undersides in the morning. Let foliage dry with airflow. Recheck every few days during heat.
Use a labeled mite treatment
If mites remain active, use a labeled product that covers spider mites and ornamentals. Follow label PPE, ventilation, and re-entry directions. Contact products work only where they touch pests.
Prefer a ready-to-use label-covered soap
Bonide soap is one ready-to-use insecticidal-soap option when the current label covers spider mites and ornamental plants. The premixed format avoids guessing at a household-detergent dilution, and extension guidance warns that detergents can burn leaves.
Protect leaves during treatment
Move the plant out of direct sun. Test a small leaf area first, then spray undersides according to the label.
Expect repeat treatment when eggs remain
Eggs and hidden mites may require repeat label-directed treatment because contact products have limited residual control.
Which growing conditions trigger desert rose leaf spots?
Correct the care environment
The biggest triggers are wet leaves, soggy roots, stagnant air, sudden seasonal moves, and mistimed feeding. The symptom starts above ground, but the cause often starts in care.
Reduce leaf wetness and root stress
Wet leaves matter because many fungal spores need sustained moisture to infect. Soggy roots matter because adenium roots need oxygen between waterings.
Keep the root zone oxygenated
Adenium culture works best when conditions stay warm, bright, fast-draining, and dry enough between waterings. Cool wet media creates root stress with leaves attached.
| Trigger | Why it matters | Safer correction |
|---|---|---|
| Evening overhead watering | Extends wet-leaf time | Water at the soil line early in the day |
| Dense organic mix | Holds water and reduces root oxygen | Repot during warm growth into a faster mix |
| Crowded windowsill | Raises leaf humidity and hides pests | Space plants and add gentle airflow |
| Sudden outdoor move | Burns shade-built leaves | Harden off gradually |
| Winter fertilizer | Pushes growth when light and roots are slow | Feed only during warm active growth |
Does hard water cause adenium white spots?
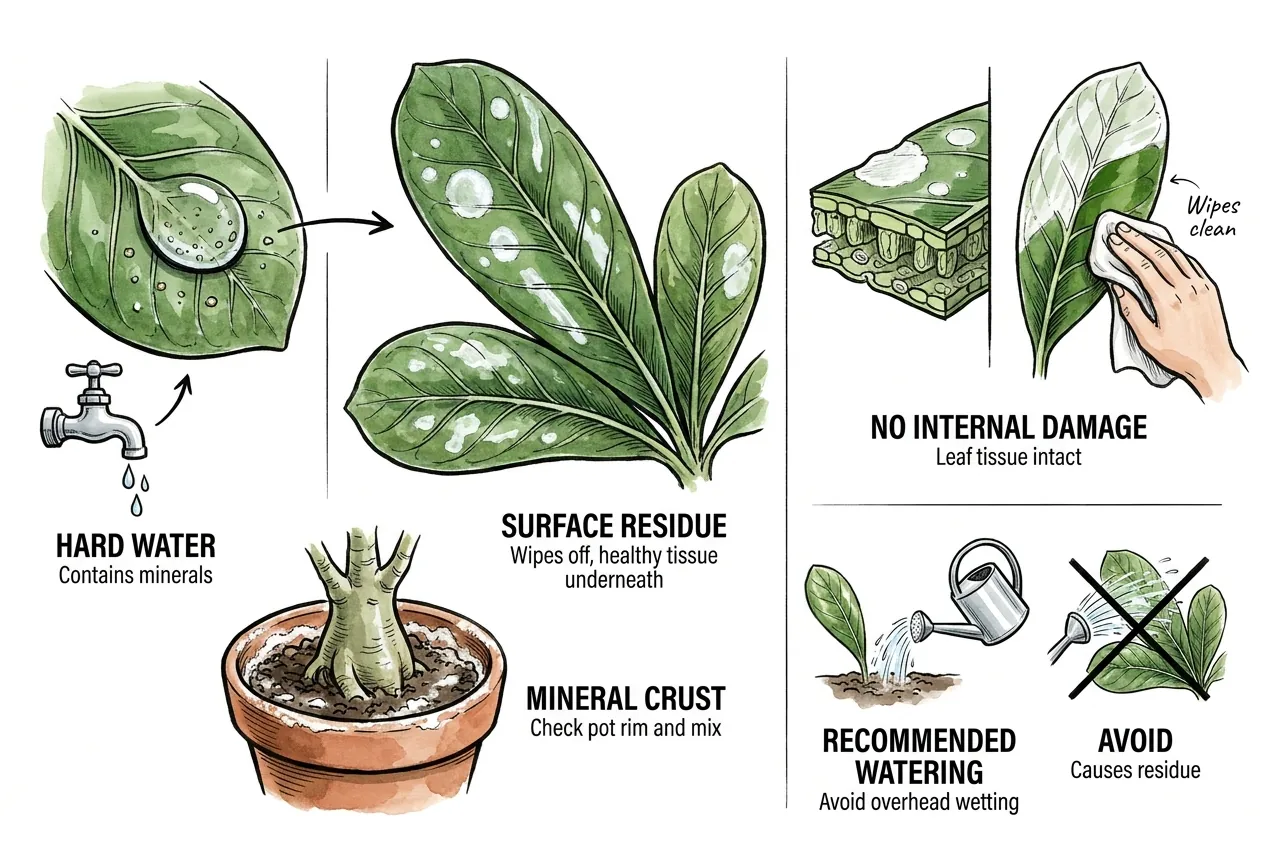
Check for mineral residue
Hard water can leave white mineral dots when droplets dry on leaf surfaces. It is most likely when marks wipe off.
Confirm the water source
Check the pot rim and mix surface too. White crust in those areas supports a mineral or fertilizer salt explanation. To confirm hard water specifically, check your water report or test its hardness rather than assuming, and note that built-up salts can also cause leaf-edge burn and interfere with nutrient uptake, so heavy recurring crust is worth correcting, not just wiping.
Wipe residue without overwatering
This is a residue problem unless the underlying leaf tissue is damaged. Wipe leaves gently and avoid routine overhead wetting.
Separate leaching from frequent wetness
Do not confuse leaching salts with keeping adenium wet. Let water drain fully, empty cachepots, and allow the mix to dry appropriately afterward.
What should I do first after finding white spots?
Contain before escalating
Your first response should be containment and diagnosis, not chemical escalation. Isolate the adenium, inspect both leaf surfaces, photograph symptoms, and treat only after the pattern is clear.
Keep isolation bright
Move the plant away from touching foliage, but keep it in suitable bright light. A dark closet adds stress and weakens your evidence.
Remove only unusable leaves
Remove only leaves that are mostly dead, heavily webbed, or heavily infected. Lightly scarred green leaves still help feed the caudex.
What should the first response workflow include?
- Photograph the worst leaves and the whole plant.
- Wipe one mark to check residue or powder.
- Inspect undersides with magnification.
- Tap suspect leaves over white paper.
- Check pot moisture, drainage, and caudex firmness.
- Decide whether to watch, rinse, prune, or treat.
Escalate when the caudex is soft
If the plant has a soft caudex, foul media, or collapse, shift attention below the leaves. Foliar spray cannot fix roots that cannot breathe.
How do I prevent adenium white leaf spots from coming back?
Build a repeatable prevention routine
Prevention means controlling light transitions, leaf humidity, mite scouting, and sanitation. The goal is a plant that dries, gets steady airflow, and gets checked before damage multiplies.
Scout during seasonal moves
Harden off every plant that moves from indoors, shade, shipping, or greenhouse conditions into stronger sun. Inspect undersides weekly during hot dry periods.
Clean tools between plants
Sanitation matters when suspicious leaves are removed. Wear gloves, clean sap and debris off pruners first, then disinfect before moving to another plant.
Use alcohol only for tool sanitation
70% isopropyl alcohol is a convenient tool-sanitation option for small pruning jobs. The concentration is commonly used for routine disinfection, but the bottle size and current formulation can change. Read the label and keep it away from flames and plant tissue.
Let the blade dry before the next cut
Wipe visible sap and debris off blades first. Wet the blade surface with alcohol, let it dry, then cut the next plant.
Respect flammability and evaporation
Keep the alcohol capped, away from flame, and off adenium leaves because it is flammable and evaporates quickly.
What is the simplest prevention routine for US growers?
Adjust the routine by season
The simplest routine follows the season. Acclimate in spring, scout in summer, reduce water in fall, and keep winter plants bright. Adenium problems often follow abrupt seasonal changes.
Move outdoors gradually in spring
In spring, move outdoors only when nights are reliably warm for adenium. Start with shade or morning sun.
Scout and protect leaves in summer
In summer, check undersides during heat and avoid oil or soap sprays in harsh sun. Heat and low humidity favor mite speed.
Reduce water as light falls
In fall and winter, reduce watering as light and growth slow. Keep the pot draining freely and avoid fertilizing a chilled, dim plant.
When should I escalate beyond watching the spots?
Escalate when symptoms reproduce
Escalate when the problem is spreading, reproducing, killing tissue, or tied to whole-plant decline. Watch when marks are stable and new growth is clean.
Use the decision table before spraying
Use this decision tree before spraying or repotting.
| If you see | Best call | Why |
|---|---|---|
| Stable papery patch after stronger sun | Watch and acclimate | Old sun injury is fixed |
| Powder that returns on new leaves | Isolate and manage mildew | Living surface growth is active |
| Stippling plus webbing or moving specks | Start mite workflow | Feeding colonies are present |
| Lesions enlarging or turning necrotic | Improve culture and consider diagnosis | Disease pressure is active |
| Spots plus soft caudex or wet sour mix | Inspect roots | Root failure outranks leaf treatment |
Prepare useful diagnostic evidence
If symptoms continue after a short period of corrected care, gather evidence for local Extension or a plant clinic. Include whole-plant photos, both leaf surfaces, and potting-mix information.
Package samples without sealing them
Do not seal succulent foliage in airtight plastic. Adenium samples can rot before the clinic sees the real symptom.
The bottom line on adenium white spots
Use diagnosis before treatment
A practical rule is identify first, treat second. Adenium white spots on leaves become readable once you separate powder, burn, stippling, residue, and expanding lesions.
Judge recovery by new growth
Old damaged leaves rarely become pretty again. Clean new growth is the honest recovery signal for desert rose white spots on leaves.
Affiliate Disclosure
This article contains Amazon affiliate links. As an Amazon Associate I earn from qualifying purchases. If you use these links, the site may earn a commission at no extra cost to you. Product availability, price, and specifications can change. Check the current listing before buying.