
Adenium Basal Stem Rot: Diagnose Before You Cut
A dark Adenium collar is not a home diagnosis. Learn how to isolate, inspect, sample, cut only when justified, and prevent basal stem rot spread.
Nathan Brooks · 2026-08-06 · Updated 2026-08-11 · 12 min read
Key Takeaways
- A dark patch at the soil line can be basal stem rot, but it does not prove Neocosmospora. Isolate the plant, stop sharing runoff and tools, photograph and mark the lesion edge, then unpot and inspect.
- You cannot identify the pathogen at home from a photo, smell, or texture (those only set urgency). A valuable plant is worth a plant-disease clinic before destructive cutting.
- Cut only when decay is actively spreading and enough firm, healthy top remains for a viable cutting. There is no evidence-based rule to cut a fixed distance or wait a fixed number of days.
- Fungicides do not cure basal stem rot from a visual diagnosis. Match the organism and the legal label before any drench, and spend the rescue window on diagnosis and sanitation.
- Contain a suspected case: isolate the pot, block runoff, bag diseased tissue, and never reuse its substrate. Handle healthy plants first and the suspect plant last.
Neocosmospora ipomoeae really has caused basal stem rot, wilt, and death in Adenium obesum. That matters. It does not mean every hard brown collar, mushy base, or collapsing desert rose has the same pathogen.
At home, the useful goal is not a species name. It is making the next decision without spreading a possible soilborne disease or destroying the remaining healthy tissue.
Can You Identify Neocosmospora at Home?
Diagnose Beyond the Photo
Not reliably. In the published Brazilian nursery outbreak, researchers did not identify the causal agent from a photograph. They isolated fungi from diseased tissue, compared morphology, ran multilocus phylogenetic analyses, and completed pathogenicity testing. That work confirmed N. ipomoeae as a cause of the observed basal stem rot. N. parceramosa was also associated with symptoms.
At home, basal stem rot is a location and syndrome. Possible causes include fusarioid fungi such as Neocosmospora, oomycetes such as Phytophthora or Pythium, bacteria, other fungi, or noninfectious damage followed by secondary decay.
Even vascular browning is not species-level proof. UC IPM notes that look-alike wilt diseases can require laboratory culture for positive identification. A plant clinic may use microscopy, culture, immunoassays, or molecular tests depending on the sample and suspected pathogen.
Why do you see both Fusarium and Neocosmospora?
The fungi historically grouped in the Fusarium solani species complex have been treated as Neocosmospora in a revised classification, while some researchers retain a broader Fusarium concept. For a home-care article, Neocosmospora, formerly associated with the Fusarium solani species complex is enough context. The naming debate does not change the need for a real diagnosis.
What Should You Check Before Cutting?
Run a Pre-Cut Inspection
- Isolate the pot. Keep it away from shared trays, splash, tools, and clean substrate.
- Record the change. Photograph the same four collar faces in consistent light with the pot-rim mark facing the camera. Trace each lesion edge on dated duplicate images. A stable scar and an expanding lesion require different responses.
- Check the whole plant. Note leaf yellowing, wilt, branch dieback, loss of turgor, and whether watering changes the canopy.
- Unpot carefully. Inspect fine roots, larger roots, and the old soil line separately. Note where discoloration or softening is worst.
- Consider noninfectious causes. Sunscald, cold injury, mechanical damage, an old graft or pruning scar, and chronic overwatering can resemble or precede rot.
- Sample before surgery when practical. Ask the diagnostic clinic how much collar, root, and adjacent healthy tissue it needs and how the sample should be packed.
Before cleaning or unpotting, I face the same pot-rim mark toward the camera and photograph all four collar faces. A disposable paper scale sits beside the tissue without contact, and the original substrate line stays visible. Outlines and dates go only on duplicate images, never on the plant.
The root ball slides onto a fresh disposable sheet without rotation, preserving the same four directions as the collar photographs. I photograph it intact before noting wet mix, collapsed roots, or discoloration relative to each collar face. Neither the sheet nor contaminated debris returns to the clean potting area.
On the duplicate images, I trace the old soil line, the visible collar boundary, and the affected root zone as separate layers. Alignment between them can help me describe progression and show a clinic where the transition lies, but it cannot identify the organism. If sampling is needed, the receiving clinic’s instructions still determine what I collect.
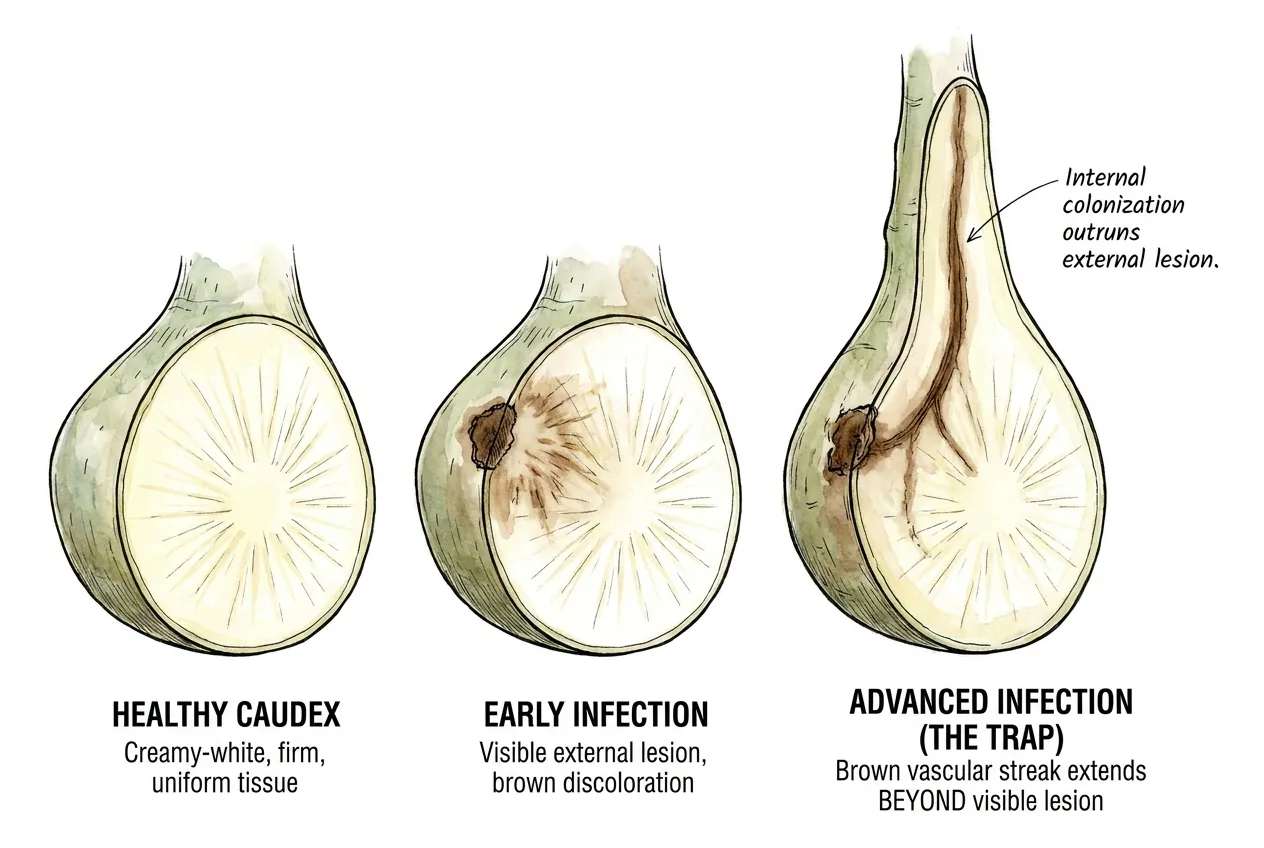
Firm, uniformly pale internal tissue is more encouraging than brown streaking or soft, translucent tissue. But a clean-looking cut is not a laboratory clearance test. Infection can extend beyond visible symptoms, and discoloration can also have noninfectious causes.
Do not make repeated exploratory slices simply to obtain certainty. Every cut removes stored tissue, creates a new wound, and exposes the handler to toxic Adenium sap.
Can Texture or Smell Tell You Which Pathogen It Is?
Use Texture to Set Urgency
They can guide urgency, not confirm an organism. A foul, slimy collapse makes bacterial soft rot more plausible. Water-soaked root and crown lesions can occur with oomycetes. Drier cankers and vascular discoloration can occur with fusarioid fungi. These patterns overlap, and mixed infections are possible.
| Observation | What it may suggest | What it does not prove | Safe next step |
|---|---|---|---|
| Soft, wet, rapidly expanding tissue | Active decay. Bacterial or oomycete causes are among the possibilities | That a particular bactericide or oomycete product will work | Isolate, sample promptly, remove from standing water |
| Firm, dark, sunken collar lesion | Canker, older rot, scar, cold injury, or other damage | Neocosmospora or any other named fungus | Mark the edge, monitor, inspect roots, seek diagnosis if expanding |
| Brown vascular streaking | Vascular injury or colonization | The species or fungicide sensitivity | Preserve a sample and assess whether a clean top remains |
| Stable dry corking with healthy growth | Healed or physiological tissue is possible | That no pathogen is present | Keep dry enough for the species and compare dated photos |
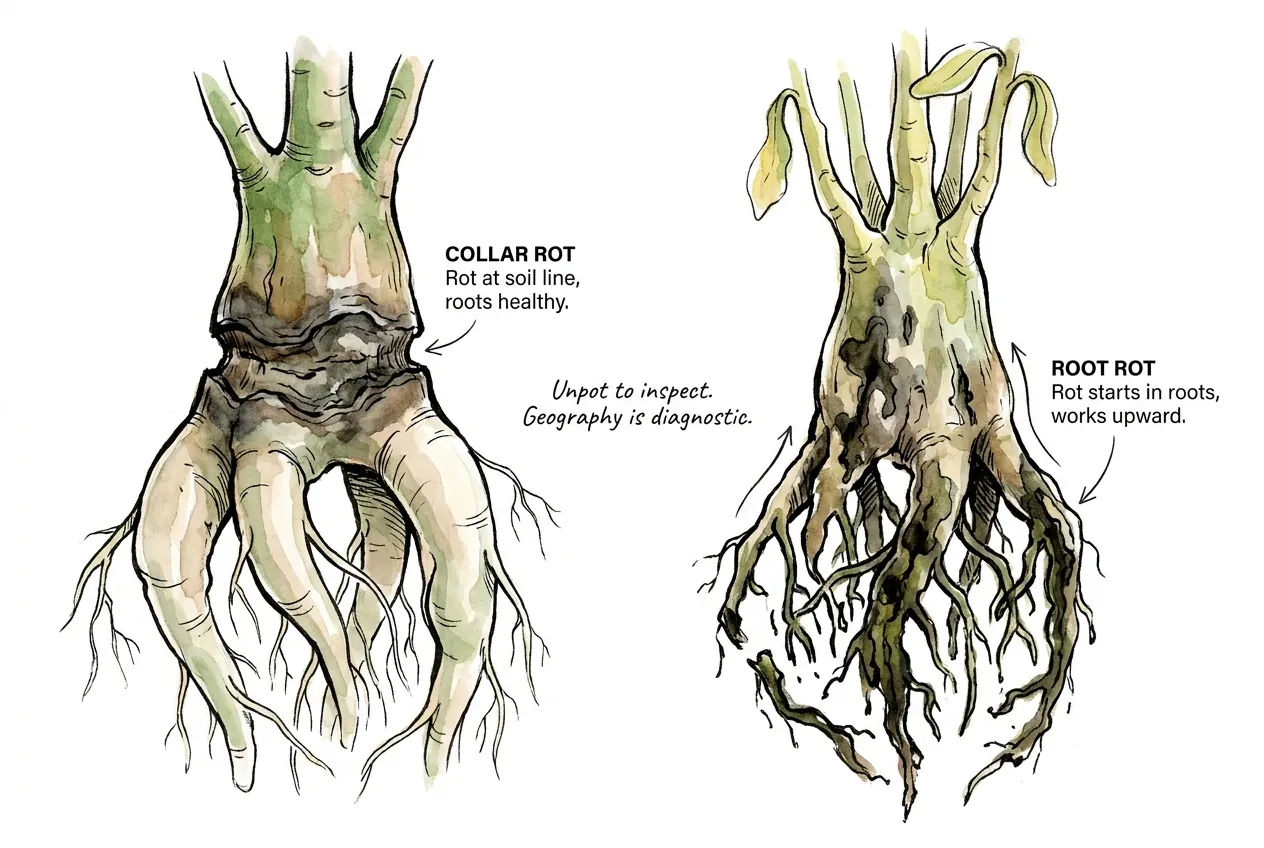
Where the damage is concentrated helps the clinic choose tests and helps you decide what tissue might remain viable. It should not be used to select pesticide chemistry by appearance alone.
When Is Cutting a Reasonable Rescue?
Cut Only for Active, Localized Decay
Consider cutting when decay is demonstrably active, the plant would otherwise be lost, and enough healthy stem or crown remains to produce a viable cutting. If the plant is rare or valuable, collect a diagnostic sample first whenever delay will not obviously sacrifice the rescue window.
Wear eye protection and gloves because Adenium sap contains cardiac glycosides. The protective-gear guide explains the splash and cutting hazards.
- Move the plant to a washable area away from the collection.
- Remove substrate so the extent of root and collar damage is visible.
- Use a sharp tool suited to the tissue diameter. Clean off debris, then disinfect it before the first cut.
- Remove clearly compromised tissue in controlled cuts. Inspect the full cross-section after each cut.
- Disinfect the tool after contact with suspect tissue before it touches tissue intended for propagation.
- Stop if no firm, apparently healthy, structurally viable top remains. More cutting cannot create healthy tissue.
- Bag the diseased tissue and old substrate. Keep them away from clean pots, tools, and runoff.
There is no validated Adenium rule to stop after two pale cross-sections, take one extra slice, or cut a fixed number of centimeters above a lesion. Visible appearance is a practical field boundary, not proof that the remaining tissue is pathogen-free.
How should the retained cutting be handled?
Dry and Re-root the Retained Top
Keep the cut surface clean, shaded from harsh sun, and exposed to moving air while it dries. The time required depends on wound diameter, temperature, humidity, and tissue condition. A thin root trim and a large trunk cross-section should not share a fixed countdown.
Use fresh, well-drained medium and a clean container when the cutting is ready to root. Reintroduce moisture according to the cutting’s condition and environment rather than a universal 7–14-day withholding rule. The substrate comparison can help choose a mix without turning gritty into a fixed recipe.
Do not claim a success percentage. Published Adenium-specific rescue rates for this home surgery were not found, and rooting a clean top is not the same as curing the infected base.
Which Cutting Supplies Are Worth Buying?
Match the Tool to the Cut
| Supply | Useful job | Buy when | Skip when |
|---|---|---|---|
| 70% isopropyl alcohol | Disinfecting a cleaned blade between suspect and retained tissue | The current bottle and listing both state 70% isopropyl alcohol | You already own a suitable tool disinfectant |
| Fiskars Softgrip bypass pruner | Smaller roots or stems within its 5/8-inch capacity | A bypass cut suits the diameter and tissue | The caudex is larger or you need a flat precision cross-section |
| Zenport K106F grafting knife | Optional precision work with an exposed blade | You know how to control and disinfect a grafting knife | An existing clean, sharp tool already fits the cut |
The alcohol is interchangeable with any reputable 70% isopropyl product. Iowa State Extension advises removing soil and sap before disinfection, then wiping or dipping the tool. No prolonged alcohol soak is needed. Alcohol reduces contamination but does not sterilize dirty steel or control every pathogen.
Fiskars currently lists the Softgrip pruner as a bypass tool with a hardened blade and 5/8-inch maximum capacity. Do not force it through a larger caudex. The grafting knife is optional and increases user-injury risk. The purchase makes sense only when precision is more important than the safety and leverage of a closed pruner.
Should You Drench an Adenium Fungicide?
Require the Label Gates
Not from a visual diagnosis. A comparison with medical azoles does not establish how a labeled horticultural product will perform in an Adenium pot. Results from another crop, another Fusarium species, or a Petri dish also do not prove curative activity inside a caudex.
UC IPM states that established Fusarium wilt generally has no effective fungicide cure and is managed primarily through prevention. That guidance is useful context, but it is not a product label for Adenium basal stem rot.
- A diagnosis specific enough to choose the target class.
- The exact plant or allowed application site on the current label.
- The target disease or a legally permitted broader use on that label.
- A rate, method, interval, and safety direction you can actually follow.
EPA explains that pesticide labels are legally enforceable and define where, how, how much, and how often a product may be used. Oomycete-targeted chemistry is not a sensible speculative drench for an unconfirmed fusarioid fungus, and broad antifungal activity is not proof of cure.
If a clinic identifies an organism and recommends a labeled treatment, follow that recommendation. Otherwise, spend the rescue window on isolation, diagnosis, viable-tissue assessment, and sanitation. The root-rot fungicide chooser explains why treatment starts with the organism and label rather than a product list.
How Do You Keep Suspected Rot from Spreading?
Block Runoff and Shared Tools
- Keep the suspect plant physically separate and prevent drainage from entering another pot or communal tray.
- Do not reuse its substrate. Bag diseased tissue and media before moving them through the collection.
- Remove soil, sap, and organic debris from tools, pots, and the bench before applying a disinfectant.
- Use new or appropriately disinfected containers and fresh, protected potting medium for retained tissue.
- Handle healthy plants first and the suspect plant last. Wash hands or change gloves before returning to the collection.
- Keep new plants separate while inspecting them, and extend isolation if any symptom remains unresolved.
NC State Extension recommends clean media, clean propagative material, washed equipment before sanitizer, regular scouting, and immediate separation of symptomatic plants. It treats one to two weeks as a minimum separation period for apparently healthy incoming greenhouse material, not a guarantee that every pathogen will declare itself in that time.
If you reuse a sound plastic or glazed pot, Iowa State Extension advises brushing away all media, washing with soapy water, rinsing, then soaking in one part household bleach to nine parts water for at least 10 minutes and rinsing again. Add bleach to water, protect skin and clothing, and use the solution within two hours. A new inexpensive pot is the simpler choice when cracks, pores, or residue make cleaning doubtful.
How Do You Reduce Future Collar-Rot Risk?
Keep the Collar Visible
Use fresh, well-drained medium suited to the plant and container. Keep the caudex flare visible rather than burying the collar under moisture-holding mix. Water according to root activity, temperature, light, and actual substrate drying, not a calendar.
Avoid injuring the collar during repotting, and keep contaminated tools or old mix away from the wound. Good drainage and sanitation reduce risk. They do not make a plant immune or prove that a future lesion has the same cause.
There is not enough Adenium-specific evidence to recommend Trichoderma as a cure for an established Neocosmospora lesion. A biological product may have preventive uses on its label, but results from beans, potatoes, or in-vitro confrontation plates should not be converted into a desert-rose success percentage.
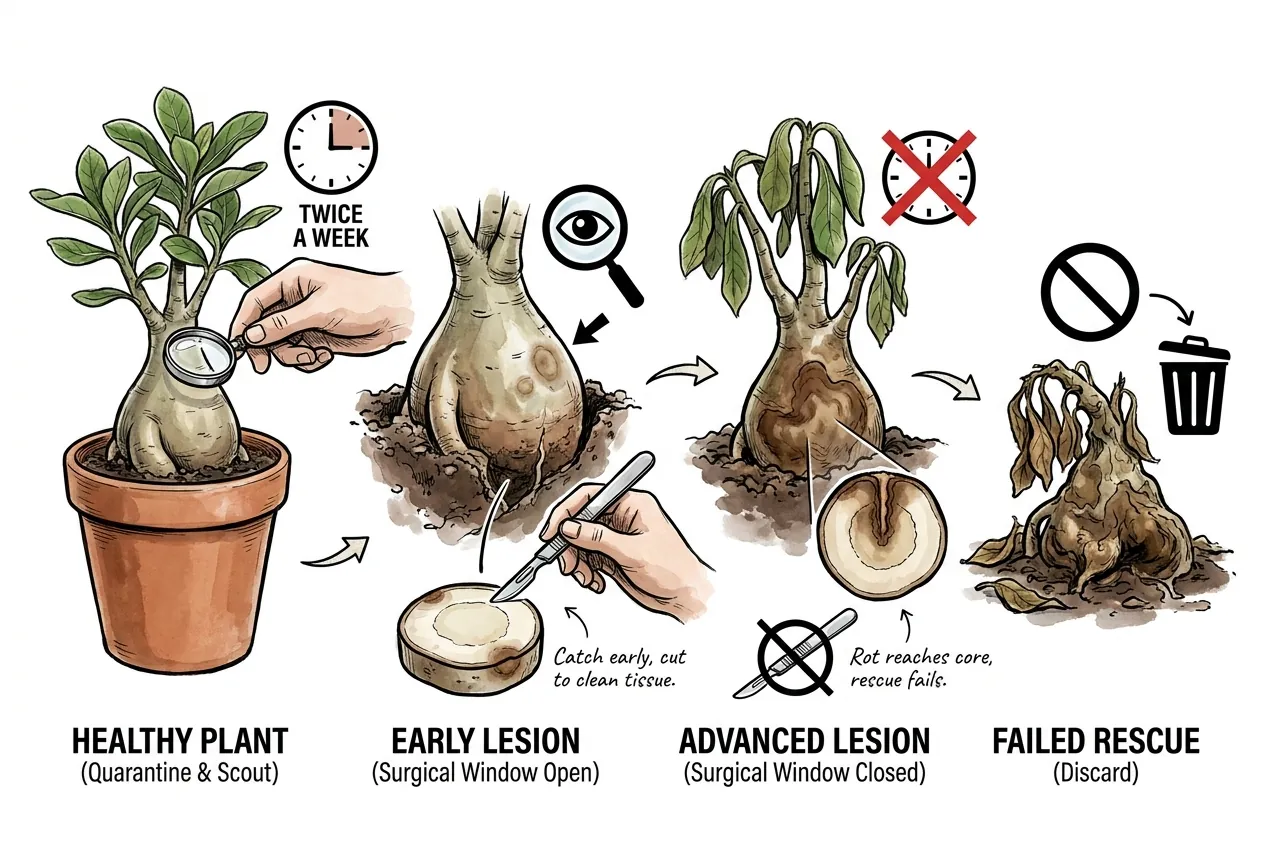
Check the collar when a plant wilts unexpectedly, but also inspect roots, watering history, temperature injury, and recent mechanical damage. Dated photographs are more useful than repeatedly squeezing or scraping the same spot.
Frequently Asked Questions
Is every dark Adenium collar patch Neocosmospora?
No. The genus is a documented cause of basal stem rot, but appearance alone cannot exclude oomycetes, bacteria, other fungi, or noninfectious injury.
Can I identify the pathogen by smell or texture?
No. Smell, softness, moisture, and lesion position help describe the sample and judge urgency. They are not a substitute for culture or other diagnostic testing.
How far above the lesion should I cut?
There is no validated fixed distance for Adenium. Remove visibly compromised tissue only while enough firm, viable top remains, disinfect the tool between suspect and retained tissue, and submit a sample when the plant’s value justifies it.
Should I dust the cut with sulfur?
Not unless the exact product label authorizes that use. A general fungicide label or laboratory activity does not establish a legal, effective caudex wound treatment. Clean cutting and appropriate drying remain the core steps.
Can I reuse the pot?
Discard the old substrate. Reuse a sound pot only after complete debris removal, washing, and an appropriate disinfection process. Replace cracked, porous, or difficult-to-clean containers.
Will Trichoderma cure an existing lesion?
There is no Adenium-specific evidence that it cures established internal rot. Treat any labeled biological product as preventive support under its stated conditions, not as a substitute for diagnosis or removal of nonviable tissue.
Affiliate Disclosure
This article contains Amazon affiliate links. As an Amazon Associate I earn from qualifying purchases. If you use these links, the site may earn a commission at no extra cost to you. Product availability, price, and specifications can change. Check the current listing before buying.