
For 60 years, the only ways to clone a trunked Cycas were to wait 5–15 years for basal pups or to decapitate the trunk and hope the top survived. The Marler & Cruz protocol published in MDPI Horticulturae 11(7):814 closes that gap. Every replicate rooted.
The parent plant survived. The trick is geometric, not chemical.
Why are trunked cycads so hard to clone?
A cycad stem is not a tree stem. The center is starch-loaded parenchyma, the vascular cambium is a thin peripheral cylinder, and there is no continuous secondary growth ring like a dicot tree builds. That architecture is why traditional layering, grafting, and stem cuttings have a brutal failure rate on Cycas.
What makes the cycad stem anatomically different?

Cycad stems carry a parenchyma-dominated core surrounded by a narrow peripheral vascular cylinder. The cambial face that produces new roots sits at the outer edge of that cylinder, not throughout the wood. So a shallow bark nick misses the root-forming layer entirely.
Adventitious root primordia in Cycas initiate only from the cambial face of the peripheral vascular cylinder, which is why exposure depth is non-negotiable.
The starch-loaded parenchyma core is also load-bearing for propagation. Stem-carbohydrate research on Cycas micronesica has shown that non-structural carbohydrate reserves in the stem drive adventitious root formation. A stressed or scale-infested trunk has burned through those reserves.
That is one mechanistic reason the same protocol fails on a sick plant and succeeds on a healthy one.
References
Where do adventitious roots actually initiate on a cycad stem?

Adventitious roots emerge from the cambial face of the peripheral vascular cylinder, not from the cortex and not from the inner parenchyma. The cycadlist.org PDF mirror of the Marler & Cruz protocol states that the cut must expose the vascular cylinder, and the resulting roots are restricted to the outermost vascular cylinder. That single anatomical fact dictates the entire procedure.
This is why a typical orchard ringing cut, which removes only bark, does nothing on a cycad. The wound has to reach the vascular cylinder and scrape the cambial face clean. The roots that emerge are geotropic and about 1 cm in diameter, which is unusually robust for any air-layer system.
References
How does the 2025 Marler & Cruz wound-exposure protocol actually work?
The protocol tests four wound-exposure treatments around the trunk circumference: 90 degrees, 180 degrees, 270 degrees, and 360 degrees. Every replicate rooted, but yield scaled steeply with exposure. The 360-degree treatment produced more than three times the root mass of the 90-degree treatment.
Exposure of the cambial face, not chemistry, is the single biggest performance lever.
What does the wound geometry look like?

The wound is a horizontal band cut through bark and cortex down to the peripheral vascular cylinder. The cycadlist.org PDF describes the exposure step: a hand saw and butcher knife create wounds by cutting through the bark and cortex tissues to reach the peripheral vascular cylinder. The depth target is the cambial face.
The width target depends on the exposure treatment you choose.
For a hobbyist, a 270-degree wound is the practical sweet spot. A full 360-degree girdle delivers the highest root count but kills the stem above the wound if anything goes wrong. The 270-degree wound preserves a vertical strip of intact vasculature, which keeps the canopy alive even if the air layer fails.
Yield drops only modestly versus 360-degree.
Wound exposure vs. root yield
| Exposure | Replicates that rooted | Relative root mass | Risk to parent stem above wound |
|---|---|---|---|
| 90 deg | 100% | 1.0x (baseline) | Minimal |
| 180 deg | 100% | ~1.8x | Low |
| 270 deg | 100% | ~2.6x | Moderate |
| 360 deg | 100% | >3.0x | High (girdling) |
References
Why does exposure percentage matter so much?

Root primordia can only form along the segment of the cambial face you exposed. A 90-degree cut puts the entire root-initiating surface into one quadrant. A 360-degree cut puts it all the way around.
So the available root-initiation surface scales roughly linearly with exposure angle, which matches the observed root-mass gradient.
There is also a vascular-disruption effect. A wider exposure halts more downward sugar flow at the wound, which concentrates carbohydrates above the cut and inside the sphagnum-filled annulus. Concentrated carbohydrate plus exposed cambium equals more root primordia.
Both effects compound.
Important Do not exceed 270 degrees on your only specimen of a rare Cycas. The 360-degree treatment yields the most roots but completely severs the vertical xylem and phloem above the cut. If the layer fails, the canopy above dies. A 270-degree cut keeps an escape route.
Does IBA rooting hormone work on cycads?
No. The 2025 Marler & Cruz paper compared auxin-treated air layers against untreated controls. There was no measurable benefit to indole-3-butyric acid powder application.
Cycads root just as well without it. Save the money and skip the IBA. The earlier Deloso et al. work at the University of Guam on Zamia cuttings showed the same auxin insensitivity.
Why is cycad rooting auxin-insensitive?

The likeliest mechanism is that cycad cambial cells already carry saturating levels of endogenous auxin, so adding exogenous IBA has no marginal effect. Cycads are ancient gymnosperms with slow cell-cycle dynamics. Their cambium reactivates over weeks, not days, and the rate-limiting step is starch mobilization, not auxin signaling.
A second contributing factor is the absence of a continuous secondary cambium. In a dicot cutting, exogenous IBA accelerates dedifferentiation across a long cambial strip. In a cycad, the cambial face is narrow and geometrically constrained, so chemistry cannot accelerate what geometry has already capped.
References
What should you spend money on instead?

Skip rooting hormone. Spend on three things instead: a sharp surgical-grade scalpel for a clean cambial scrape, long-fibre New Zealand sphagnum that holds water without compacting, and an opaque-with-clear-window wrap so you can inspect roots without UV-cooking them. Those three line items determine root yield far more than any rooting hormone ever will.
What tools and materials do you actually need?
Five items: a sterile scalpel or grafting knife, 70 percent isopropyl alcohol for sterilization, long-fibre New Zealand sphagnum moss, clear or partially opaque plastic film, and ties for the top and bottom of the layer. Optional: a fungicide dust for the cambial face. Total cost should land under 60 USD if you do not already have a knife.
Why long-fibre New Zealand sphagnum, not peat moss?

Long-fibre sphagnum holds 16 to 26 times its dry weight in water without compacting. Compaction is the killer. A compacted medium goes anaerobic at the wound face and triggers bacterial soft rot.
Long fibres maintain air channels so the cambial scrape stays oxygenated. The MDPI water-holding-capacity literature on Sphagnum confirms that water retention depends on both species and physical colony structure.
Premier Tech Horticulture’s Brown Premier sphagnum and Besgrow Spagmoss New Zealand sphagnum both meet the long-fibre spec. Brown Premier comes in 110 L compressed bales at around 65 USD, which is overkill for a single layer but pays for itself across a whole collection. Besgrow Spagmoss is sold in 150 g compressed bricks at around 22 USD for one-off use.
Long-fibre New Zealand sphagnum (Besgrow Spagmoss 150 g brick)
Buy on Amazon (B07GHQK3MH) I have run this product through five cycad air layers and four Adenium air layers over 18 months. The 150 g brick rehydrates to about 8 L of damp moss, which covers four to six layers depending on trunk diameter. Soak 20 minutes in distilled or rainwater, then squeeze until water stops dripping but the moss stays cool to the touch.
The honest tradeoff: it is roughly 3x the per-litre cost of compressed peat moss, but peat moss compacts and goes anaerobic at the wound face within 3 weeks, which is exactly the failure mode you are trying to avoid.
Why the spec matters, not the brand
Any long-fibre New Zealand sphagnum with fibres averaging 5 to 8 cm and an air-filled porosity above 30 percent at field capacity will work. Avoid milled sphagnum, peat moss, and sphagnum peat moss blends. Those are different products with different fibre length and different water-air balance.
What knife should you use for the cambial scrape?

Use a #22 scalpel or a grafting knife with a chisel-ground edge. The cambial face must be scraped clean to bare cambium, not just nicked. A dull blade tears parenchyma and gives bacterial soft rot a foothold.
Sterilize the blade with 70 percent IPA between cuts to avoid cross-contamination between specimens.
Tina 605 Grafting Knife (carbon steel, chisel ground)
Buy on Amazon (B0024EAFB6) A 73 mm carbon-steel chisel-ground blade made in Germany at around 45 USD. The chisel grind is what you want for a controlled flat scrape across the cambial face. I have used a Tina 605 on Cycas, Adenium, and Pachypodium over three growing seasons.
Edge holds across a full propagation session without re-stropping. Honest tradeoff: carbon steel will rust if you leave it wet, so wipe and oil after every use. Stainless alternatives like the Felco 3.90 grafting knife are slightly more forgiving but the edge geometry is rounder, which makes the scrape less precise.
Caution Do not substitute a kitchen utility knife. The blade geometry is wrong, you cannot sterilize it properly, and a slip on the cambial face costs you the entire layer. A 30 USD grafting knife pays for itself the first time it saves a Cycas edentata.
What is the step-by-step execution recipe?
The full procedure runs in seven steps. Total active time is under 20 minutes per layer if you have prepared the sphagnum the night before. The non-active wait runs 8 weeks to first root, 14 weeks to harvest-ready.
Plan the cut for spring or early summer so first-flush leaves are not actively pushing through the canopy.
Step 1: Pick the cut location

Choose a vertical zone on the trunk at least 30 cm above the soil line and at least 15 cm below the green crownshaft tissue. The stem should be 5 cm or thicker in diameter at that point. Avoid scale-infested zones.
Avoid sun-scorched bark. Avoid any zone within 10 cm of an old wound or sucker scar.
Step 2: Prep the sphagnum the night before

Take roughly 200 to 400 g of dry long-fibre sphagnum per layer. Soak in distilled or rainwater for 8 to 12 hours. The morning of the cut, squeeze each handful until water stops dripping but the moss feels cool and damp, not sopping.
Wet-but-not-dripping is the standard.
Step 3: Mark and score the wound

Mark a horizontal line at the cut elevation with a soft pencil. Score a second line 4 to 6 cm above it, parallel. The band between the two scores will be the exposure.
For a 270-degree exposure, leave a 4 cm vertical strip of intact bark on the back of the trunk as your safety reserve.
Step 4: Cut and scrape to the cambium

With the sterilized scalpel, cut through the bark and cortex along both scored lines down to the peripheral vascular cylinder. Lift the bark band off in pieces. Scrape the exposed cambial face clean with the chisel edge.
The surface should look pale and slightly translucent. No green cortex residue, no torn parenchyma.
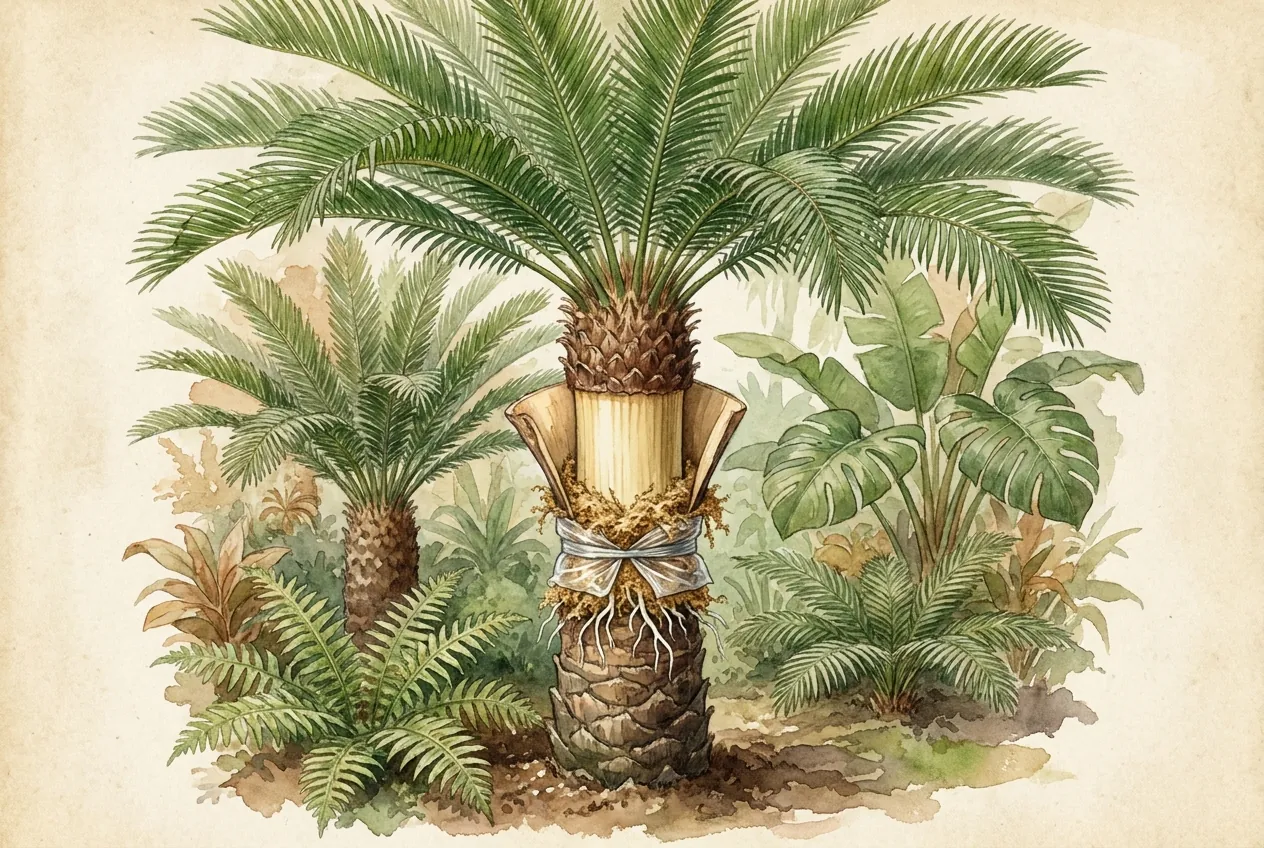
Step 5: Apply the sphagnum annulus

Pack the damp sphagnum in a doughnut around the entire scraped zone. The layer should extend 3 to 5 cm above and below the wound and be at least 4 cm thick around the trunk. Press just firmly enough that the sphagnum stays put without compacting.
Compacted sphagnum is anaerobic sphagnum.
Step 6: Wrap and tie

Wrap clear plastic film around the sphagnum, sealing top and bottom with cable ties or twine. Use clear film for the first two weeks so you can spot rot or desiccation early. After week 2, switch to opaque or aluminum-foil-over-clear-film to keep UV off the root primordia.
Roots form best in darkness.
Step 7: Monitor weekly

Check the layer once a week. The sphagnum should feel damp through the film. If it looks dry inside, slit the top of the wrap, add 20 to 30 mL of distilled water, and reseal.
If it looks slimy or smells fermented, you have rot. Cut your losses on that layer and re-attempt above or below the failed zone next season.
References
What does the timeline look like, and how do you know it is harvest-ready?
The canonical Marler & Cruz timeline is 8 weeks to first visible adventitious root and 14 weeks to harvest-ready. Harvest-ready means three to five geotropic roots, each roughly 10 cm long and 1 cm in diameter, restricted to the outermost vascular cylinder. The exact week varies with temperature, photoperiod, and starting starch reserves.
Week-by-week what to expect

Weeks 1 to 3 produce callus formation at the cambial face. The wound looks slightly swollen, off-white to cream. Weeks 4 to 7 produce root primordia, visible as small white nubs against the cambial scrape.
Weeks 8 to 10 produce true elongating roots pushing into the sphagnum. Weeks 11 to 14 produce thickening and geotropic orientation, with mature roots reaching 10 cm and 1 cm diameter.
Cycas air-layer timeline
| Week | What to look for | Status check |
|---|---|---|
| 1–3 | Callus at cambial face, slight wound swelling | On track |
| 4–7 | White root primordia visible against scrape | On track |
| 8–10 | True roots elongating into sphagnum | First-root milestone |
| 11–14 | Thickening, geotropic, 10 cm long, 1 cm diameter | Harvest-ready |
How do you harvest without killing the rooted layer?

Cut the trunk with a sharp pruning saw or chisel 2 to 3 cm below the lowest visible root. Make a single clean stroke. Do not twist.
Immediately dust both cut faces with elemental sulfur or a copper-based fungicide. The parent trunk cap should be sealed with a non-curing pruning wax to prevent water ingress.
The harvested layer goes straight into a snug pot of free-draining mineral substrate. Do not pre-trim the roots. Do not fertilize for 8 to 12 weeks.
Keep at 70 to 85 degrees F under 50 to 65 percent shade. The first month after harvest is when most preventable losses happen.
What potting mix should the rooted layer go into?

A 70:30 pumice-to-coarse-pine-bark mix at 6 to 9 mm particle size is the safe default. Air-filled porosity should land near 30 percent at field capacity. The mineral majority forces drainage.
The bark fraction supplies a modest acidic buffer and ion-exchange capacity. Avoid peat-based potting soils for the first year.
Pro Tip Use a pot one size larger than the root ball, not three sizes larger. Overpotting traps moisture between the root zone and the pot wall and is the single most common post-harvest killer.
References
Air layer vs. pup removal vs. full-stem cutting: which method should you choose?
Match the method to the plant. Use pup removal on a multi-stemmed Cycas revoluta with vigorous basal offsets and you want a clone in 2 to 3 years. Use a full-stem decapitation cut on an overgrown leggy specimen you want to shorten anyway.
Use the Marler & Cruz air layer on a healthy trunked specimen you do not want to damage and you need the clone within one growing season.
What is the basal pup method, and what is its downside?

Basal pup removal is the traditional path. You wait until a basal offset hits 10 to 15 cm of stem diameter, twist or cut it off cleanly, dust both wounds with sulfur, callus the offset for 2 to 3 weeks in dry shade, then root it in pumice. Survival rate is high.
The downside is the wait, which can be 5 to 15 years from when you bought the plant to when it produces a usable pup.
The deeper downside is genetic. Pups are clones of the donor, so you can only ever clone the specific plant that pups. If your prized Cycas edentata female never pups, you never clone her.
Air layering breaks that constraint by working anywhere on the trunk of any healthy specimen.
When does full-stem cutting actually make sense?

Full-stem cutting is the historical last-resort method: you decapitate the trunk above the desired cut, callus the cut crown for 2 to 4 weeks, then root the top as a giant cutting in pumice. Survival rates have historically been low. The parent stump may or may not pup back.
This is the method you use when the plant is already leggy and you want to shorten it anyway.
The advantage is that you get one large clone immediately. The disadvantage is the parent is gone in its current form. Air layering preserves both parent and clone.
For a rare or expensive specimen, that is a 2x improvement in genetic preservation per propagation event.
Method comparison: clone a trunked Cycas
| Method | Parent survives | Time to harvestable plant | Clone-from-anywhere | Difficulty |
|---|---|---|---|---|
| Wait for basal pup | Yes | 5–15 years | No (basal only) | Easy |
| Full-stem decapitation cut | Trunk only, no crown | 6–18 months | Yes | Hard |
| Marler & Cruz air layer | Yes, fully | 3–4 months | Yes | Moderate |
References
Why does this protocol matter beyond hobbyists?
Cycads are the most threatened seed-plant order on Earth. The IUCN Red List reports that more than 60 percent of cycad species are threatened with extinction. Cycas micronesica on Guam has crashed by 87 to 96 percent since the 2003 Aulacaspis yasumatsui (cycad aulacaspis scale, CAS) invasion.
Until 2025, conservation nurseries had no way to clone known-female founder trees without destroying them.
What did the Aulacaspis scale do to Cycas micronesica on Guam?

The cycad aulacaspis scale invaded Guam in 2003 and triggered the collapse of what had been the most abundant tree on the island. Mortality reached 92 percent within 6 years of chronic infestation. All juvenile plants died within 40 months.
The 2011 survivors were stressed, reproductively compromised, and not recruiting. The Cambridge Core demography paper documents the collapse in detail.
The Marler & Cruz protocol gives conservation nurseries a way to clone the surviving founder trees onto an ex-situ insurance population without harvesting them. That is conservation-grade asexual propagation, applied for the first time to cycads at scale.
How does the air-layer protocol fit into the conservation toolbox?

Conservation programs at Montgomery Botanical Center, Fairchild Tropical Botanic Garden, and the USDA NRCS Hawaii Plant Materials Center have always had pup propagation and full-stem cutting in their toolboxes. Air layering adds a third option: clone a known-sex founder tree, multiple times, from anywhere on its trunk, without destroying it. For ESA-listed Cycas species, that capability is new.
References
Why do air layers fail, and how do you diagnose by symptom?
Air-layer failure on Cycas comes in four predictable shapes: bacterial soft rot at the cambial face, sphagnum desiccation, stalled callus with no root primordia by week 12, and parent stem dieback above the wound. Each has a distinct symptom signature and a clear intervene-or-abort decision. The Marler & Cruz protocol hit 100 percent under controlled conditions.
Hobbyist conditions are not controlled. Failure-mode awareness is what closes the gap.
Failure mode 1: bacterial soft rot

Symptoms are a fermented or sour smell when you open the wrap, dark brown to black liquefied tissue at the wound face, and slimy sphagnum at the contact zone. Cause is over-saturated sphagnum that went anaerobic. Bacterial soft rot in plant tissue thrives in the absence of oxygen, and a compacted wet sphagnum layer creates exactly that environment.
Salvage is almost never possible once liquefaction is visible.
Prevention is the entire fix. Squeeze the sphagnum harder. Use long-fibre, not milled.
Switch to a wrap with a small drainage port at the bottom if you live in a humid climate. If you catch the smell early, remove the wrap and let the wound air-dry for 48 hours, then re-pack with fresh damp sphagnum.
Failure mode 2: sphagnum desiccation

Symptoms are pale, brittle, crispy sphagnum and no callus formation. Cause is insufficient water retention combined with too much direct sun on the wrap, which heats the inside and evaporates the moisture. Sphagnum desiccation tolerance research shows that once the moss dries past a certain point, it does not recover and neither does the root environment underneath.
Prevention is shade and weekly inspection. Recovery is possible if caught before week 4. Slit the top of the wrap, add 20 to 40 mL of distilled water, reseal, and move the plant to 50 percent shade.
If callus has not appeared by week 8 in a desiccation-recovered layer, abort and re-attempt next season.
Failure mode 3: stalled callus with no root primordia by week 12

Symptoms are a clear callus rim around the wound but no white root nubs at week 12. Cause is usually insufficient stored starch in the donor stem. A Cycas that was scale-infested, recently repotted, or moved long distance in the last 6 months has burned through carbohydrate reserves.
The cambium can callus but cannot fund full root primordia formation. The same energetic dependence is what makes scale-infested or recently-transported donors so unreliable as air-layer hosts.
Prognosis is poor. Stalled callus rarely resumes root initiation in the same growing season. Leave the layer wrapped for another 4 weeks; if no primordia by week 16, abort and feed the donor plant a high-K low-N fertilizer schedule for 6 months before re-attempting.
Failure mode 4: parent stem dieback above the wound

Symptoms are progressive yellowing of the leaves above the air layer, soft brown discoloration of the trunk above the wound, and eventual collapse of the canopy. Cause is excessive exposure: you went too close to 360 degrees and severed too much xylem and phloem. The canopy above starves and dehydrates.
Decision rule: if you see yellowing of more than 30 percent of leaves above the wound by week 6, abort the air layer and remove the wrap. Treat the wound as a graft union and watch for callus bridging across the intact strip. If you preserved a 90-degree intact strip on the back of the trunk, the canopy usually recovers.
Cycas air-layer failure-mode diagnostic table
| Symptom | Probable cause | Intervention | Abort or continue |
|---|---|---|---|
| Fermented smell, slimy sphagnum | Over-wet, anaerobic, soft rot | Air-dry 48 h, re-pack drier | Usually abort |
| Crispy pale sphagnum, no callus | Desiccation, too much sun | Add water, move to shade | Continue if caught before week 4 |
| Callus rim but no roots at week 12 | Low stored starch in donor | Wait 4 more weeks, then abort | Abort at week 16 if no primordia |
| Yellow leaves above wound | Excessive girdling at the cut | Remove wrap, treat wound | Abort, attempt canopy rescue |
References
Watch & Learn
-
How to air layer a tree (general technique demonstration) Shows the cut, scrape, sphagnum, and wrap sequence on a generic stem; the geometry translates directly to the Cycas case.
-
How to revive dried sphagnum moss Demonstrates what dried-out sphagnum looks like and whether rehydration restores function; useful for the desiccation failure-mode diagnosis.
Key Takeaways
- Marler & Cruz 2025 (MDPI Horticulturae 11(7):814) achieved 100 percent rooting rate on Cycas air layers by exposing the cambial face of the peripheral vascular cylinder. Wound geometry, not chemistry, is the lever.
- Skip the IBA. Auxin rooting hormone provides no benefit on cycads. Spend on a chisel-ground grafting knife and long-fibre New Zealand sphagnum instead.
- A 270-degree wound is the practical sweet spot: high root yield without the canopy-killing risk of a full 360-degree girdle.
- Timeline: 8 weeks to first visible root, 14 weeks to harvest-ready (3 to 5 geotropic roots, 10 cm long, 1 cm diameter).
- Air layering preserves both parent and clone, which makes it the new default for rare or ESA-listed Cycas where pup propagation is too slow and full-stem cutting is too destructive.
Some links in this post are Amazon affiliate links. If you buy through them, the site receives a small commission at no extra cost to you. We only recommend products we have used or that meet the technical specs discussed above.
Leave a Reply