
How to Expose a Caudex Above Soil Without Sunburn or Rot
How to expose caudex above soil without sunburn or rot. Lift in small stages at repot, shade the new band with dry grit, and rebuild your pot weights.
Nathan Brooks · 2026-10-27 · 24 min read
Key Takeaways
- Raise a caudex only in its own repot window. Healthy summer growers wait for late dormancy.
- Lift no more than the smaller of 2 cm or a quarter of caudex height per repot, fine roots kept in the mix.
- Leave true geophytes, Dioscorea elephantipes, and unknown tubers at their current depth.
- Shade the new band with a dry grit collar and lower it in thirds, at least 10 days apart.
- A lift voids old pot weights. Rebuild them before trusting any watering habit.
Many caudex plants can sit higher in the pot, but none should get there in one jump.
To expose a caudex above the soil safely, lift it a little at a planned repot, then shade the newly exposed band for several weeks.
The lift also changes how the pot dries, so the old watering habit has to be rebuilt by weight.
A few plants, including true geophytes and Dioscorea elephantipes, should stay at their current depth.
Timing follows the repot calendar. A healthy summer grower such as Adenium or Pachypodium waits for late dormancy, as the repot timing guide explains, so October is for planning, not lifting.
Which Caudex Types Can Be Raised
The Henry Shaw Cactus and Succulent Society sorts caudiciforms by where the caudex and the growing point sit.
That split answers the lift question better than the labels stem and tuber.
Some plants already carry the caudex above ground, so a lift only exposes roots. Others keep the caudex buried with the shoots above it, and growers raise these for display. True geophytes keep both underground and should not be lifted.
| Plant group | Common examples | Where the storage organ sits | Lift verdict |
|---|---|---|---|
| Stem caudex | Adenium, Operculicarya, Cyphostemma, most Pachypodium | Above ground, with a buried root flare | Expose upper roots in small stages |
| Half-buried tuberous stem | Pachypodium succulentum | About half buried in habitat | Raise toward half height over several repots |
| Buried tuber with shoots above | Fockea edulis | Partly or fully buried in habitat | The classic staged lift, and reversible |
| Surface caudex | Dioscorea elephantipes, Stephania | At or near the surface already | Keep the current depth |
| True geophyte | Ceropegia barberae (formerly Brachystelma barberae), Ibervillea | Fully underground with its growing point | Do not lift |
Check where the growing point and the fine roots sit before you plan any lift, because that decides how far the plant can go.
Stem Caudices Expose Roots, Not More Trunk
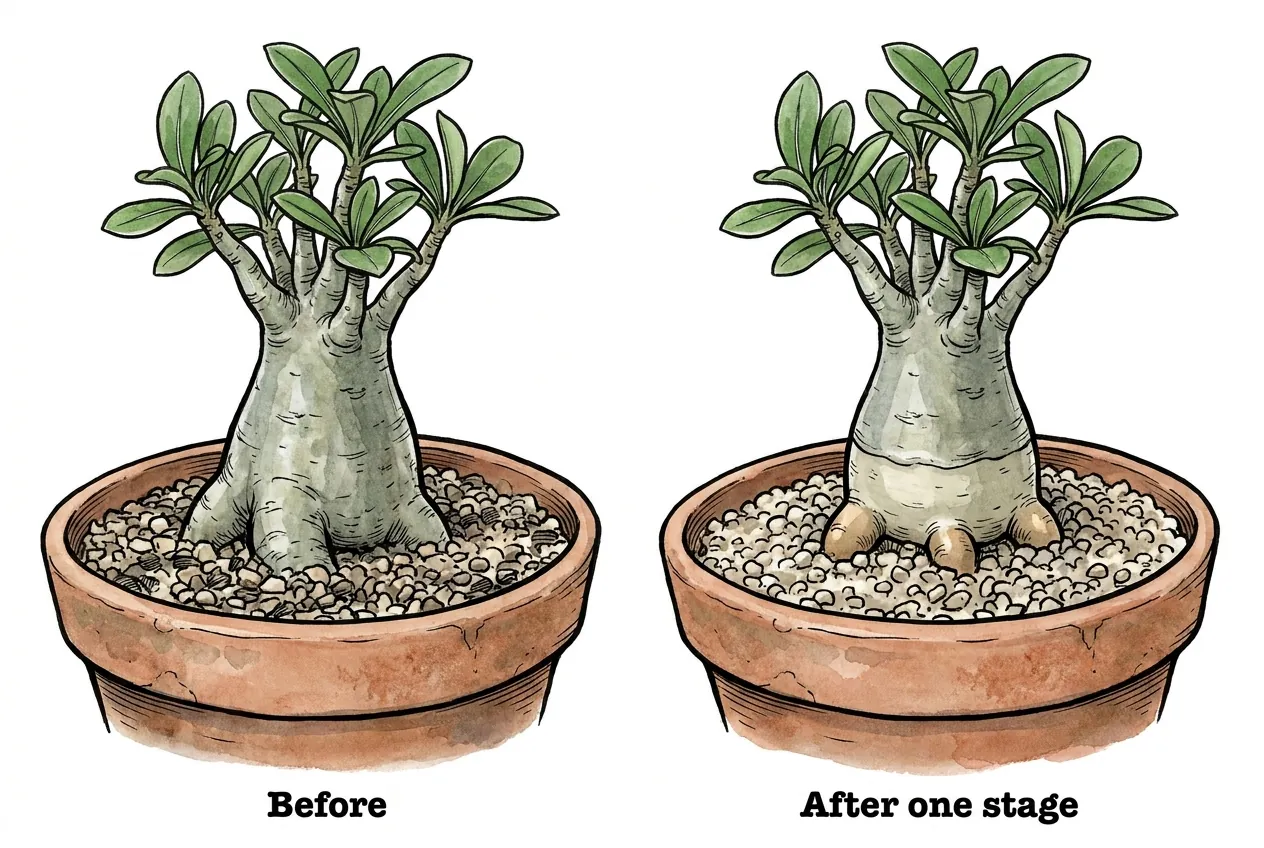
Adenium, Operculicarya, Cyphostemma, and most Pachypodium already hold the swollen stem above the mix. Lifting them exposes the root flare and the upper roots, which growers shape into a sculptural base.
The Adenium bonsai guide covers that styling for one genus. The same logic carries across these plants. Lift in small stages, arrange only flexible roots, and remember that a lift reveals girth rather than creating it.
Handle the roots gently. SANBI warns that Adenium multiflorum has fleshy, brittle roots that are easily damaged during repotting.
Operculicarya roots swell into twisted shapes, and the Henry Shaw society notes that seed-grown plants produce better-looking roots to expose as they grow.
Pachypodium succulentum is an exception in its genus. SANBI describes its turnip-shaped base growing half buried, so half exposure is its natural ceiling.
Fockea and Other Buried Tubers Are the Classic Lift
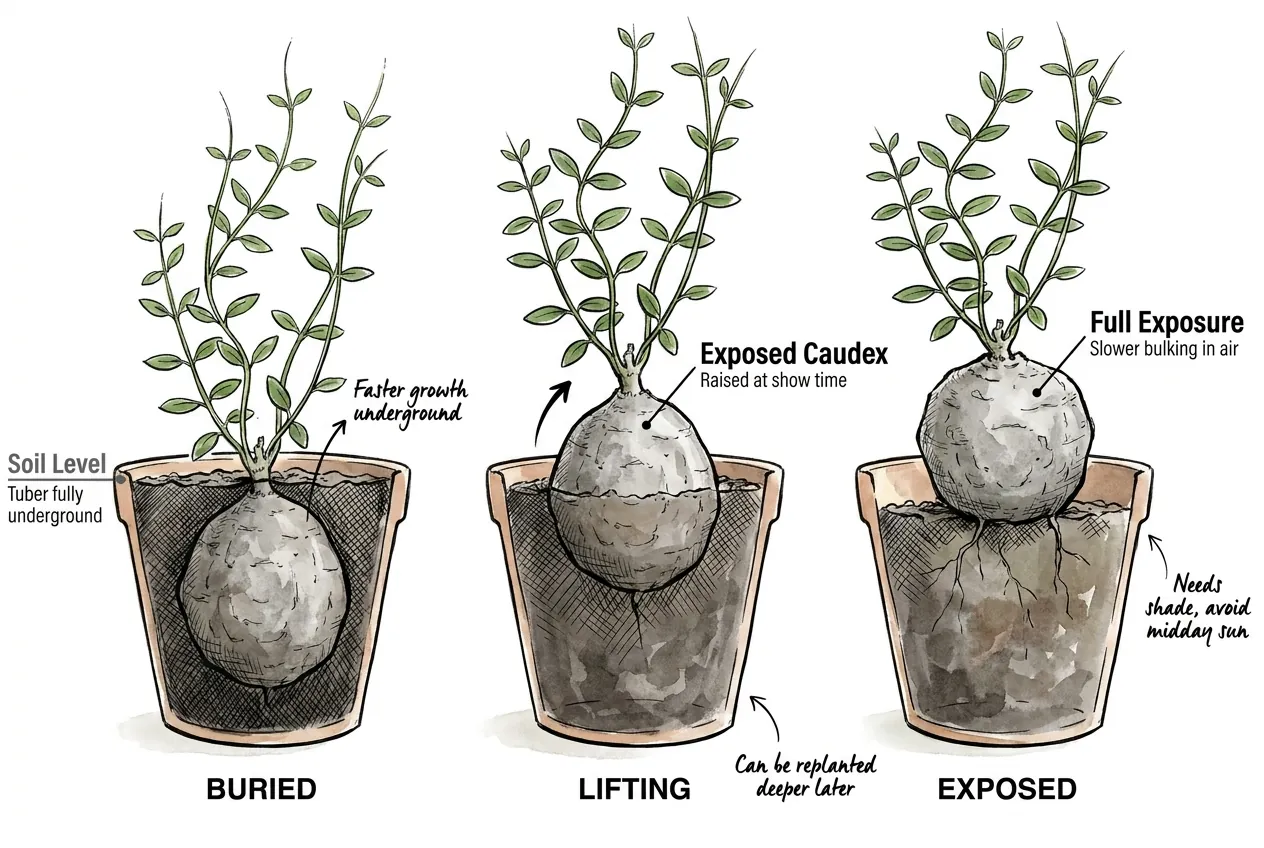
Fockea edulis keeps its grey tuber partly or fully buried in the wild while its vines climb above.
Henry Shaw growers plant it with the top of the caudex at soil level, because a buried caudex grows faster.
At show time they raise it, and replanting it deeper later does not affect growth. That makes a Fockea lift one of the few root decisions you can undo.
The same society warns that full midday sun can discolor an exposed Fockea caudex. Expect the raised tuber to need shade, and expect slower bulking once it sits in air.
Stem and tuber are not clean categories either. A 2023 anatomy study found that Adenium and Fockea both thicken the seedling hypocotyl and the taproot.
That is why the root tuber versus stem caudex guide checks buds and roots instead of trusting the label.
Plants to Leave at Their Current Depth
Dioscorea elephantipes already carries its caudex above ground, so there is nothing useful left to lift.
SANBI describes elephantine bark protecting that caudex while the plant rests. Stephania tubers also grow close to the soil surface in habitat, so the Stephania half-bury rule already marks their limit.
True geophytes carry the real risk. Ceropegia barberae, which SANBI lists under its older name Brachystelma barberae, keeps a disc-shaped tuber underground.
It can rot to watery slime within a day or two if kept wet at rest.
Leave a geophyte tuber at its current depth, ring it with grit, and skip any staged lift.
If you cannot tell which group a plant belongs to, keep its current depth until you can.
With an unknown organ, a lift has no upside worth the risk.
Time the Lift to the Plant’s Repot Window
A lift is simply a repot with the plant set higher in the mix. It gets no date of its own, and the bud and root-zone checks in the repot timing guide set the window.
Summer growers lift at late dormancy, once both of those checks pass. A winter grower that needs a lift gets it at its first new autumn growth, and Fockea follows its own new shoots.
Warm soil matters because the roots do the recovering. In a study of the succulent Opuntia ficus-indica, roots did not elongate at soil temperatures below about 12°C (54°F).
Arizona Extension adds that winter cactus transplants root slowly in cool soil, while midsummer transplants face more sunburn and heat stress. Late dormancy sits between those two problems for a summer grower.
A healthy summer grower is never lifted in October, because its roots are slowing down just as a lift would demand new ones.
What to Do in October Instead
October still has useful work. Before a summer grower settles into its winter rest, take a few minutes to set up next spring’s lift.
- Photograph the plant at its current soil line from the side that faces your main light.
- Mark that side on the pot rim so the plant goes back facing the same way.
- Decide whether the plant is a lift candidate at all, using the type table above.
- Set aside a bag of dry, coarse mineral grit for the collar that will shade the newly exposed band.
- Choose the recovery spot where the plant will sit, unchanged, for several weeks after the lift.
Arizona Extension notes that nurseries mark one side of a cactus so it can be replanted in the same orientation.
A side that never faced the sun can burn when it suddenly does.
If the pot is simply too small, a slip-pot at the same depth carries the plant to spring.
Winter growers are on a different clock. Dioscorea elephantipes, a common winter grower, is usually waking now but already sits at the surface.
Keep the Lift Apart From Other Big Changes
Each major change shifts root supply or water demand, so make only one at a time.
A lift, a hard prune, and the first trip outdoors all compete for the same recovering roots.
Heavy pruning is the first change to keep apart. In a container study on holly liners, shoot pruning at potting reduced new root growth, and light tip pruning did better than cutting back half the shoots.
The spring move outdoors is the second. Iowa State Extension waits until nights stay reliably above 50°F, then moves a houseplant from full shade into more light over 10 to 14 days.
Finish lowering the grit collar indoors before that move, or cover the whole band again for the move.
Flowering is the third. Clemson advises against repotting plants that are just beginning to flower.
Lift One Small Stage at Repot
Society, extension, and bonsai guidance on root exposure gives no lift height per repot. Bonsai growers describe exposing roots little by little over time, so the stage size below is a working rule rather than a standard.
Record the Old Soil Line Before You Unpot
The old soil line is the reference for every later stage, so capture it while the plant is still potted.
Before a lift, I photograph the light-facing side again, this time with a ruler standing on the mix surface against the caudex.
That photo goes into the plant’s log with the date, and the rim mark records which side faced the light.
After unpotting, the old line usually shows on the bark, which is how Arizona Extension says growers read a cactus’s original depth.
Measure the caudex from where the main roots leave it up to the crown. That height sets the size of the stage.
Set a Stage Height You Can Reverse
A stage is the gap on the caudex between the old soil line and the new mix surface.
My stage limit is the smaller of 2 cm (3/4 inch) or one quarter of the caudex height, once per repot window.
On a 4 cm caudex that means 1 cm, and on a large Fockea it means 2 cm.
The fine roots override the number. If any healthy fine root would end up above the new surface, I set the plant lower until every one sits back in the mix.
When the stage number and the fine roots disagree, the roots win and the plant goes lower.
A second stage waits for the next repot window, usually a year later. It goes ahead only when the last band is firm and darkened or corked, the plant matched its usual seasonal growth, and new pale roots fill the mix.
Any failure means holding the plant at its current height for another season.
A small step keeps the young root zone in the mix, and Arizona Extension notes that saguaro can only grow roots from the region where roots already exist.
In a cholla, Cylindropuntia acanthocarpa (studied as Opuntia acanthocarpa), new side roots appeared 1 to 2 cm behind dried-out root tips after rewetting. None arose from older root sections.
A band of that size is also easy to cover with grit, judge in one season, and reverse at the next repot.
Sort Fine Roots From Corky Roots
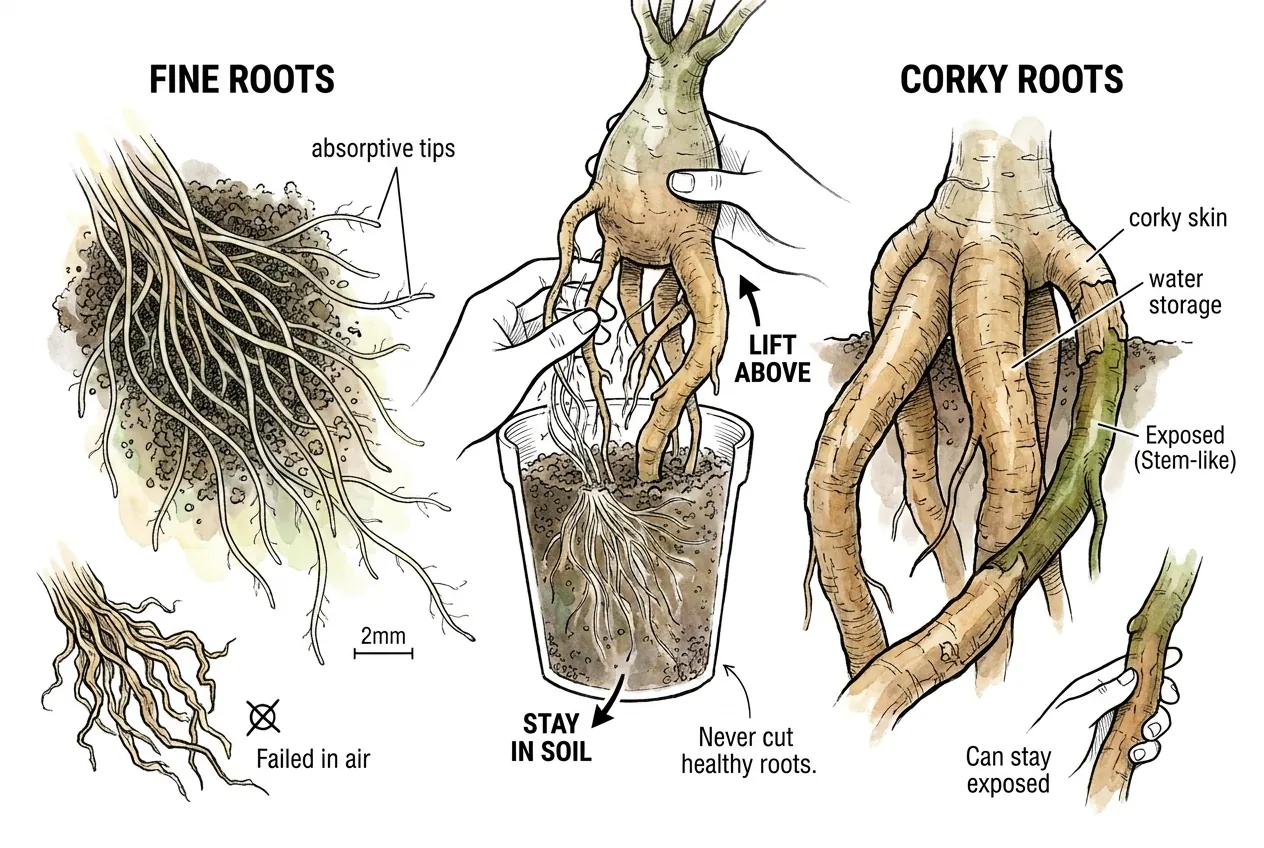
Roots do two different jobs, and only one kind belongs above the surface. Fine roots, traditionally anything 2 mm or thinner, include the pale absorptive tips that do most of the uptake.
Thicker roots with a tan or brown corky skin mostly carry and store water. Uptake capacity falls as that cork layer develops, so a corked root works more like a pipe than a sponge.
Fine roots dry fast in air. Bare fine roots of dormant tree seedlings lost up to 82% of their water within 3 hours.
Those seedlings recovered once replanted, but a fine root left permanently above the mix has no moist mix to rewet it, so count it as lost.
Firm corky roots can stay at or above the new line. Exposed tree roots in a mountain field study took one to two years to turn stem-like.
The grit collar covers them during its lowering schedule, and after that they stay exposed while you watch them for wrinkling or scald.
Never cut healthy roots to make a lift fit. Lower the plant instead, and trim only broken or frayed roots.
Plant Dry and Hold the First Water
Fresh root wounds give rot a faster way in. In a survey of rot in succulents, test plants inoculated through a wound showed rot in about 10 days, against about 20 days through the soil.
Trim broken roots cleanly, let them dry, and plant into dry mix. Then follow the one-week water hold and gradual restart from the repot guide.
Adenium sap is toxic and Pachypodium spines are sharp, so set up the protective gear for repotting caudex before you start.
Shade the New Band Until It Acclimates
The band between the old and new soil lines grew in darkness. It needs its own slow introduction to light, even when the trunk above it has faced the same window for years.
Why the Band Burns When the Trunk Does Not
Sun tolerance belongs to each patch of tissue, not to the whole plant. When researchers turned the shaded side of apples toward full sun, its photosynthetic efficiency dropped sharply after 1 day and matched the sunny side only by day 10.
Bark widens the gap. In birch, sun-grown bark built an extra light-blocking layer that shade-grown bark lacked. Old stems let through only 1 to 3% of sunlight, against about 24% in young twigs.
UC IPM describes the same pattern in older trees. It warns that they can sunburn when pruning suddenly exposes bark that was normally shaded.
A freshly exposed band has not built that protection yet. For a plant that winters on a cold south window, the cold south window sunburn guide covers placement and light.
Build a Dry Grit Collar
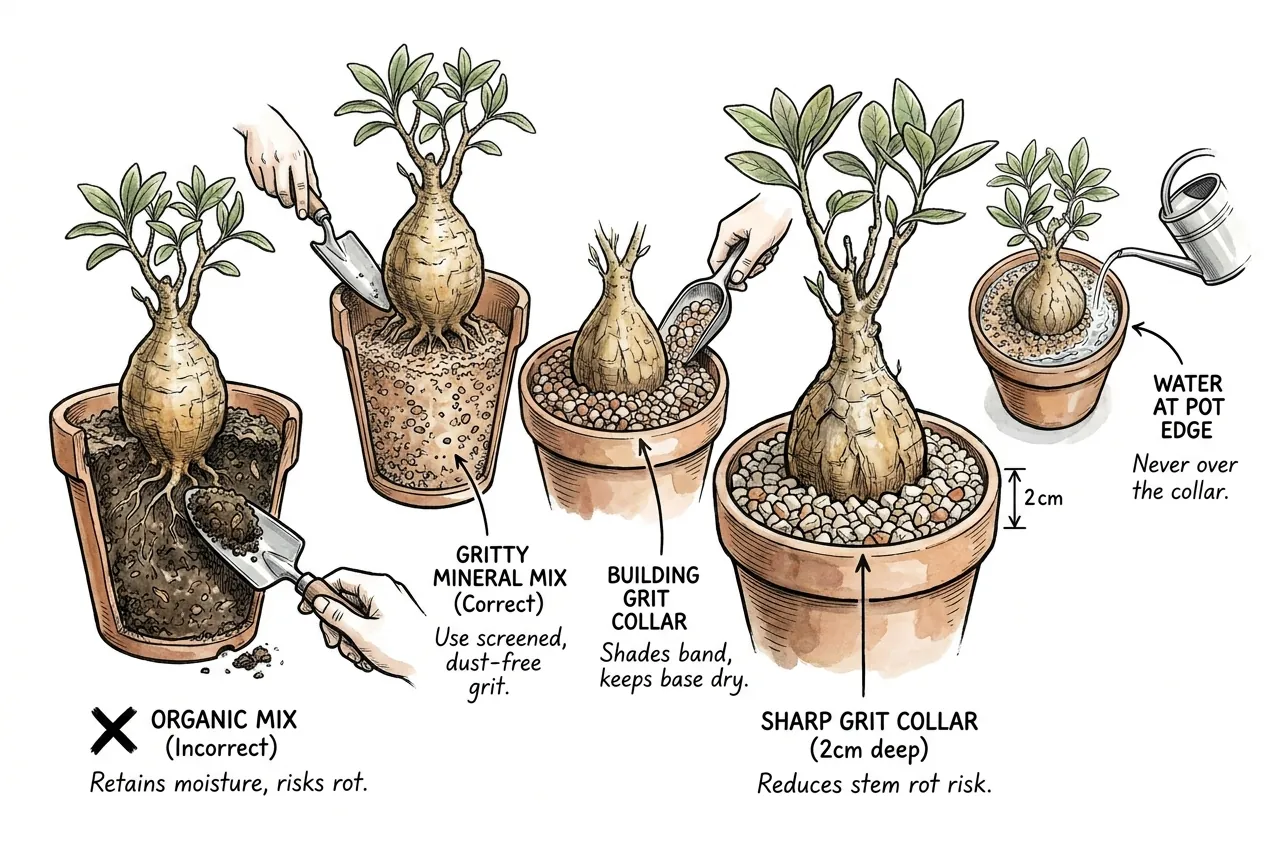
A collar of dry mineral grit shades the band and keeps the base dry at the same time.
The RHS sets alpines slightly high and finishes them with a 2 cm (3/4 inch) collar of sharp grit, which reduces the risk of stem rot.
Its alpine guide adds that grit keeps the neck of the plant dry.
Two US extension services are more cautious. UC IPM warns never to cover the root crown with soil or mulch. Arizona Extension adds that gravel mulch must not cover a plant’s base and create a moist environment for rot organisms.
Both warnings target cover that keeps the base moist, so this collar is designed around that risk.
It stays dry, mineral, and no deeper than 2 cm, and it comes off in steps on the schedule below.
Use screened, dust-free mineral grit such as pumice, and see the caudex substrate comparison for the choice.
Water onto the mix at the pot edge, never over the collar.
Lower the Collar in Thirds
Right after the lift, I fill the space around the new band with dry grit up to the old soil line, so no band surface shows.
Because each stage is 2 cm or less, the collar never gets deeper than the RHS collar. The plant’s spot, lights, and orientation stay exactly as they were.
The band stays fully covered for the first 10 days. After that, the collar drops by a third of the band height at each step, with at least 10 days between steps.
Each step gets a photo of the light-facing side, repeated 2 to 3 days later and again at the end of the interval.
A white, silvery, yellow-white, or tan patch that newly appears on the bared strip in those photos sends the grit back that same day.
That step then waits under cover for at least another 10 days before the strip is bared again.
A second failure at the same step holds the band there until the next repot.
Slow, even darkening, a reddish blush, or new cork are normal signs of acclimation. A soft, dark, or wet patch is not sunburn, so the grit comes away and the plant gets a rot check instead.
Ten days is my minimum, not a published step size. It matches how long shaded apple peel needed to catch up with the sunny side, and shade-grown leaves can need several weeks to recover.
Stepping by thirds puts only a small strip at risk at once. The full sequence takes at least 40 days, so plan the lift well before the plant moves outdoors.
Change only the band’s cover, never the plant’s overall light, so any new mark has one clear cause.
For heat waves and shade cloth on the bench, the caudex sunburn prevention setup covers the rest of the toolkit.
Water the Lifted Pot by Weight, Not Habit
A lift moves the roots closer to the drying surface of the mix. The change is uneven, so the old watering habit stops fitting the pot.
Why the Surface Dries First After a Lift
Raised in the same pot, the roots sit higher with extra unrooted mix below them. Moved into a shallow pan for display, they sit in less mix overall.
Either way, the top dries faster while the base can stay wet. Every mix holds a saturated layer at the bottom of the pot that never drains, and its depth depends on the mix rather than the pot.
Purdue’s container lab notes that this perched zone becomes a larger share of the total as container height decreases.
NC State adds that larger containers do not dry out as quickly, so a pan can swing from wet to dry sooner than the pot it replaced.
The best pot guide explains why a shallow pan narrows your margin for error.
The grit collar adds a twist. Gravel mulch cut evaporation from the soil below by 33 to 41% in a field study, so a dry-looking collar can hide damp mix.
Rebuild the Pot-Weight Reference
A lift voids every number you had for that pot. At potting, I write the date on the tag with a note that the old weights no longer apply.
The first normal in-season watering after the repot guide’s restart checks gives the new drained weight.
The next normal dry stage gives the new dry reference, confirmed by dry mix at the drainage hole rather than at the surface.
Grit removed from the collar changes the weight too, so each portion gets weighed and subtracted from both references.
Watering then follows the rebuilt references and the existing temperature and season gates, never the old interval.
The full method, including the weight that prompts a dryness check and how to keep scale error small, lives in the dormancy watering measurement kit.
The watering tools setup also notes that both reference weights need re-recording after a repot.
Pot weighing borrows the principle of the gravimetric method, which NC State calls the only direct measure of soil water.
It also reads the whole pot rather than the dry top. That matters in the first weeks, when mild wrinkling can come from root loss or a wet, airless base, not only from thirst.
Treat every pre-lift weight and watering interval as void until the pot proves its new numbers.
Failure Signs After a Lift and How to Back Off
Most trouble shows on the band or at the new soil line within the first weeks.
Each sign has a different cause and a different fix, so identify it before acting.
| What you see | Likely cause | Back-off action |
|---|---|---|
| Pale yellow or white patch on the lit side, dry and firm | Early sunscald | Restore the grit or shade the same day |
| Straw-yellow to tan patch that dries hard | Scald scar | Leave it in place, keep the cover, no new stage until the second-stage checks pass |
| Even, dry, light-brown bark on all sides | Normal corking | Continue the plan |
| Soft, dark, wet, or spreading spot at the new soil line | Collar rot | Pull the grit away, stop water, unpot and inspect |
| Papery, brittle, hollow fine roots above the mix | Dead absorbing roots | Trim to firm tissue and skip rescue watering |
Pale or Tan Patches Mean Light Injury
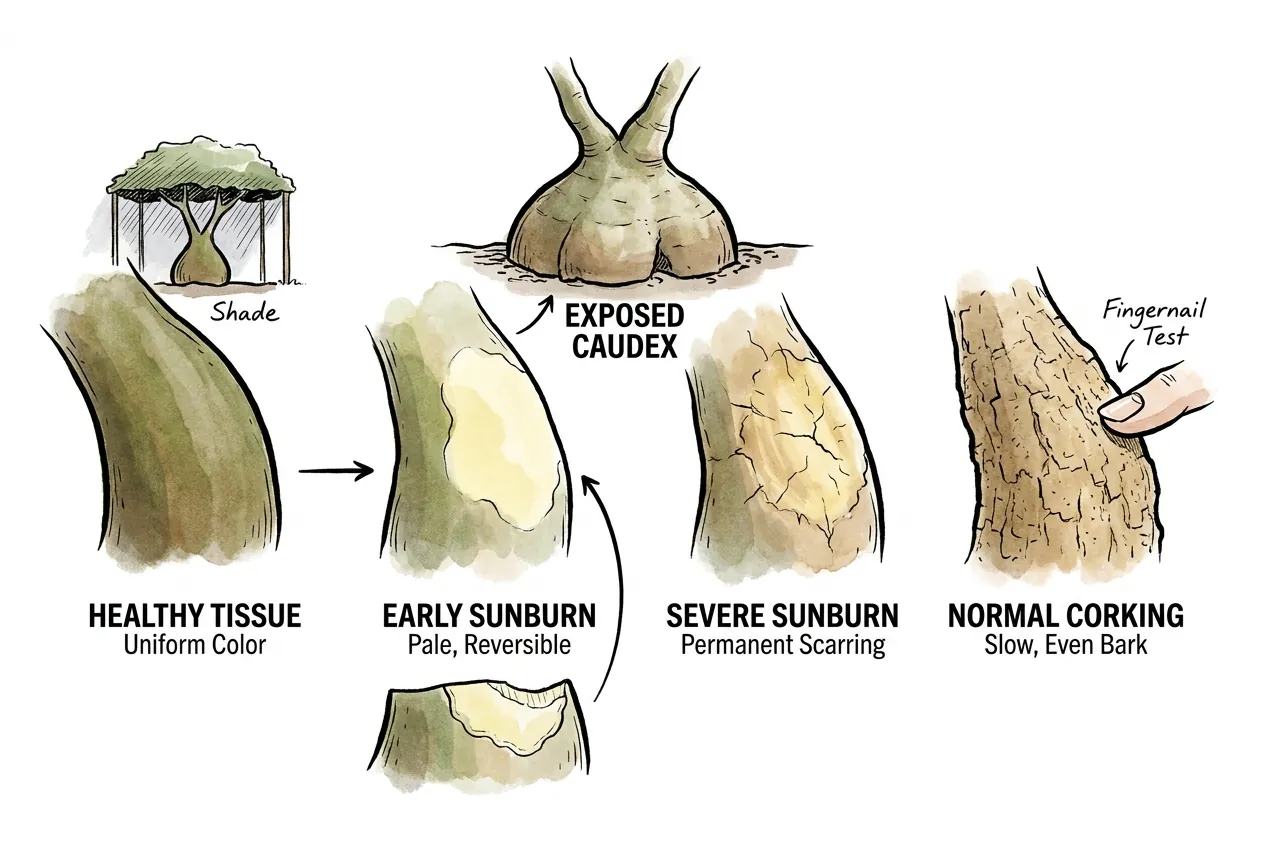
Sunscald follows the light. Arizona Extension describes sunburned cactus tissue turning yellow, then straw yellow, before the outer skin dies and leaves a permanent scar.
Light sunburn caught early can reverse once shade goes back on. Severe sunburn browns and may crack into bark-like scarring, and that wound can later let bacteria in.
Normal corking usually looks different. It builds slowly as even tan or brown bark, without the pale stage that comes first in scald, and the scale versus corking check helps rule out pests.
Leave a dry, firm scar in place rather than cutting it out. It will not turn green again, but a stable, dry scar can stay harmless.
Soft, Dark Tissue at the New Soil Line Means Rot
After a lift, inspect the new soil line first, not the old mark. That junction now sits where splash, damp surface mix, and fresh root wounds meet.
Rot is soft, dark, wet, and spreading, and it may weep or smell. For small crown rot lesions on trees, UC IPM’s first response is to remove soil from the base and let the crown tissue dry.
Stop watering, open the collar, and unpot to inspect. Use the rot or dormancy firmness map before cutting anything.
Never lower a rotting plant back into the mix. Burying wet, infected tissue recreates the deep-planting conditions that favor collar rot.
Papery Exposed Roots Are Spent
Brittle, hollow, papery fine roots above the surface have dried out for good. In Agave deserti, drought-damaged side roots regained only 21% of their conductivity after rewetting, while young roots recovered fully.
Snip spent roots back to firm tissue or let them drop, and do not water to revive them.
A firm, thick root that is only wrinkling can go under dry grit instead.
When Lowering the Plant Is the Right Fix
A Fockea tuber that keeps scalding can go back down at the next repot. Henry Shaw growers report that replanting a Fockea deeper does not affect its growth.
Stem caudices are different. Arizona Extension advises keeping green stem tissue above ground in columnar cacti such as saguaro, and the same logic argues against burying an Adenium or Pachypodium band again.
Restore its collar to the old soil line, no higher, and keep it there longer, or give the band light shade.
Any failure sign means no new stage until the second-stage checks above pass at the next repot. Until then, hold the plant at its current height.
Cover a scald, dry a rot, and trim dead roots, but never bury a soft collar to hide it.
Your Lift Plan for the Coming Year
The plant sets the pace. One small stage a year looks slow, but it keeps the roots working, the band unburned, and every step easy to cover or undo.
For a summer grower, October’s job is a photo, a rim mark, and a bag of dry grit.
The lift itself waits for the swelling buds and warm root zone of late dormancy.
After that come the collar, the rebuilt pot weights, and one clean season before any second stage.
Raise the caudex one small, reversible stage at a time, and let the roots and the band tell you when the next one is safe.